最近连续折腾了好几天到凌晨3点,终于跑通了,整合包,原版等等方式全部尝试过,最终摸索出来一个成功运行的版本,教程如下:
所有包我都会打包上传,不想自己下载的可以去下载我下载好的那几个包
一、使用大佬patientx-cfz/comfyui-rocm这个库
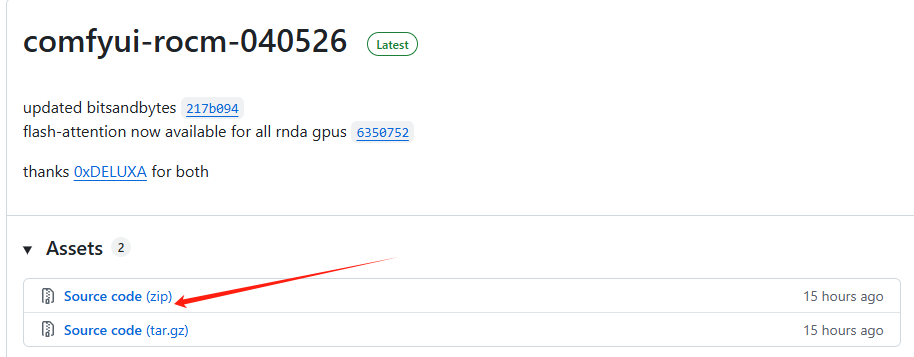
下载版本到本地,我写文章的今天版本是comfyui-rocm-040526,我本地也是使用的这个版本,下载压缩文件到本地,如图所示:
解压到本地并修改名称(不改也可以),我本地目录是D:\comfyui-rocm
然后就可以运行根目录下的install.bat文件进行安装了,经过测试,下载速度很慢,最终我取消了运行该bat文件,并手动下载了需要的安装包,安装包我放在对应位置后,才运行install.bat文件进行最后的环境确认。
注意要自己下载的话就先停掉install.bat
① Python 3.12.9 嵌入版(注意改名)
https://www.python.org/ftp/python/3.12.9/python-3.12.9-embed-amd64.zip
保存到comfyui-rocm\python_embed.zip
② Python 3.12.9 完整版(注意改名)
https://www.python.org/ftp/python/3.12.9/python-3.12.9-amd64.zip
保存到comfyui-rocm\python_full.zip
③ get-pip.py(打开直接另存为即可)
https://bootstrap.pypa.io/get-pip.py
保存到comfyui-rocm\get-pip.py
自己下载的话可以到国内镜像站下载前面两个压缩包https://npmmirror.com/mirrors/python/3.12.9/
下载完上面三个文件后,手动运行下面的命令
# 1. 进入 comfyui-rocm 目录
# 2. 创建 python_env 文件夹(如果不存在)
mkdir python_env
# 3. 解压嵌入版 Python 到 python_env
tar -xf python_embed.zip -C python_env
# 4. 删除 python_embed.zip(可选)
del python_embed.zip
# 5. 解压完整版 Python 到临时目录
mkdir pythonfull
tar -xf python_full.zip -C pythonfull
# 6. 复制开发文件
xcopy pythonfull\include python_env\include\ /E /I /Q
xcopy pythonfull\libs python_env\libs\ /E /I /Q
# 7. 清理临时文件
rd /s /q pythonfull
del python_full.zip
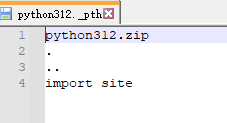
# 8. 修改 python312._pth 配置文件
用记事本打开python_env\python312._pth,内容替换为:
# 9. 安装 pip
\python_env\python.exe get-pip.py --no-warn-script-location
# 10. 安装构建工具
.\python_env\python.exe -m pip install --upgrade pip setuptools wheel --no-warn-script-location
修改D:\comfyui-rocm\detect_gpu.py这个文件的28行(False->True)
(['rx 6850', 'rx 6750', 'rx 6700'], 'gfx103X', 'RDNA 2', True),
修改后保存重新install.bat文件
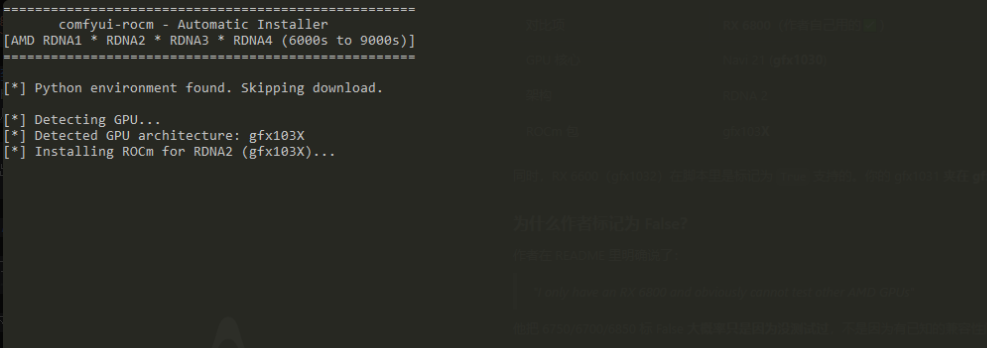
运行install.bat期间会没有任何提示,可以手动终止,或者一直等它自动执行完,我是终止了,手动输入了命令,能看到安装进程,终止后运行下面的命令:
# 第1步:安装 ROCm(能看到进度)
.\python_env\python.exe -m pip install "rocm[devel,libraries]" --index-url https://rocm.nightlies.amd.com/v2-staging/gfx103X-dgpu/ --no-warn-script-location
# 第2步:初始化 rocm-sdk
.\python_env\Scripts\rocm-sdk init
# 第3步:安装 PyTorch(也很大)
.\python_env\python.exe -m pip install --index-url https://rocm.nightlies.amd.com/v2-staging/gfx103X-dgpu/ torch torchaudio torchvision --no-warn-script-location
第2步执行初始化,会出现下面的提示:然后执行第3步
Devel contents expanded to 'D:\comfyui-rocm\python_env\Lib\site-packages\_rocm_sdk_devel'
二、使用命令继续安装剩余依赖,注意都在D:\comfyui-rocm 目录下执行,
复制的话一个命令行一个命令行的复制执行,不同的命令行之间已经有间隔,注意复制不要出错
# 1. 安装 ComfyUI 依赖
.\python_env\python.exe -m pip install -r requirements.txt --no-warn-script-location
# 2. 安装自定义节点(这三个可以先不安装,不影响使用)
cd custom_nodes
git clone https://github.com/Comfy-Org/ComfyUI-Manager --quiet
git clone https://github.com/patientx/CFZ-SwitchMenu.git --quiet
git clone https://github.com/patientx/CFZ-Caching --quiet
cd ..
# 3. 安装 triton 和 sage-attention
.\python_env\python.exe -m pip install triton-windows==3.6.0.post25
.\python_env\python.exe -m pip install sageattention==1.0.6
# 4. Patch sage-attention 文件
del python_env\Lib\site-packages\sageattention\attn_qk_int8_per_block.py
curl -sL -o python_env\Lib\site-packages\sageattention\attn_qk_int8_per_block.py https://raw.githubusercontent.com/patientx/ComfyUI-Zluda/refs/heads/master/comfy/customzluda/sa/attn_qk_int8_per_block.py
del python_env\Lib\site-packages\sageattention\attn_qk_int8_per_block_causal.py
curl -sL -o python_env\Lib\site-packages\sageattention\attn_qk_int8_per_block_causal.py https://raw.githubusercontent.com/patientx/ComfyUI-Zluda/refs/heads/master/comfy/customzluda/sa/attn_qk_int8_per_block_causal.py
del python_env\Lib\site-packages\sageattention\quant_per_block.py
curl -sL -o python_env\Lib\site-packages\sageattention\quant_per_block.py https://raw.githubusercontent.com/patientx/ComfyUI-Zluda/refs/heads/master/comfy/customzluda/sa/quant_per_block.py
# 5. 安装 bitsandbytes
.\python_env\python.exe -m pip install https://github.com/0xDELUXA/bitsandbytes_win_rocm/releases/download/0.50.0.dev0-py3-rocm7-win_amd64_rdna/bitsandbytes-0.50.0.dev0-cp312-cp312-win_amd64.whl
# 6. 安装 flash-attention
.\python_env\python.exe -m pip install https://github.com/0xDELUXA/flash-attention/releases/download/v2.8.4_win-rocm/flash_attn-2.8.4-py3-none-win_amd64.whl
.\python_env\python.exe -m pip install https://github.com/0xDELUXA/flash-attention/releases/download/v2.8.4_win-rocm/amd_aiter-0.0.0-py3-none-win_amd64.whl
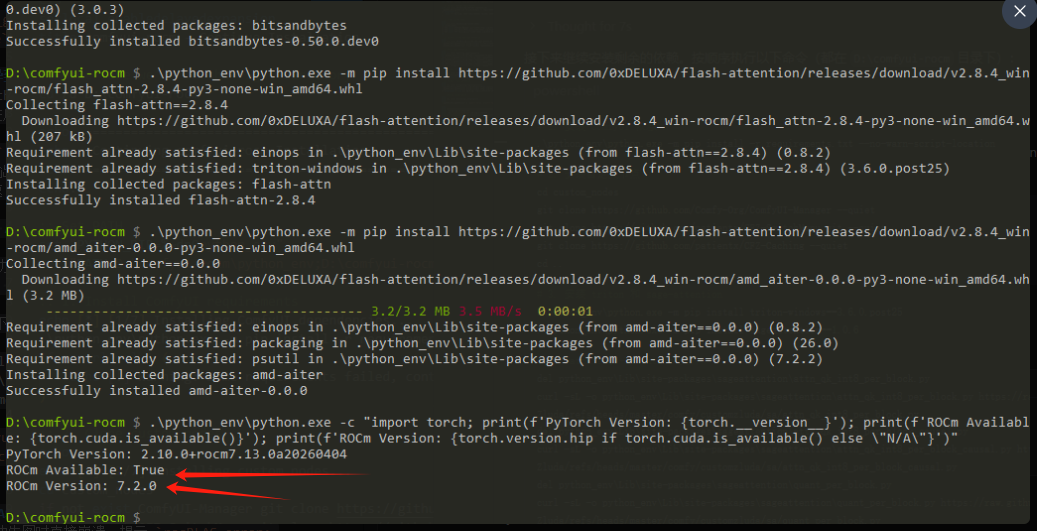
# 7. 验证安装!(最关键的一步)
.\python_env\python.exe -c "import torch; print(f'PyTorch Version: {torch.__version__}'); print(f'ROCm Available: {torch.cuda.is_available()}'); print(f'ROCm Version: {torch.version.hip if torch.cuda.is_available() else \"N/A\"}')"
第7步执行完后会出现下面的提示,GPU可用,ROCm可用
三、运行.\comfyui-rocm.bat,会报错,然后执行下面的命令,卸载掉flash-attention,命令如下:
.\python_env\python.exe -m pip uninstall flash-attn amd-aiter -y
卸载完成后执行 .\comfyui-rocm.bat ,启动成功
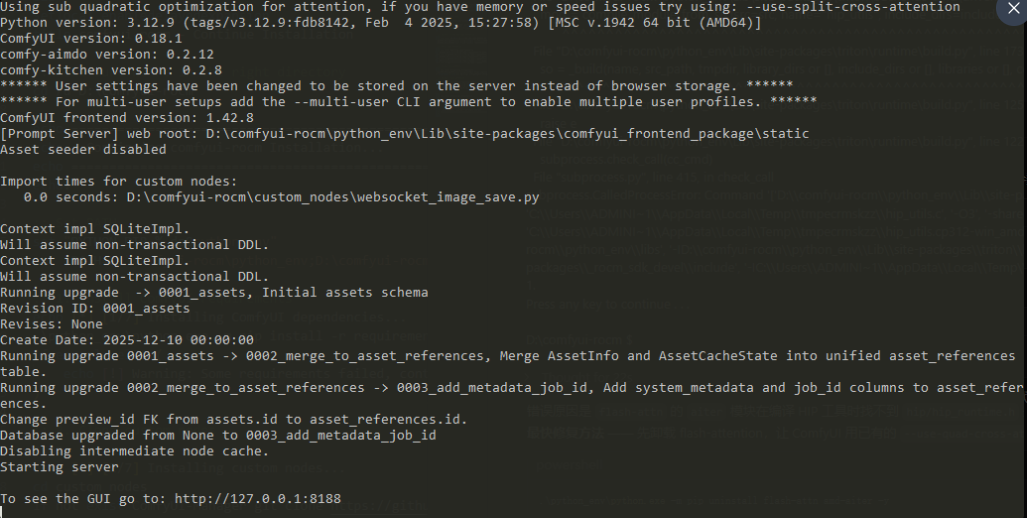
启动成功,撒花,骗你的,继续看下面
GitHub仓库链接(自己去搜,没法解析)
comfyui-rocm,作者:patientx-cfz
ComfyUI-Manager,作者:Comfy-Org
运行下面命令,自动从仓库克隆项目到本地 ,或者使用我提供的压缩包,解压到这个custom_nodes目录中也可以,解压后继续运行.\comfyui-rocm.bat,会自动安装依赖。
cd D:\comfyui-rocm\custom_nodes
git clone https://github.com/Comfy-Org/ComfyUI-Manager
cd ..
.\comfyui-rocm.bat
安装完成后,启动项目会看到一个manager按钮
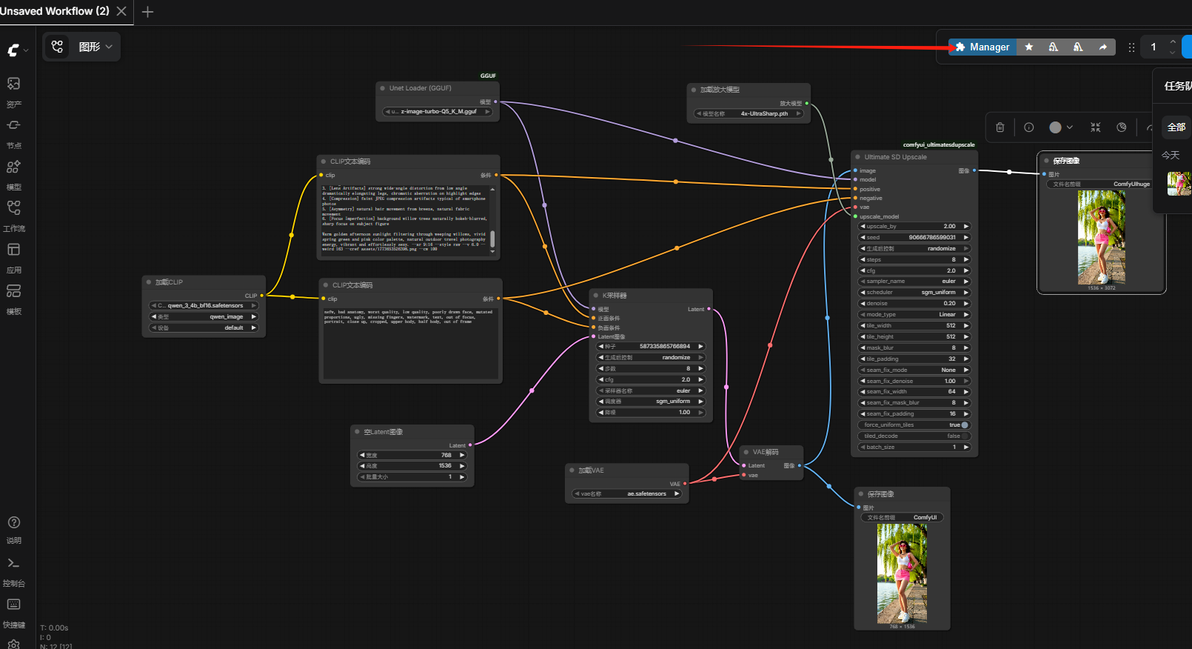
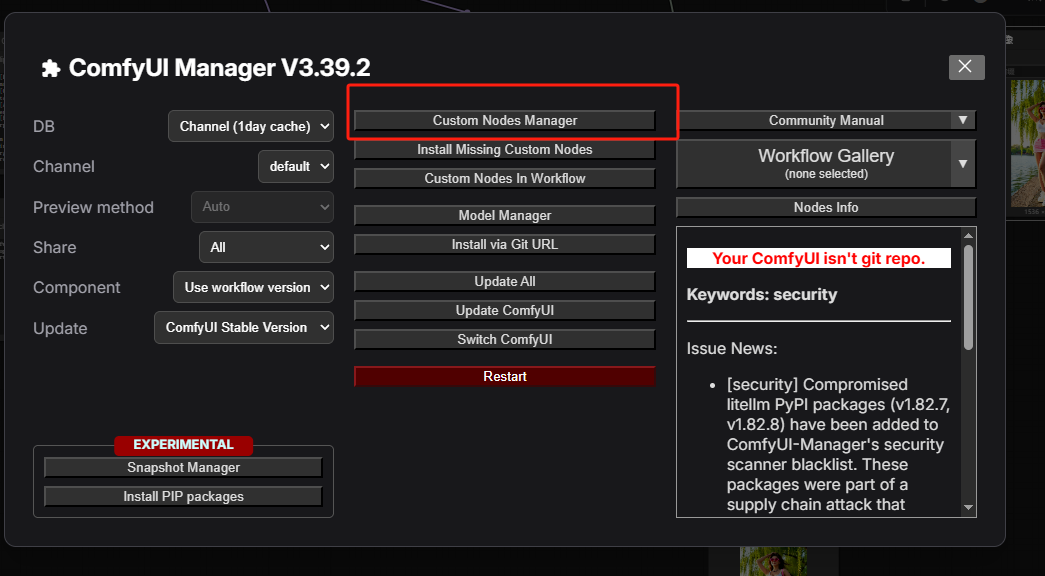
然后点击manager按钮,点击custom Nodes manager,然后搜索gguf,下载作者为City96的comfyui-GGUF,安装后会要求重启,重启即可

我用到的生图模型是z-image-turbo-Q5_K_M.gguf,文本解码器是qwen_3_4b_bf16.safetensors,VAE是ae.safetensors。如图所示,已经可以正常生成图片了,忽略后面的俩执行节点,那是图片放大,可以自己去安装
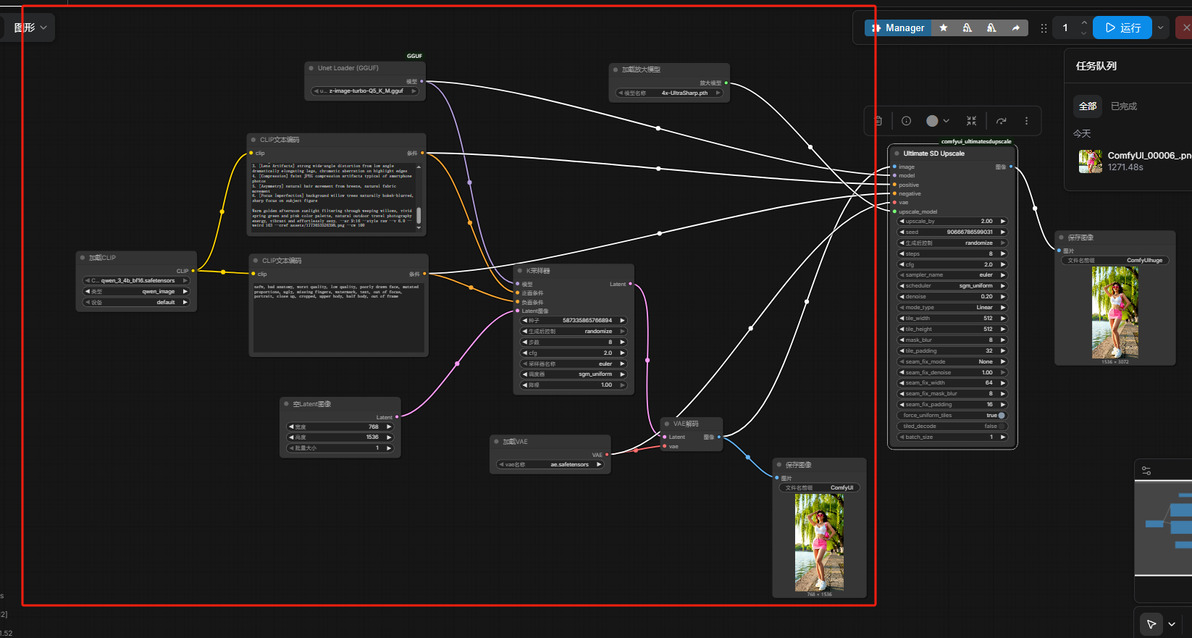
注意红色箭头部分的相关配置,然后就可以点击运行来出图了,对了还有K采样器中的设置,步数一定不要太大,8~10步即可
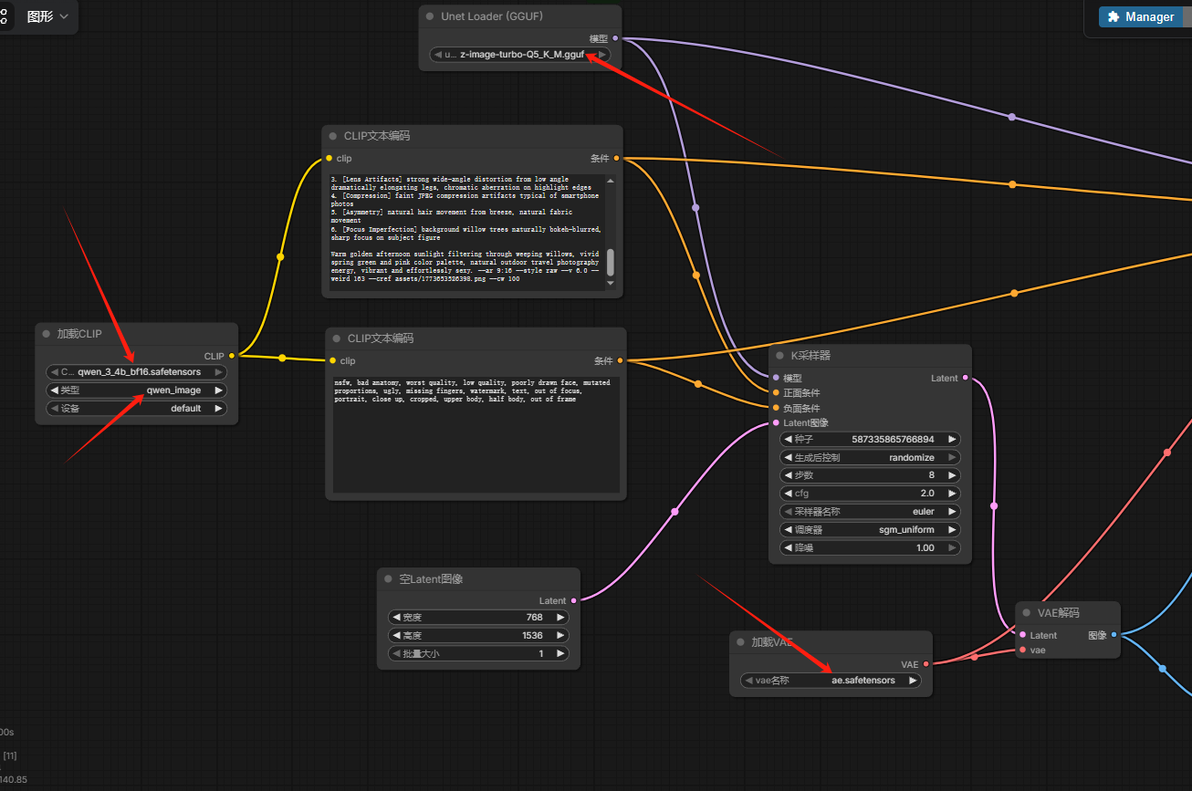
ae.safetensors放在D:\comfyui-rocm\models\vae目录下
qwen_3_4b_bf16放在D:\comfyui-rocm\models\clip目录下
z-image-turbo-Q5_K_M.gguf放在D:\comfyui-rocm\models\unet目录下
需要的安装包以及文件在下面的链接里,需要的自取
https://pan.baidu.com/s/1OIKsLQLu0DGqGDJTEo-MLA?pwd=s3am 提取码: s3am
至于为啥我非要折腾z-image模型,因为这个模型生成的任务细节比较好,其他的A卡能用的模型,人物手指牙齿等部分会糊掉,鸭掌,非常难看,最后附图一张,细节还将就,完结撒花![[嗑瓜子]](https://i0.hdslb.com/bfs/emote/28a91da1685d90124cfeead74622e1ebb417c0eb.png)