

目前 WordPress 加速策略很多都是缓存动态生成的 html ,对于使用 Nginx 作为 Web Server 的情况来说,使用了WP的缓存插件后,访客请求传递给 Nginx ,Nginx 将请求传递给 php ,php 再从 Cache 中提取缓存丢给 Nginx ,Nginx 最后响应访客。那么如果我们直接将缓存交给 Nginx,Nginx 收到请求后直接响应缓存,就能有一定程度的提速。
另外还有个额外的好处是,如果你的 php 意外挂了,你的博客依然能够访问。
百度 “fastcgi_cache 配置” 可以找到一堆文章,但是我谷歌百度看了许多教程后都没能够正常缓存,或者只缓存了首页,经过了三天的探索,终于配置成功。下面来说说如何正确配置WordPress 站点的 FastCGI_Cache。

以下操作在 Nginx 1.14.0 、PHP 7.1 、WordPress 4.9.5 、WP使用文章名作为固定链接、CentOS 7 环境下。

前提要求:Nginx 有 ngx_cache_purge 模块
使用命令 Nginx -V 即可查询。带有 ngx_cache_purge 字样即带有该模块。
如果没有的话需要带上模块重新编译,这个就不赘述了,百度一下就有。
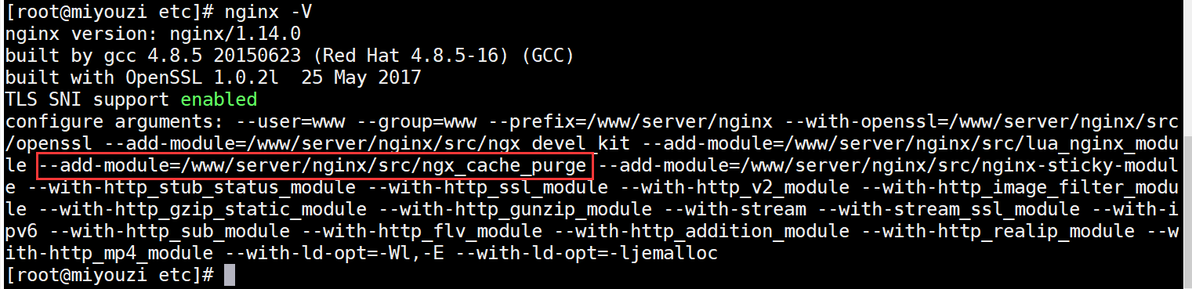
查询是否有 ngx_cache_purge 模块
①获取 php-fpm 通讯地址
这会配置在 php-fpm.conf 中,如下图:
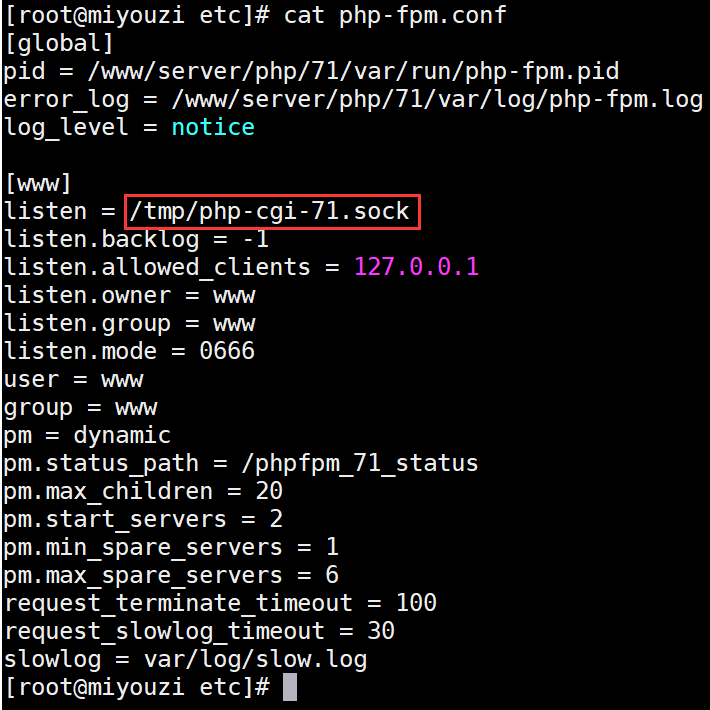
这将会作为 fastcgi_pass 的参数
②查看 tmpfs 挂载点并建立缓存目录
使用 tmpfs 文件系统的目录是从内存中划出来的目录,使用命令 df -h 即可查看,我们将会把缓存直接放在这个目录来提高缓存读取速度。
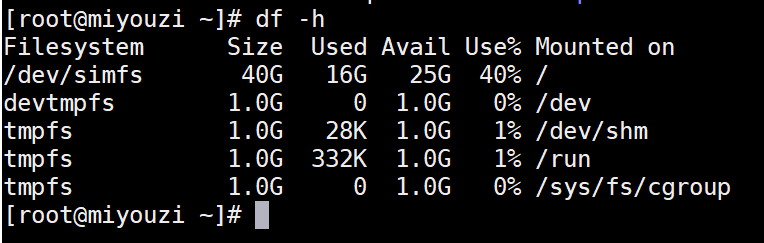
这里情况就是选用 /run 目录。
然后建立缓存目录,并记得更改权限。
PS:缓存目录会有两个,一个 Cache,一个 Temp,Temp 比较不重要些。
mkdir /run/wpcache
mkdir /run/wpcache/temp
chown -R www:www /run/wpcache
③配置你站点的 Nginx conf
将以下命令添加至站点配置最上方(server区外)。如果你想要配置多个 WordPress 站点,请这几条配置写在 Nginx 主配置 nginx.conf 的 http 块中。
# fastcgi_cache_path 后面的路径就是第②步中设定的路径,max_size请根据分区大小自行设置
fastcgi_cache_path /run/wpcache levels=1:2 keys_zone=WORDPRESS:250m inactive=1d max_size=600M;
# 即第②步中的 Temp 路径
fastcgi_temp_path /run/wpcache/temp;
fastcgi_cache_key "$scheme$request_method$host$request_uri";
# 在指定错误下允许使用过期 Cache
fastcgi_cache_use_stale error timeout invalid_header http_500;
#忽略一切nocache申明,避免不缓存伪静态等
fastcgi_ignore_headers Cache-Control Expires Set-Cookie;然后在站点配置的 server 块中加上如下配置:
PS:其中注释请仔细阅读。
	#缓存清理配置
    location ~ /purge(/.*) {
        allow 127.0.0.1;
        allow 【你的站点IP】;
        deny all;
        fastcgi_cache_purge WORDPRESS "$scheme$request_method$host$1";
    }

    location ~* ^.+\.(ogg|ogv|svg|svgz|eot|otf|woff|mp4|ttf|rss|atom|jpg|jpeg|gif|png|ico|zip|tgz|gz|rar|bz2|doc|xls|exe|ppt|tar|mid|midi|wav|bmp|rtf)$ {
		access_log off;
		log_not_found off;
		expires 7d;
    }

	location ~ .*\.(js|css)?$
    {
		expires   12h;
		access_log off;
    }

	location = /robots.txt { access_log off; log_not_found off; }

	location / {
		## FastCGI_Cache 配置,默认 0 缓存,然后以下判断无需缓存则设为 1
		set $skip_cache 0;
		#post访问不缓存
		if ($request_method = POST) {
			set $skip_cache 1;
		}
		#动态查询不缓存
		if ($query_string != "") {
			set $skip_cache 1;
		}
		#后台等特定页面不缓存(其他需求请自行添加即可)
		if ($request_uri ~* "/wp-admin/|/xmlrpc.php|wp-.*.php|/feed/|index.php|sitemap(_index)?.xml") {
			set $skip_cache 1;
		}
		#对登录用户、评论过的用户不展示缓存
		if ($http_cookie ~* "comment_author|wordpress_[a-f0-9]+|wp-postpass|wordpress_no_cache|wordpress_logged_in") {
			set $skip_cache 1;
		}
		##
		try_files $uri $uri/ @wordpress;
		include fastcgi.conf;
		fastcgi_pass  unix:/tmp/php-cgi-71.sock;
		# fastcgi_pass 填的即时第①步中查询的路径
		fastcgi_index index.php;
		#新增的缓存规则
		fastcgi_cache_bypass $skip_cache;
		fastcgi_no_cache $skip_cache;
		fastcgi_cache WORDPRESS;
		# 设置对以下响应缓存
		fastcgi_cache_valid 200 301 302 1d;
		# 添加一个头部方便查看我们的 FastCGI_Cache 是否正常运作。
		add_header rt-Fastcgi-Cache "$upstream_cache_status From $host";
		fastcgi_intercept_errors on;
		# 下面这条用于解决登录后查看文章404的问题
		error_page 404 = @wordpress;
	}

	location @wordpress {
		# 解决只缓存首页不缓存文章的问题
		include fastcgi.conf;
		fastcgi_pass unix:/tmp/php-cgi-71.sock;
		# 回传 php-fpm 的响应码,显示 Nginx 设定的错误页面(如 404 等)
		fastcgi_intercept_errors on;
		# 下面填写 WP 站点的 index.php 路径
		fastcgi_param SCRIPT_FILENAME /www/wwwroot/miyouzi.tk/index.php;
		fastcgi_cache_bypass $skip_cache;
		fastcgi_no_cache $skip_cache;
		fastcgi_cache WORDPRESS;
		fastcgi_cache_valid 200 301 302 1d;
		add_header rt-Fastcgi-Cache "$upstream_cache_status From $host";
	}
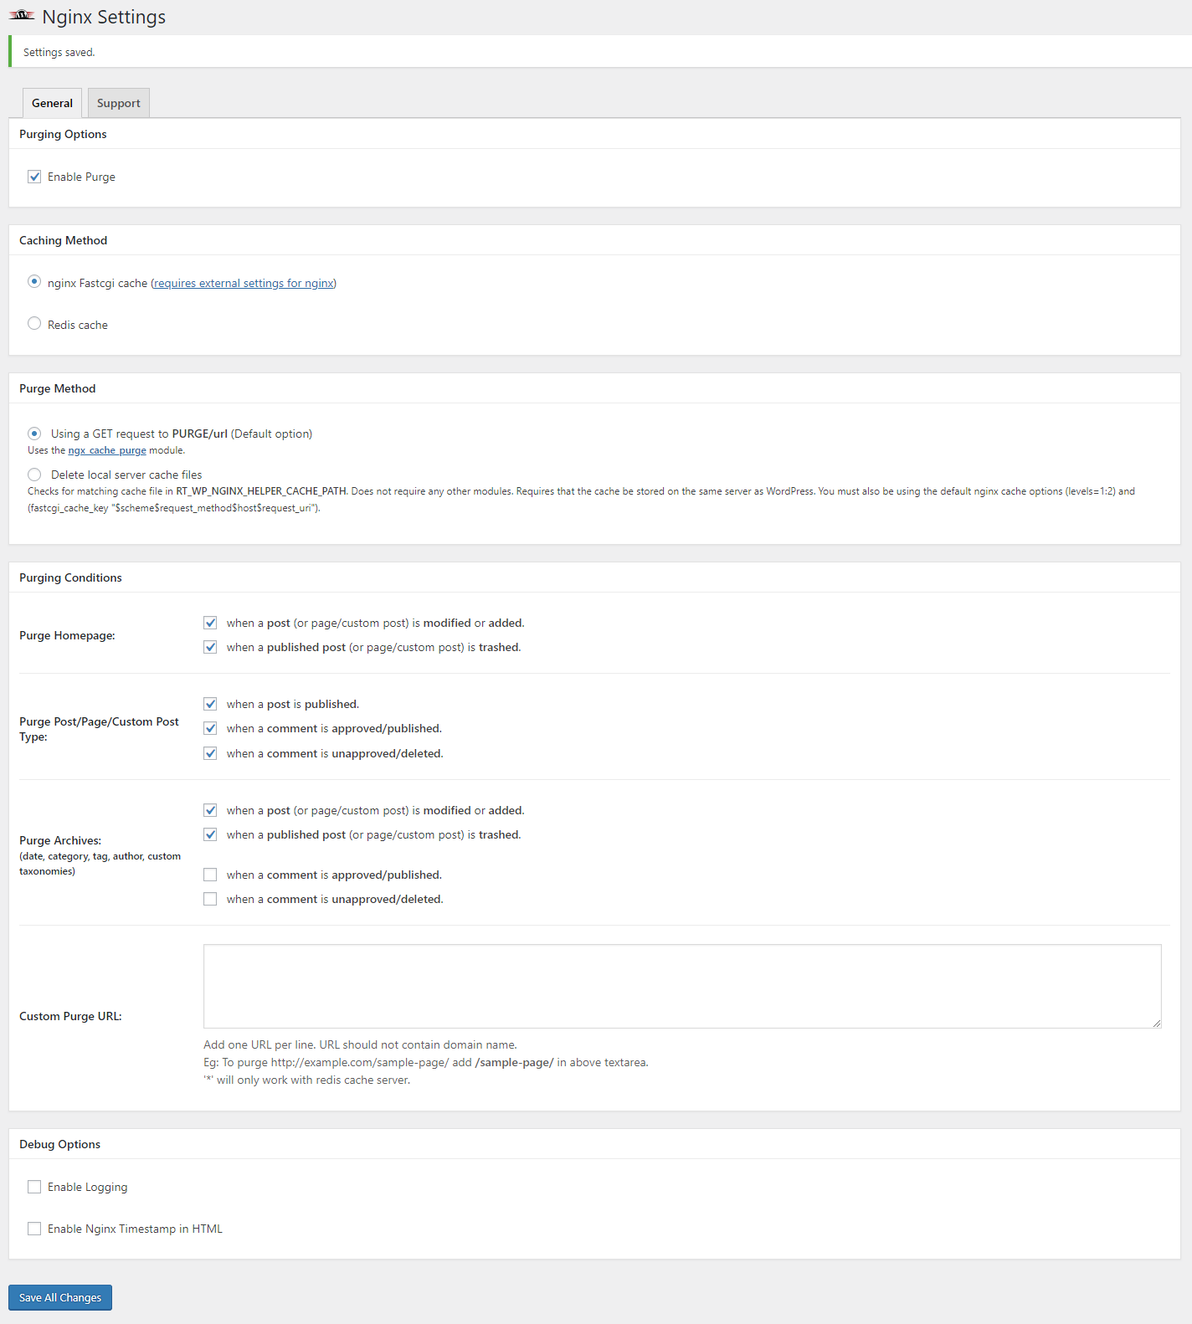
④安装 WordPress 插件:Nginx Helper
使用 FastCGI_Cache 产生的缓存是不会自己更新清除的,需要配合插件清除过期的缓存。
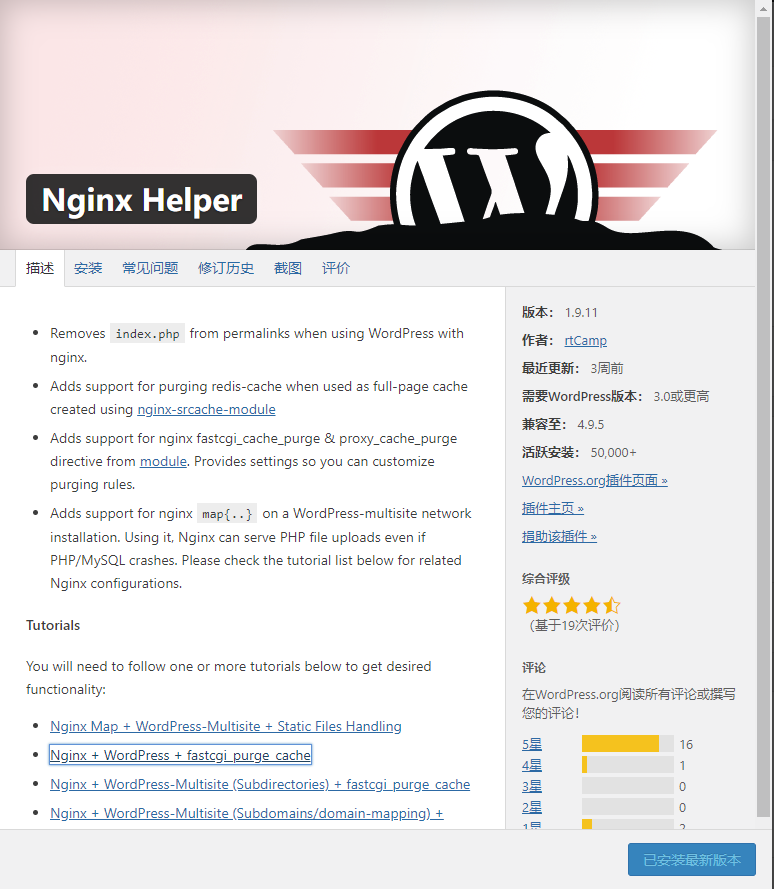
安装后配置如下:
⑤查看是否正常工作
上面我们为了方便查看是否正常工作加了一个 header
add_header rt-Fastcgi-Cache "$upstream_cache_status From $host";现在我们只要打开开发者工具查看一下页面相应头部即可:
PS:上面一大串东西是WP插件 “HTTP/2 Server Push” 的功劳(
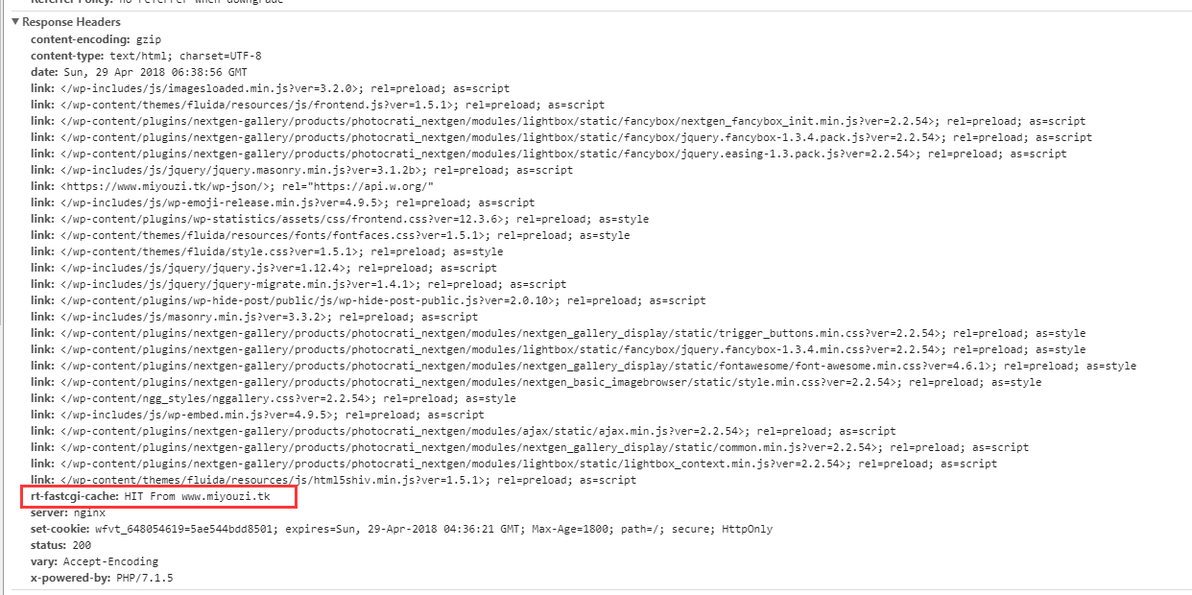
其中 HIT 即成功使用缓存
一般会有三个状态:MISS、HIT、BYPASS。
MISS:尚未产生缓存。
HIT:命中缓存。
BYPASS:此页面不会缓存。
也可以前往缓存目录(这里的例子就是 /run/wpcache )看看是否有缓存生成。
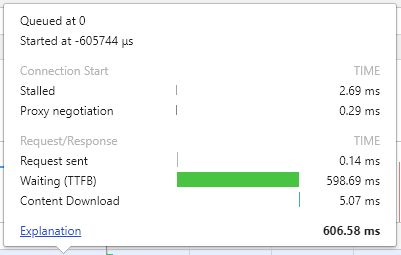
⑥那么提升多少呢?
未使用 FastCGI_Cache (但 php 有做一些缓存策略):
使用 FastCGI_Cache :
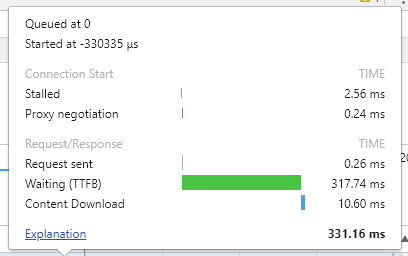
可以看到提升还是有的,对于高并发的站点来说提升可能会更明显。但是整体来说,拖慢速度的很多都是静态资源:
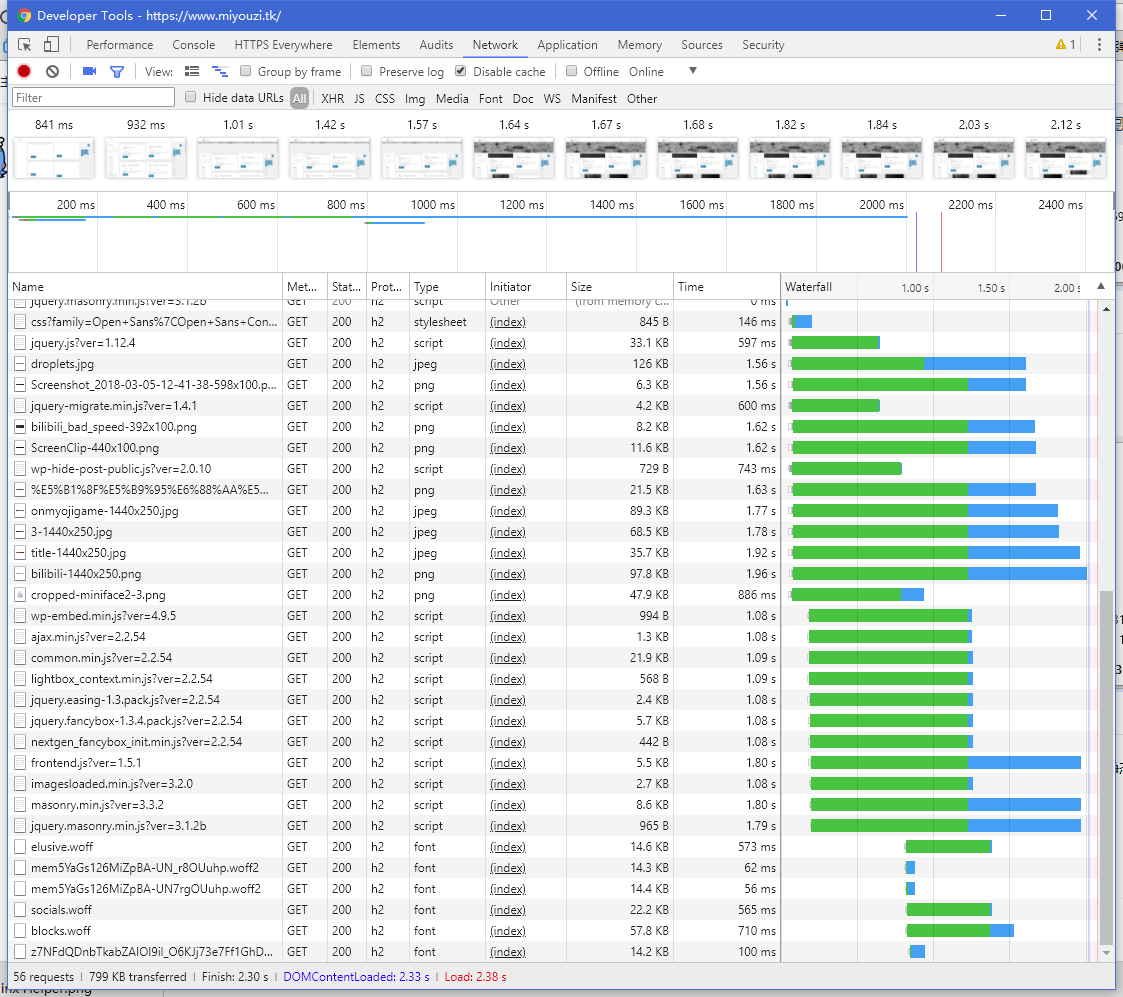
尝试过使用 gzip_static 但效果并不明显,可能瓶颈在 IO
对于这部分的加速,CDN可能是个较好的加速方案。
更多 FastCGI_Cache 的性能对比:
https://www.wphostingspot.com/2016/05/13/nginx-fastcgi-cache-vs-redis-object-cache-speed-hits-ps/
PS:对于依然使用 http1.1 的小伙伴来说,还是尽早使用 http2 ,这个提升幅度才是 “真加速” (
部分参考资料
《Nginx开启fastcgi_cache缓存加速,支持html伪静态页面》
https://zhangge.net/5042.html
《fastcgi_cache with conditional purging》
https://easyengine.io/wordpress-nginx/tutorials/single-site/fastcgi-cache-with-purging/
《Adding $upstream_cache_status in HTTP Response Headers》
https://easyengine.io/tutorials/nginx/upstream-cache-status-in-response-header/
Nginx官方文档
https://nginx.org/en/docs/http/ngx_http_core_module.html
