
目前是后处理最后一篇,还有一篇是后处理整理,后面会上传到github。
内容篇多前看目录
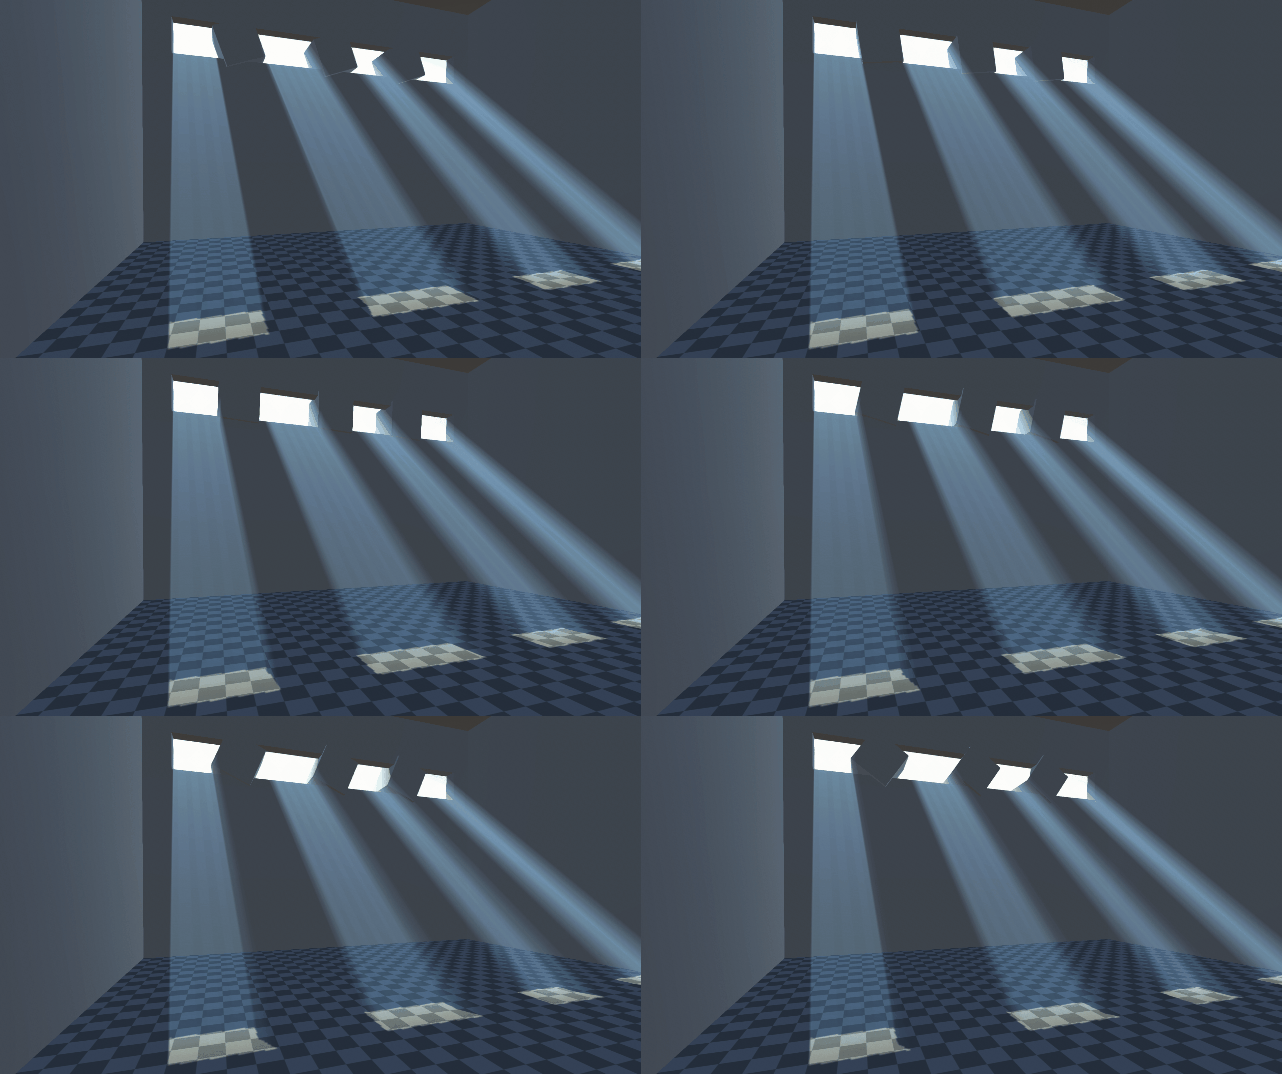
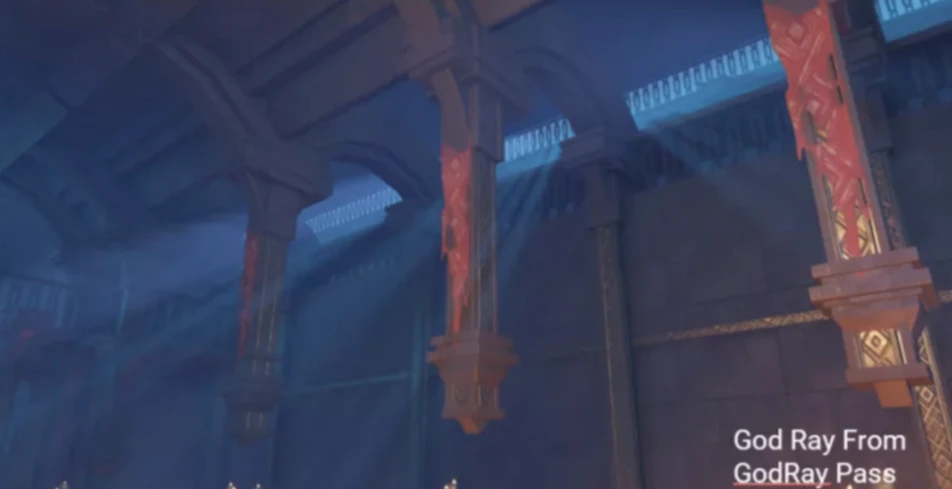
效果
目的
怎么做体积光?都使用到了什么技术?
Ray Marching 是什么?还可以实现什么效果。
怎么使用后处理实现体积光,都需要注意什么。
使用版本Unity 2021.3.15
介绍
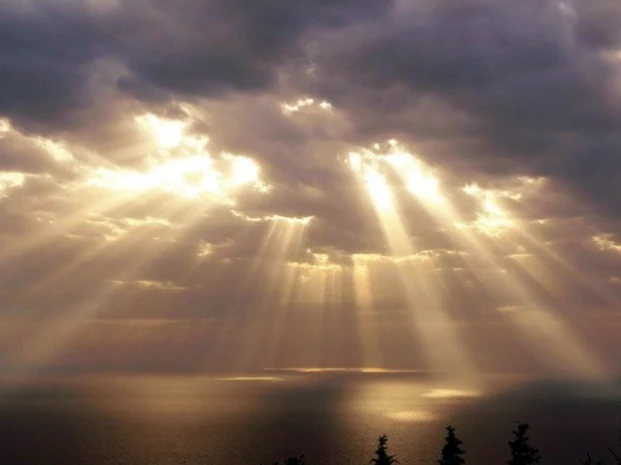
体积光(Volumetric Lights )是模拟现实中散射效果, 散射的光线进入人眼,让这些介质看起来像拢住了光线一样,也就是所谓的体积光。
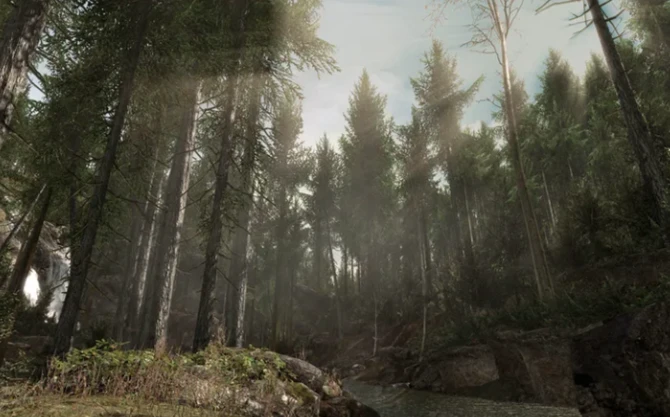
因为体积光是我们生活中能看到的现象,我们可以看到其实不是光有体积, 我们也看不到光的体积, 光穿过物体,产生的形状。
当空气中粒子的密度足够高时,部分遮挡光源的物体将以光束或光线的形式在这些粒子上投射阴影。
我们这里是使用后处理的方式来实现效果。
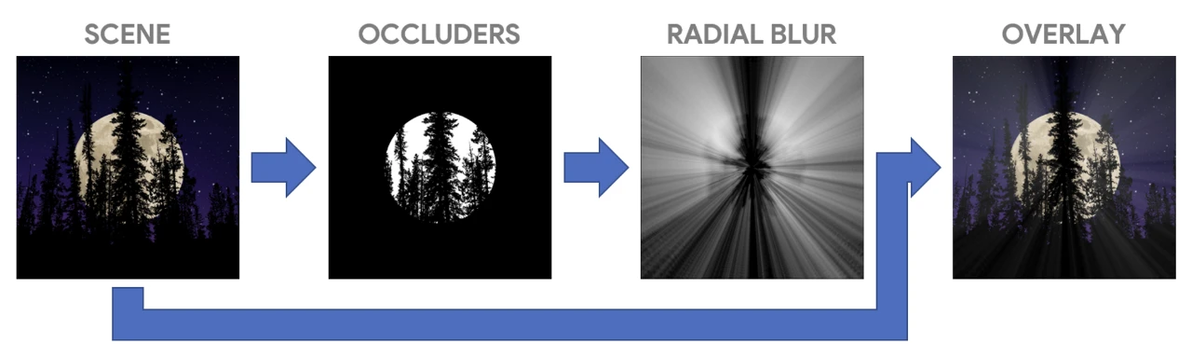
后处理实现方法
制作遮罩,使用深度制作一个遮罩,光是白色,物体渲染成黑色。
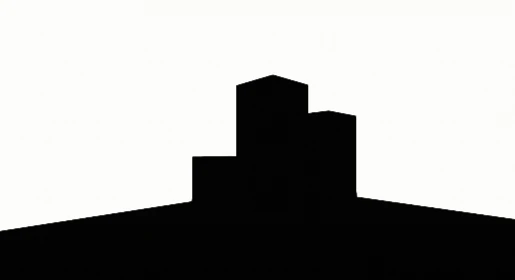
使用Ray Marching 计算光线进步,
处理完的图叠加到原图上面
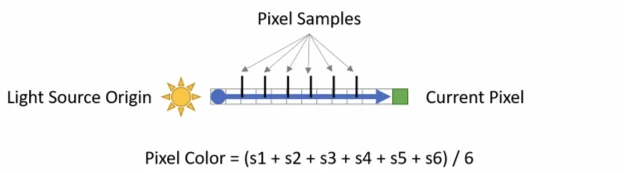
Ray Marching 是什么
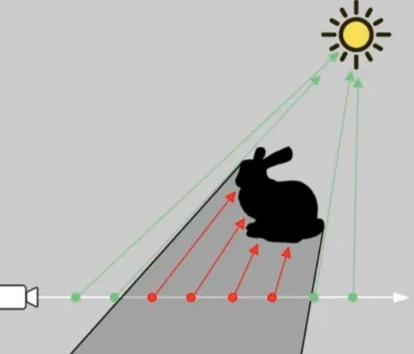
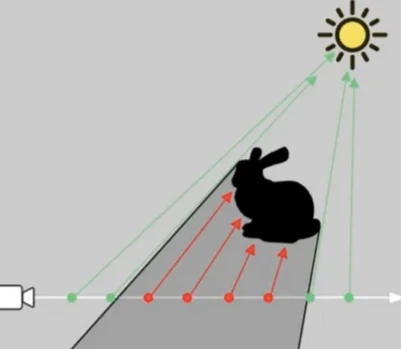
Ray Marching是光线进步 ,光线进步的原理是由我们的摄像机朝屏幕渲染的每一个像素发射一条射线,
Ray-marching 原理
在实时渲染中,通常采用 ray-marching 的方式实现介质中散射光的渲染。即对屏幕上每个像素,计算从摄像机发出的视线光线,在介质中以一个特定的步长迭代步进,并在每次步进的位置向光源再做一次 ray-marching 计算入射光强度,再根据 phase function 和 transmittance function 计算从当前位置到摄像机的散射光强度
流程
使用后处理获取到场景的物体的深度,然后使用深度屏幕空间重建世界空间坐标。 使用Ray Marching进行物体判断空间中这个点是否在阴影中。
在阴影中就不进行光的叠加,
如果不在阴影中进行光的叠加。
实现过程
Render Feature
我们前准备一个基础的后处理效果,Render Feature
using UnityEngine;
using UnityEngine.Rendering;
using UnityEngine.Rendering.Universal;

public class VolumLightFeature : ScriptableRendererFeature
{

    public Shader shader;                                          // 用于后处理计算的Shader
    CopyTransparentColorPass postPass;                             // 后处理计算的Pass
    Material _Material = null;                                     // 根据Shader生成的材质


    public override void Create()
    {
        this.name = "VolLight";                                                                  // 外部显示的名字
        postPass = new CopyTransparentColorPass();                                          // 初始化Pass
        postPass.renderPassEvent = RenderPassEvent.AfterRenderingTransparents;              // 渲染层级 = 透明物体渲染后
    }
    public override void AddRenderPasses(ScriptableRenderer renderer, ref RenderingData renderingData)
    {

        if (shader == null)                                                // 检测Shader是否存在
            return;
        if (_Material == null)                                             //创建材质
            _Material = CoreUtils.CreateEngineMaterial(shader);


        var cameraColorTarget = renderer.cameraColorTarget;              // 获取当前渲染的结果
        postPass.Setup(cameraColorTarget, _Material);                    // 设置调用后 处理Pass,初始化参数
        renderer.EnqueuePass(postPass);
    }
}

public class CopyTransparentColorPass : ScriptableRenderPass
{

    const string CommandBufferTag = "AdditionalPostProcessing Pass";      // 标签名字

    public Material m_Material;                                           // 后处理材质
    VolumetricVolume m_VolumetricVolume;                                    // 属性参数组件

    RenderTargetIdentifier m_ColorAttachment;                             // 渲染输入的原图
    RenderTargetHandle m_TemporaryColorTexture01;                         // 临时渲染结果(临时RT)

    public void Setup(RenderTargetIdentifier _ColorAttachment, Material material)
    {

        this.m_ColorAttachment = _ColorAttachment;                               // 初始化输入纹理
        m_Material = material;                                                   // 初始化材质
    }
    public override void Execute(ScriptableRenderContext context, ref RenderingData renderingData)
    {

        var stack = VolumeManager.instance.stack;                                              // 获取所有继承Volume框架的脚本。
        m_VolumetricVolume = stack.GetComponent<VolumetricVolume>();                             // 查找对应的属性参数组件
        var cmd = CommandBufferPool.Get(CommandBufferTag);                                     // 从命令缓冲区池中获取一个带标签的命令缓冲区,该标签名可以在后续帧调试器中见到

        Render(cmd, ref renderingData);                                                          // 调用渲染函数

        context.ExecuteCommandBuffer(cmd);                                                       // 执行命令缓冲区
        CommandBufferPool.Release(cmd);                                                          // 释放缓存区
        cmd.ReleaseTemporaryRT(m_TemporaryColorTexture01.id);                                    // 输出临时RT
    }

    void Render(CommandBuffer cmd, ref RenderingData renderingData)
    {
        // 判断组件是否开启,且非Scene视图摄像机
        if(m_VolumetricVolume.IsActive() && !renderingData.cameraData.isSceneViewCamera)
        {
             // 写入参数 获取Shader的数据和Vol组件的绑定
            m_Material.SetFloat("_Brightness", m_VolumetricVolume.brightness.value);


            RenderTextureDescriptor opaqueDesc = renderingData.cameraData.cameraTargetDescriptor;              // 创建RT

            opaqueDesc.depthBufferBits = 0;                                                                    // 设置深度缓存区,就深度缓冲区的精度为0,
            cmd.GetTemporaryRT(m_TemporaryColorTexture01.id, opaqueDesc);                                      // 通过目标相机的渲染信息创建临时缓冲区
            cmd.Blit(m_ColorAttachment, m_TemporaryColorTexture01.Identifier(), m_Material);                   // 输入纹理经过材质计算输出到缓冲区
            cmd.Blit(m_TemporaryColorTexture01.Identifier(), m_ColorAttachment);                               // 再从临时缓冲区存入主纹理
        }
    }
}Shader
Shader "Hidden/Volumetric"
{
    Properties
    {
        _MainTex ("Texture", 2D) = "white" {}
        // 亮度
        _Brightness ("Brightness", Float) = 1

    }
    SubShader
    {
        Tags { "RenderType"="Opaque" "RenderPipeline"="UniversalPipeline"}
        LOD 100

        HLSLINCLUDE

        #include "Packages/com.unity.render-pipelines.universal/ShaderLibrary/Core.hlsl"


        CBUFFER_START(UnityPerMaterial)
        float4 _MainTex_ST;
        half _Brightness;
        CBUFFER_END

            struct appdata
            {
                float4 positionOS : POSITION;
                float2 texcoord : TEXCOORD0;
            };

            struct v2f
            {
                float2 uv : TEXCOORD0;
                float4 positionCS : SV_POSITION;
            };

            TEXTURE2D(_MainTex);                          SAMPLER(sampler_MainTex);
        ENDHLSL


        Pass
        {
            HLSLPROGRAM
            #pragma vertex vert
            #pragma fragment frag

            v2f vert (appdata v)
            {
                v2f o;
                VertexPositionInputs  PositionInputs = GetVertexPositionInputs(v.positionOS.xyz);
                o.positionCS = PositionInputs.positionCS;
                o.uv = TRANSFORM_TEX(v.texcoord, _MainTex);

                return o;
            }


            half4 frag (v2f i) : SV_Target
            {

                half4 col = SAMPLE_TEXTURE2D(_MainTex,sampler_MainTex,i.uv);
                col.rgb = col.rgb * _Brightness;
                return col;
            }
            ENDHLSL
        }
    }
}Volume
using UnityEngine;
using UnityEngine.Rendering;
using UnityEngine.Rendering.Universal;

[System.Serializable,]
public sealed class VolumetricVolume : VolumeComponent, IPostProcessComponent
{
    [Tooltip("是否开启效果")]
    public BoolParameter enableEffect = new BoolParameter(true);

    public ClampedFloatParameter brightness = new ClampedFloatParameter(1f, 0, 3);


    // 实现接口
    public bool IsActive() => enableEffect == true;
    public bool IsTileCompatible() => false;
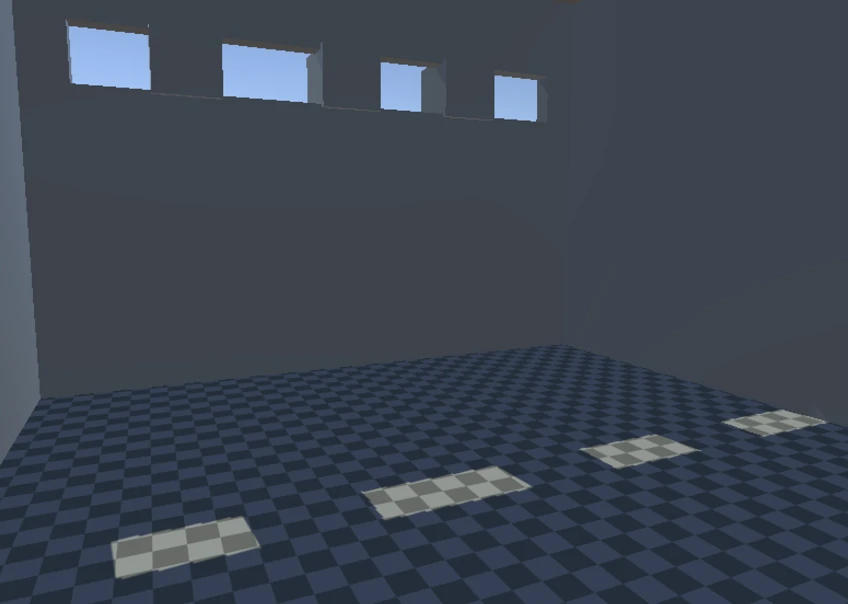
}准备一个场景验证效果室内场景
Shader
整个计算过程,主要是分怎么几步,
获取深度计算
重构世界空间坐标
判断物体是否在阴影里
获取深度贴图URP | Depth 深度 - 哔哩哔哩 (网页链接)
float2 uv = i.uv;
float depth = SAMPLE_TEXTURE2D(_CameraDepthTexture, sampler_CameraDepthTexture, uv).r;

depth = 1 - depth; // 得到深度反向值2. 使用屏幕空间去重构世界空间坐标
这一步是给后面计算物体是否被光线影响准备。
定义一个函数
// 输入 UV和深度
            float4 GetTheWorldPos(float2 ScreenUV, float Depth)
            {

                float3 ScreenPos = float3(ScreenUV, Depth);                                  // 获取屏幕空间位置
                float4 normalScreenPos = float4(ScreenPos * 2.0 - 1.0, 1.0);                 // 映射到屏幕中心点
                float4 ndcPos = mul(unity_CameraInvProjection, normalScreenPos);             // 计算到ndc空间下的位置
                ndcPos = float4(ndcPos.xyz / ndcPos.w, 1.0);

                float4 sencePos = mul(unity_CameraToWorld, ndcPos * float4(1,1,-1,1));      // 反推世界空间位置
                sencePos = float4(sencePos.xyz, 1.0);
                return sencePos;
}这一步就使用屏幕纹理坐标和深度值重构出当前像素在世界空间中的位置
float3 ro = _WorldSpaceCameraPos.xyz;                    // 相机在世界空间中的位置
float3 worldPos = GetTheWorldPos(uv, depth).xyz; // 屏幕纹理坐标和深度值重构出当前像素在世界空间中的位置这里ro 前获取摄像机在世界空间中的位置。
效果
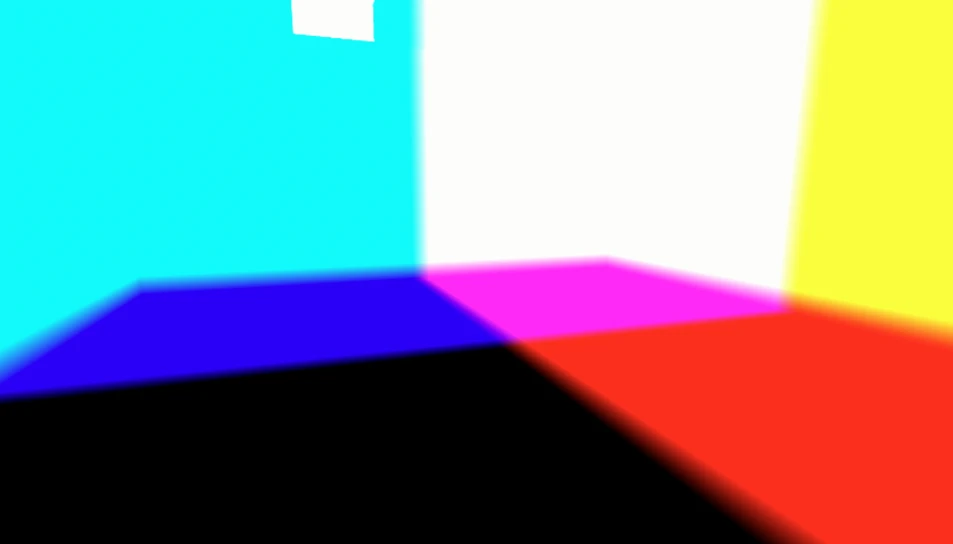
还有另一种方法 使用摄像机,在由摄像机来生成矩阵,传到我们的Shader中实现。
URP | 后处理-SSAO效果 - 哔哩哔哩 (bilibili.com)
扩展 ndc空间是什么?
我们在渲染的时候,物体世界空间转换到屏幕空间的时候,是需要进行ndc正交投影的,这个是渲染流水线的过程。
摄像机空间转换到屏幕空间这个变换就将3D坐标变换成了2D坐标,即我们所看到的画面了。经过这个变换后,将看到的整个世界会被压缩到一个[-1,1]的立方体中。这个过程我们有两个点需要注意, NDC 和 屏幕映射
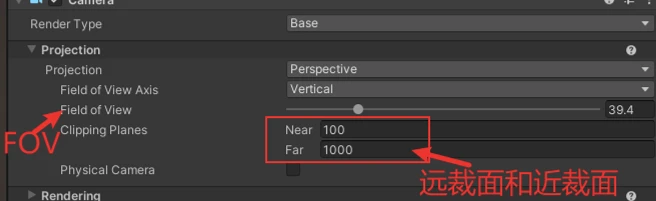
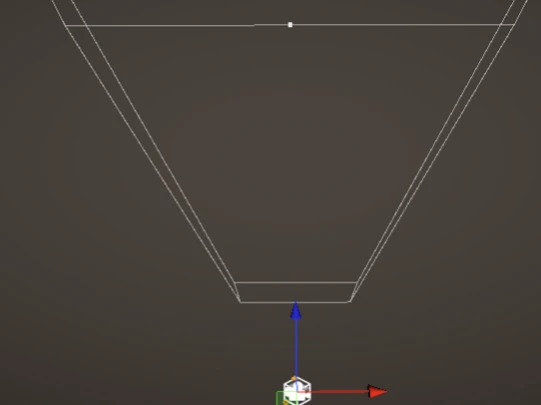
正交投影 (NDC)这里我们需要知道,摄像机渲染到屏幕,摄像机是有一个近裁面和远裁面的。 只有在这里才会显示。
透视视角
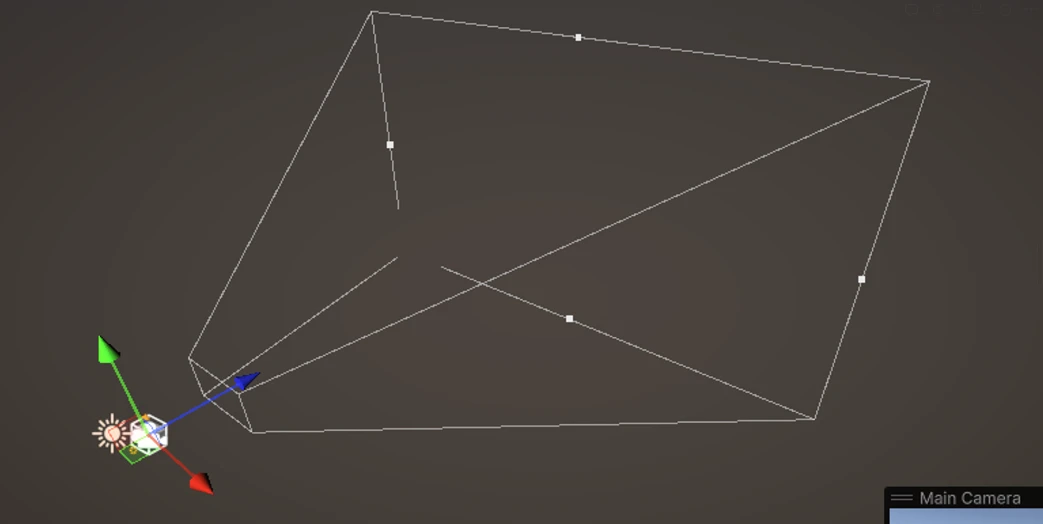
这里使用Unity 的摄像机 做演示,
顶视图
3. 计算光照强度叠加
我们判断物体位置是不是在阴影里,如果在阴影里,我们的光照是不叠加的。
URP | 物体阴影 - 哔哩哔哩 (bilibili.com)
定义获取阴影的函数
// 阴影函数
            float Getshadow(float3 posWorld)
            {
                float4 shadowCoord = TransformWorldToShadowCoord(posWorld);
                float shadow = MainLightRealtimeShadow(shadowCoord);
                return shadow;
}注意:增加Lighting.hlsl库
在片元着色器阶段
//定义光线起始点 到 摄像机,
float3 rd = normalize(worldPos - ro);     //
float3 currentPos = ro;初始化一个变量 currentPos 为相机位置
使用 length 函数计算出当前像素到相机之间的距离
float m_length = min(length(worldPos - ro), _MaxDistance);
定义三个属性
float delta = _StepSize;       // 步长大小  控制每次迭代的步长
float totalInt = 0;
float d = 0;首先初始化一个变量 delta 为步长大小 _StepSize,用于控制每次迭代的步长然后初始化两个变量 totalInt 和 d 为 0,分别用于记录总的积分值和当前的积分距离
计算光线进步
// 光线进步计算
                for(int j = 0; j < _MaxStep; j++)
                {
                    d += delta;
                    if(d > m_length) break;   // 判断距离大于设定的距离 不在生成
                    currentPos += delta * rd;               // 根据步长 delta 和方向向量 rd 计算出当前像素的位置 currentPos
                    totalInt += _LightIntensity * Getshadow(currentPos);   // 然后使用 Getshadow 函数计算出当前像素位置的阴影值
                }


                Light mylight = GetMainLight();                                //获取场景主光源
                half4 LightColor = half4(mylight.color,1);                     //获取主光源的颜色

                half3 lightCol = totalInt * LightColor * _Color.rgb * _Color.a;
                half3 oCol = SAMPLE_TEXTURE2D(_MainTex, sampler_MainTex, uv).rgb;
                half3 dCol = lightCol + oCol;                  //原图和 计算后的图叠加


                //return m_length;
                return float4(dCol, 1);
首先根据步长 delta 和方向向量 rd 计算出当前像素的位置 currentPos,然后使用 Getshadow 函数计算出当前像素位置的阴影值,并将其乘上光照强度 _LightIntensity,加入到总的积分值 totalInt 中。
接下来,根据场景中的主光源 mylight,将其颜色和积分值 totalInt 相乘,得到一个表示光照颜色的向量 lightCol。然后从原始纹理中采样出当前像素的颜色 oCol,并将光照颜色和原始颜色相加,得到最终的颜色 dCol。
shader部分完成
注意:这里加入一个_Color变量控制 颜色。
Volume
这里是外部控制的一些属性,
using UnityEngine;
using UnityEngine.Rendering;
using UnityEngine.Rendering.Universal;

[System.Serializable,]
public sealed class VolumetricVolume : VolumeComponent, IPostProcessComponent
{
    [Tooltip("是否开启效果")]
    public BoolParameter VolumeLight = new BoolParameter(true);

    public ColorParameter ColorChange = new ColorParameter(Color.white, true);
    [Range(0, 3)]
		public ClampedFloatParameter lightIntensity = new ClampedFloatParameter(0.05f, 0f, 0.1f);       // 体积光确定
    public FloatParameter stepSize = new FloatParameter(0.1f);                                      // 步长大小
    public FloatParameter maxDistance = new FloatParameter(1000);                                   // 最大渲染距离
    public IntParameter maxStep = new IntParameter(200);                                            // 最大迭代次数

    // 实现接口
    public bool IsActive() => VolumeLight == true;
    public bool IsTileCompatible() => false;
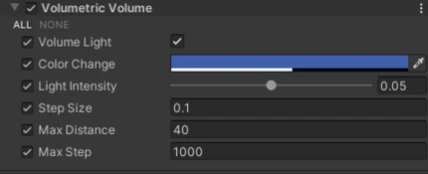
}、、 和 是用于控制体积光效果的参数。
lightIntensity 控制体积光的强度,可以用来调整体积光的明暗程度。
stepSize 控制每次迭代的步长大小,可以用来控制体积光的精度和性能。
maxDistance 控制体积光的最大渲染距离,可以用来进行远近裁剪,避免在远处或者超出可视范围的位置进行不必要的计算。
maxStep 控制体积光的最大迭代次数,可以用来控制体积光的精度和性能。
注意这里 ColorChange 控制体积光的颜色, ColorChange 的 a 通道也可以控制强度,
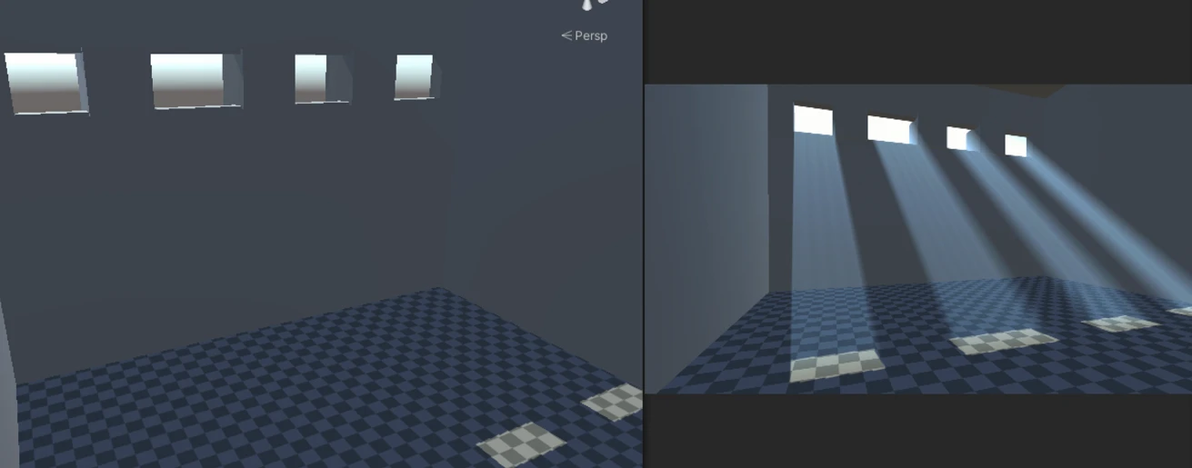
效果
RendererFeature
这里简单没有难度,只是把Shader的材质赋值过来,不是很清楚的看前面
URP | 后处理-自定义后处理 - 哔哩哔哩 (bilibili.com)
using UnityEngine;
using UnityEngine.Rendering;
using UnityEngine.Rendering.Universal;

public class VolumLightFeature : ScriptableRendererFeature
{

    public Shader shader;                                          // 用于后处理计算的Shader
    CopyTransparentColorPass postPass;                             // 后处理计算的Pass
    Material _Material = null;                                     // 根据Shader生成的材质


    public override void Create()
    {
        this.name = "VolumLight";                                                                  // 外部显示的名字
        postPass = new CopyTransparentColorPass();                                          // 初始化Pass
        postPass.renderPassEvent = RenderPassEvent.AfterRenderingTransparents;              // 渲染层级 = 透明物体渲染后
    }
    public override void AddRenderPasses(ScriptableRenderer renderer, ref RenderingData renderingData)
    {

        if (shader == null)                                                // 检测Shader是否存在
            return;
        if (_Material == null)                                             //创建材质
            _Material = CoreUtils.CreateEngineMaterial(shader);


        var cameraColorTarget = renderer.cameraColorTarget;              // 获取当前渲染的结果
        postPass.Setup(cameraColorTarget, _Material);                    // 设置调用后 处理Pass,初始化参数
        renderer.EnqueuePass(postPass);
    }
}

public class CopyTransparentColorPass : ScriptableRenderPass
{

    const string CommandBufferTag = "AdditionalPostProcessing Pass";      // 标签名字

    public Material m_Material;                                           // 后处理材质
    VolumetricVolume m_VolumetricVolume;                                    // 属性参数组件

    RenderTargetIdentifier m_ColorAttachment;                             // 渲染输入的原图
    RenderTargetHandle m_TemporaryColorTexture01;                         // 临时渲染结果(临时RT)

    public void Setup(RenderTargetIdentifier _ColorAttachment, Material material)
    {

        this.m_ColorAttachment = _ColorAttachment;                               // 初始化输入纹理
        m_Material = material;                                                   // 初始化材质
    }
    public override void Execute(ScriptableRenderContext context, ref RenderingData renderingData)
    {

        var stack = VolumeManager.instance.stack;                                              // 获取所有继承Volume框架的脚本。
        m_VolumetricVolume = stack.GetComponent<VolumetricVolume>();                             // 查找对应的属性参数组件
        var cmd = CommandBufferPool.Get(CommandBufferTag);                                     // 从命令缓冲区池中获取一个带标签的命令缓冲区,该标签名可以在后续帧调试器中见到

        Render(cmd, ref renderingData);                                                          // 调用渲染函数

        context.ExecuteCommandBuffer(cmd);                                                       // 执行命令缓冲区
        CommandBufferPool.Release(cmd);                                                          // 释放缓存区
        cmd.ReleaseTemporaryRT(m_TemporaryColorTexture01.id);                                    // 输出临时RT
    }

    void Render(CommandBuffer cmd, ref RenderingData renderingData)
    {

        // 判断组件是否开启,且非Scene视图摄像机    因为如果不开启非Scene视图 场景也会爆。
        if(m_VolumetricVolume.IsActive() && !renderingData.cameraData.isSceneViewCamera)
        {

            RenderTargetIdentifier source = renderingData.cameraData.renderer.cameraColorTarget;
            RenderTextureDescriptor inRTDesc = renderingData.cameraData.cameraTargetDescriptor;
            inRTDesc.depthBufferBits = 0;

            SetMatData();

            int destination = Shader.PropertyToID("Temp1");
            cmd.SetGlobalTexture(destination, source);
            cmd.GetTemporaryRT(destination, inRTDesc.width, inRTDesc.height, 0, FilterMode.Bilinear, RenderTextureFormat.DefaultHDR);


            cmd.Blit(source, destination);
            // 写入参数 获取Shader的数据和Vol组件的绑定
            cmd.Blit(destination, source, m_Material, 0);
            cmd.ReleaseTemporaryRT(destination);
        }
    }


    private void SetMatData()
    {
            m_Material.SetInt("_MaxStep", m_VolumetricVolume.maxStep.value);               //
            m_Material.SetFloat("_MaxDistance", m_VolumetricVolume.maxDistance.value);
            m_Material.SetFloat("_LightIntensity", m_VolumetricVolume.lightIntensity.value);
            m_Material.SetFloat("_StepSize", m_VolumetricVolume.stepSize.value);
            m_Material.SetColor("_Color", m_VolumetricVolume.ColorChange.value);

    }
}注意 当前只在Game 视图显示, Scene视图不显示
优化体积光
我们调整步长大小,就会出现很明显的 锯齿
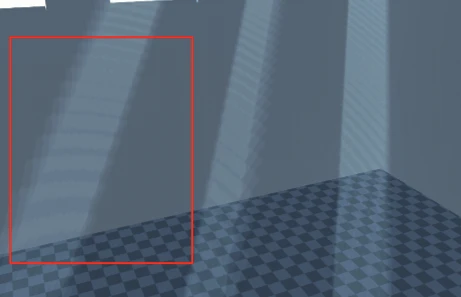
这里我们使用前面处理的过的方法,使用模糊。这样的缺点就的更费,性能占比增加。
URP | 后处理-模糊算法总结 - 哔哩哔哩 (bilibili.com)
实现思路
我们生成体积光的以后在进行一步模糊,在和原图叠加起来,这里我们使用多Pass的方式实现。
高斯模糊
我们前处理Shader 计算高斯模糊
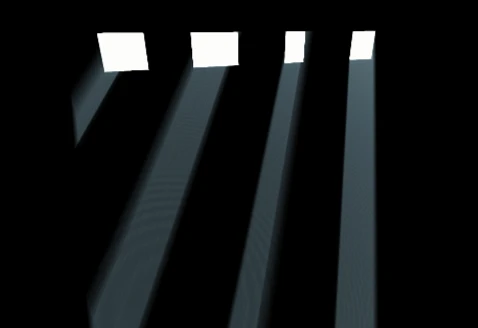
第一个Pass ,我们只需要获取到 体积光就可以,不需要和背景叠加,
修改Shader
 					Light mylight = GetMainLight();                                //获取场景主光源
                half4 LightColor = half4(mylight.color,1);                     //获取主光源的颜色

                half3 lightCol = totalInt * LightColor * _Color.rgb * _Color.a;


                //half3 oCol = SAMPLE_TEXTURE2D(_MainTex, sampler_MainTex, uv).rgb;
                //half3 dCol = lightCol + oCol;                  //原图和 计算后的图叠加


                //return m_length;
                return float4(lightCol, 1);
            }
2. 修改第二个的Pass ,我们来执行模糊效果,把上面出现的纹理进行模糊
// 高斯模糊
        Pass
        {

            HLSLPROGRAM
            #pragma vertex vert
            #pragma fragment frag

            v2f vert (appdata v)
            {
                v2f o;
                VertexPositionInputs  PositionInputs = GetVertexPositionInputs(v.positionOS.xyz);
                o.positionCS = PositionInputs.positionCS;
                o.uv = v.texcoord;

                return o;
            }


            half4 frag (v2f i) : SV_Target
            {

                float4 col = float4(0, 0, 0, 0);

                float blurrange = _BlurInt / 300;

                col += SAMPLE_TEXTURE2D(_MainTex, sampler_MainTex, i.uv + float2(0.0, 0.0)) * 0.147716f;
                col += SAMPLE_TEXTURE2D(_MainTex, sampler_MainTex, i.uv + float2(blurrange, 0.0)) * 0.118318f;
                col += SAMPLE_TEXTURE2D(_MainTex, sampler_MainTex, i.uv + float2(0.0, -blurrange)) * 0.118318f;
                col += SAMPLE_TEXTURE2D(_MainTex, sampler_MainTex, i.uv + float2(0.0, blurrange)) * 0.118318f;
                col += SAMPLE_TEXTURE2D(_MainTex, sampler_MainTex, i.uv + float2(-blurrange, 0.0)) * 0.118318f;

                col += SAMPLE_TEXTURE2D(_MainTex, sampler_MainTex, i.uv + float2(blurrange, blurrange)) * 0.0947416f;
                col += SAMPLE_TEXTURE2D(_MainTex, sampler_MainTex, i.uv + float2(-blurrange, -blurrange)) * 0.0947416f;
                col += SAMPLE_TEXTURE2D(_MainTex, sampler_MainTex, i.uv + float2(blurrange, -blurrange)) * 0.0947416f;
                col += SAMPLE_TEXTURE2D(_MainTex, sampler_MainTex, i.uv + float2(-blurrange, blurrange)) * 0.0947416f;

                return col;

            }

            ENDHLSL
}这里具体参考前面的内容。
URP | 后处理-模糊算法总结 - 哔哩哔哩 (bilibili.com)
3.我们需要把模糊后面的效果和原场景进行叠加,才能显示出来。
所以第三个Pass 合并 (PS. 这里类型Bloom的效果)
// 合并两个图像
        Pass
        {

            HLSLPROGRAM
            #pragma vertex vert
            #pragma fragment frag

            v2f vert (appdata v)
            {
                v2f o;
                VertexPositionInputs  PositionInputs = GetVertexPositionInputs(v.positionOS.xyz);
                o.positionCS = PositionInputs.positionCS;
                o.uv = v.texcoord;

                return o;
            }

            half4 frag (v2f i) : SV_Target
            {

                half3 oCol = SAMPLE_TEXTURE2D(_MainTex, sampler_MainTex, i.uv).rgb;
                half3 lCol = SAMPLE_TEXTURE2D(_FinalTex, sampler_FinalTex, i.uv).rgb;

                half3 dCol = lCol + oCol;                  //原图和 计算后的图叠加


                return float4(dCol,1);
            }
            ENDHLSL

        }
全Shader
Shader "Hidden/VolumetricShader"
{
    Properties
    {
        _MainTex ("Texture", 2D) = "white" {}
        _Color ("_Color", color) = (1,1,1,1)
        _MaxStep ("_MaxStep",float) = 200      //设置最大步数
        _MaxDistance ("_MaxDistance",float) = 1000   //最大步进距离
        _LightIntensity ("_LightIntensity",float) = 0.01 //每次步进叠加的光照强度
        _StepSize ("_StepSize" , float) = 0.1	 //每次步进距离
    }
    SubShader
    {
        Tags { "RenderType"="Opaque" "RenderPipeline"="UniversalPipeline"}
        ZWrite Off
		ZTest Always
		Cull Off


        HLSLINCLUDE

        #include "Packages/com.unity.render-pipelines.universal/ShaderLibrary/Core.hlsl"
        #include "Packages/com.unity.render-pipelines.universal/ShaderLibrary/Lighting.hlsl"


        CBUFFER_START(UnityPerMaterial)
        float4 _MainTex_ST, _FinalTex_TexelSize;
        float4 _Color;
        half _Brightness;
        float _MaxDistance;
        float _MaxStep;
        float _StepSize;
        float _LightIntensity;

        float _BlurInt;
        CBUFFER_END

            struct appdata
            {
                float4 positionOS : POSITION;
                float2 texcoord : TEXCOORD0;
            };

            struct v2f
            {
                float2 uv : TEXCOORD0;
                float4 positionCS : SV_POSITION;
            };

            TEXTURE2D(_MainTex);                          SAMPLER(sampler_MainTex);
            TEXTURE2D(_FinalTex);                         SAMPLER(sampler_FinalTex);
            TEXTURE2D(_CameraDepthTexture);               SAMPLER(sampler_CameraDepthTexture);

        ENDHLSL

        // 体积光
        Pass
        {
            HLSLPROGRAM
            #pragma vertex vert
            #pragma fragment frag


            // 接收阴影所需关键字
            #pragma multi_compile _ _MAIN_LIGHT_SHADOWS                    //接受阴影
            #pragma multi_compile _ _MAIN_LIGHT_SHADOWS_CASCADE            //产生阴影
            #pragma multi_compile _ _ADDITIONAL_LIGHTS_VERTEX _ADDITIONAL_LIGHTS
            #pragma multi_compile _ _SHADOWS_SOFT                         //软阴影


            // 输入 UV和深度
            float4 GetTheWorldPos(float2 ScreenUV, float Depth)
            {

                float3 ScreenPos = float3(ScreenUV, Depth);                                  // 获取屏幕空间位置
                float4 normalScreenPos = float4(ScreenPos * 2.0 - 1.0, 1.0);                 // 映射到屏幕中心点
                float4 ndcPos = mul(unity_CameraInvProjection, normalScreenPos);             // 计算到ndc空间下的位置
                ndcPos = float4(ndcPos.xyz / ndcPos.w, 1.0);

                float4 sencePos = mul(unity_CameraToWorld, ndcPos * float4(1,1,-1,1));      // 反推世界空间位置
                sencePos = float4(sencePos.xyz, 1.0);
                return sencePos;
            }
            // 阴影函数
            float Getshadow(float3 posWorld)
            {
                float4 shadowCoord = TransformWorldToShadowCoord(posWorld);                  // 获取阴影坐标
                float shadow = MainLightRealtimeShadow(shadowCoord);

                return shadow;
            }

            v2f vert (appdata v)
            {
                v2f o;
                VertexPositionInputs  PositionInputs = GetVertexPositionInputs(v.positionOS.xyz);
                o.positionCS = PositionInputs.positionCS;
                o.uv = TRANSFORM_TEX(v.texcoord, _MainTex);

                return o;
            }


            half4 frag (v2f i) : SV_Target
            {

                float2 uv = i.uv;
                float depth = SAMPLE_TEXTURE2D(_CameraDepthTexture, sampler_CameraDepthTexture, uv).r;
                depth = 1 - depth;   // 得到深度值


                float3 ro = _WorldSpaceCameraPos.xyz;                    // 相机在世界空间中的位置
                float3 worldPos = GetTheWorldPos(uv, depth).xyz;         // 屏幕纹理坐标和深度值重构出当前像素在世界空间中的位置


                //return float4(worldPos,1);
                //定义光线起始点 到 摄像机,
                float3 rd = normalize(worldPos - ro);     // 像素位置 到  摄像机位置
                float3 currentPos = ro;                   //  初始化一个 摄像机位置

                //
                float m_length = min(length(worldPos - ro), _MaxDistance);      // 使用 length 函数计算出当前像素到相机之间的距离


                float delta = _StepSize;       // 步长大小  控制每次迭代的步长
                float totalInt = 0;
                float d = 0;


                // 光线进步计算
                for(int j = 0; j < _MaxStep; j++)
                {
                    d += delta;
                    if(d > m_length) break;   // 判断距离大于设定的距离 不在生成
                    currentPos += delta * rd;               // 根据步长 delta 和方向向量 rd 计算出当前像素的位置 currentPos
                    totalInt += _LightIntensity * Getshadow(currentPos);   // 然后使用 Getshadow 函数计算出当前像素位置的阴影值
                }


                Light mylight = GetMainLight();                                //获取场景主光源
                half4 LightColor = half4(mylight.color,1);                     //获取主光源的颜色

                half3 lightCol = totalInt * LightColor * _Color.rgb * _Color.a;
                half3 oCol = SAMPLE_TEXTURE2D(_MainTex, sampler_MainTex, uv).rgb;
                half3 dCol = lightCol + oCol;                  //原图和 计算后的图叠加


                return float4(lightCol, 1);
                //return m_length;
                //return float4(dCol, 1);
            }
            ENDHLSL
        }

        // 高斯模糊
        Pass
        {

            HLSLPROGRAM
            #pragma vertex vert
            #pragma fragment frag

            v2f vert (appdata v)
            {
                v2f o;
                VertexPositionInputs  PositionInputs = GetVertexPositionInputs(v.positionOS.xyz);
                o.positionCS = PositionInputs.positionCS;
                o.uv = v.texcoord;

                return o;
            }


            half4 frag (v2f i) : SV_Target
            {

                float4 col = float4(0, 0, 0, 0);

                float blurrange = _BlurInt / 300;

                col += SAMPLE_TEXTURE2D(_MainTex, sampler_MainTex, i.uv + float2(0.0, 0.0)) * 0.147716f;
                col += SAMPLE_TEXTURE2D(_MainTex, sampler_MainTex, i.uv + float2(blurrange, 0.0)) * 0.118318f;
                col += SAMPLE_TEXTURE2D(_MainTex, sampler_MainTex, i.uv + float2(0.0, -blurrange)) * 0.118318f;
                col += SAMPLE_TEXTURE2D(_MainTex, sampler_MainTex, i.uv + float2(0.0, blurrange)) * 0.118318f;
                col += SAMPLE_TEXTURE2D(_MainTex, sampler_MainTex, i.uv + float2(-blurrange, 0.0)) * 0.118318f;

                col += SAMPLE_TEXTURE2D(_MainTex, sampler_MainTex, i.uv + float2(blurrange, blurrange)) * 0.0947416f;
                col += SAMPLE_TEXTURE2D(_MainTex, sampler_MainTex, i.uv + float2(-blurrange, -blurrange)) * 0.0947416f;
                col += SAMPLE_TEXTURE2D(_MainTex, sampler_MainTex, i.uv + float2(blurrange, -blurrange)) * 0.0947416f;
                col += SAMPLE_TEXTURE2D(_MainTex, sampler_MainTex, i.uv + float2(-blurrange, blurrange)) * 0.0947416f;

                return col;

            }

            ENDHLSL
        }

        // 合并两个图像
        Pass
        {

            HLSLPROGRAM
            #pragma vertex vert
            #pragma fragment frag

            v2f vert (appdata v)
            {
                v2f o;
                VertexPositionInputs  PositionInputs = GetVertexPositionInputs(v.positionOS.xyz);
                o.positionCS = PositionInputs.positionCS;
                o.uv = v.texcoord;

                return o;
            }

            half4 frag (v2f i) : SV_Target
            {

                half3 oCol = SAMPLE_TEXTURE2D(_MainTex, sampler_MainTex, i.uv).rgb;
                half3 lCol = SAMPLE_TEXTURE2D(_FinalTex, sampler_FinalTex, i.uv).rgb;

                half3 dCol = lCol + oCol;                  //原图和 计算后的图叠加


                return float4(dCol,1);
            }
            ENDHLSL

        }

        //

    }

}我们需要在Post 中控制两个属性,一个是模糊的次数和模糊的大小。
Volume 代码
using UnityEngine;
using UnityEngine.Rendering;
using UnityEngine.Rendering.Universal;

[System.Serializable,]
public sealed class VolumetricVolume : VolumeComponent, IPostProcessComponent
{
    [Tooltip("是否开启效果")]
    public BoolParameter VolumeLight = new BoolParameter(true);

    public ColorParameter ColorChange = new ColorParameter(Color.white, true);
    [Range(0, 3)]
	public ClampedFloatParameter lightIntensity = new ClampedFloatParameter(0.05f, 0f, 0.1f);       // 体积光确定
    public ClampedFloatParameter stepSize = new ClampedFloatParameter(0.1f, 0.1f, 0.5f);                                      // 步长大小
    public FloatParameter maxDistance = new FloatParameter(1000);                                   // 最大渲染距离
    public IntParameter maxStep = new IntParameter(200);                                            // 最大迭代次数

    public ClampedIntParameter loop = new ClampedIntParameter(3, 1, 10);
    public ClampedFloatParameter BlurInt = new ClampedFloatParameter(0.3f, 0.0f, 1f);


    // 实现接口
    public bool IsActive() => VolumeLight == true;
    public bool IsTileCompatible() => false;
}记得在 RendererFeature 中绑定属性。
private void SetMatData()
    {
            m_Material.SetInt("_MaxStep", m_VolumetricVolume.maxStep.value);               //
            m_Material.SetFloat("_MaxDistance", m_VolumetricVolume.maxDistance.value);
            m_Material.SetFloat("_LightIntensity", m_VolumetricVolume.lightIntensity.value);
            m_Material.SetFloat("_StepSize", m_VolumetricVolume.stepSize.value);
            m_Material.SetColor("_Color", m_VolumetricVolume.ColorChange.value);
            m_Material.SetFloat("_BlurInt", m_VolumetricVolume.BlurInt.value);
    }
}我们接着在RendererFeature 中增加代码 调整调用模糊
RendererFeature
主要是处理两个地方,一个是使用循环执行模糊,一个是把原图传入到Shader进行融合。
SetMatData();

            int destination = Shader.PropertyToID("Temp1");
            int BlurRT = Shader.PropertyToID("Temp2");

            //cmd.SetGlobalTexture(BlurRT, source);
            cmd.GetTemporaryRT(destination, inRTDesc.width, inRTDesc.height, 0, FilterMode.Bilinear, RenderTextureFormat.DefaultHDR);
            cmd.GetTemporaryRT(BlurRT, inRTDesc.width, inRTDesc.height, 0, FilterMode.Bilinear, RenderTextureFormat.DefaultHDR);


            cmd.Blit(source, destination, m_Material, 0);
            // 写入参数 获取Shader的数据和Vol组件的绑定
            //cmd.Blit(destination, source, m_Material, 0);
            for (int i = 0; i < m_VolumetricVolume.loop.value; i++)
            {
                cmd.Blit(destination, BlurRT, m_Material, 1);
                cmd.Blit(BlurRT, destination);
            }

            cmd.SetGlobalTexture("_FinalTex", source);
            cmd.Blit(destination, BlurRT, m_Material, 2);
            cmd.Blit(BlurRT, source);

            cmd.ReleaseTemporaryRT(destination);
cmd.ReleaseTemporaryRT(BlurRT);注意:需要cmd.SetGlobalTexture("_FinalTex", source); 把原画传入到Shader进行融合
效果
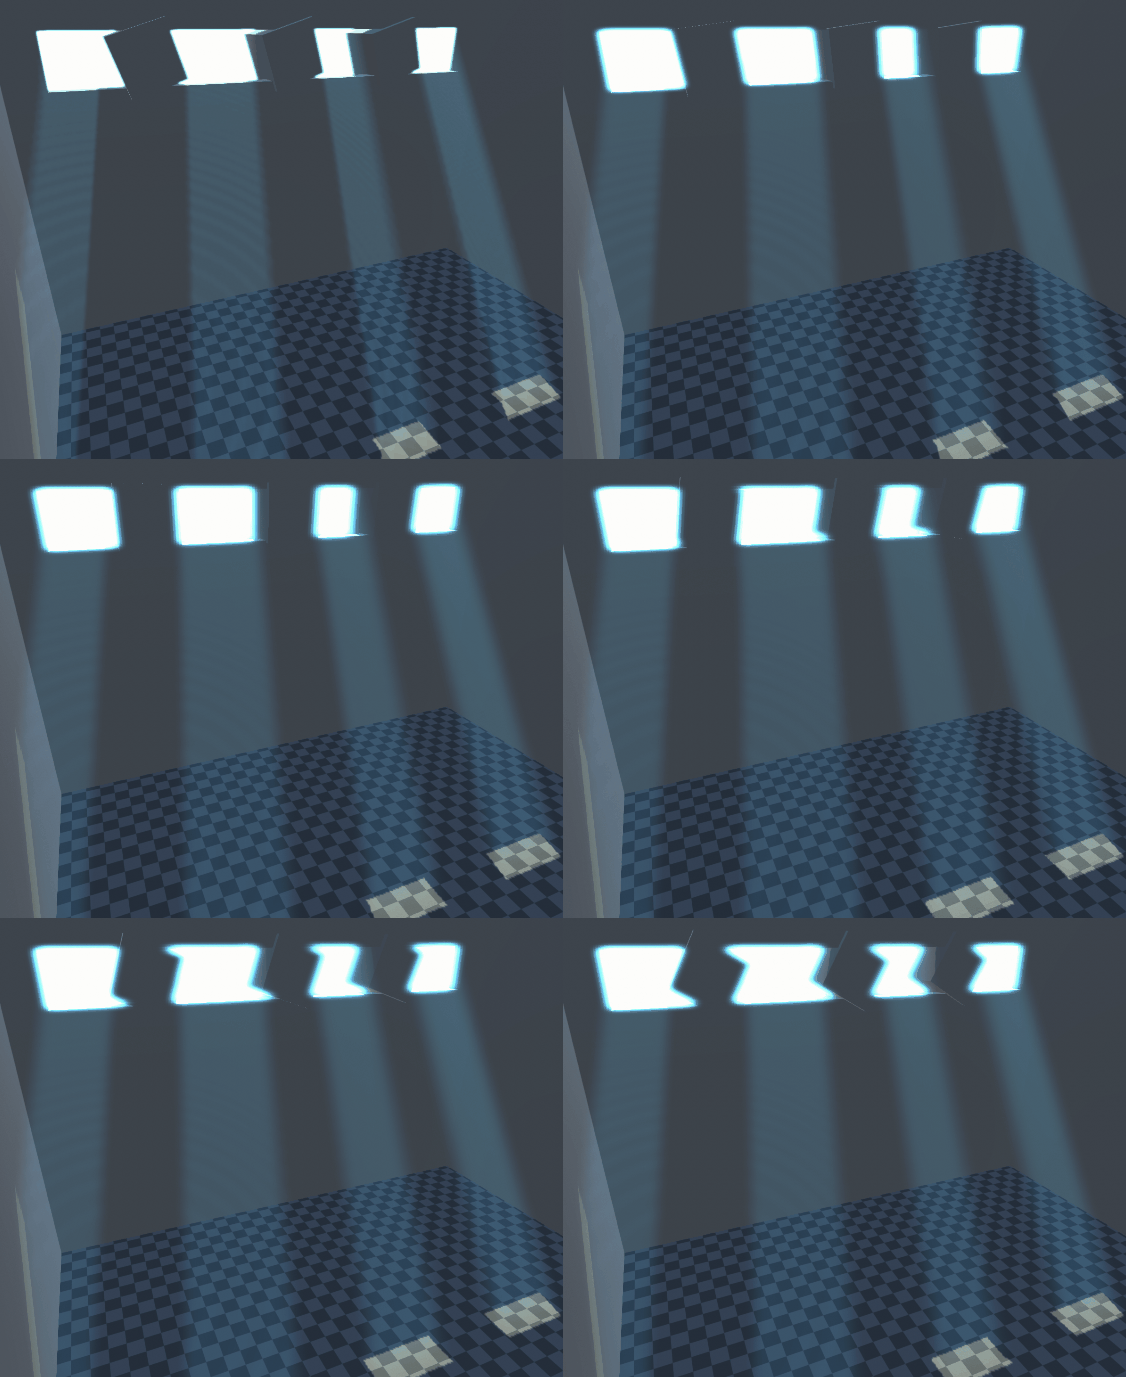
我们就可以看到,模糊了间隔缝隙。
全代码 RendererFeature
using UnityEngine;
using UnityEngine.Rendering;
using UnityEngine.Rendering.Universal;

public class VolumLightFeature : ScriptableRendererFeature
{

    public Shader shader;                                          // 用于后处理计算的Shader
    CopyTransparentColorPass postPass;                             // 后处理计算的Pass
    Material _Material = null;                                     // 根据Shader生成的材质


    public override void Create()
    {
        this.name = "VolumLight";                                                                  // 外部显示的名字
        postPass = new CopyTransparentColorPass();                                          // 初始化Pass
        postPass.renderPassEvent = RenderPassEvent.AfterRenderingTransparents;              // 渲染层级 = 透明物体渲染后
    }
    public override void AddRenderPasses(ScriptableRenderer renderer, ref RenderingData renderingData)
    {

        if (shader == null)                                                // 检测Shader是否存在
            return;
        if (_Material == null)                                             //创建材质
            _Material = CoreUtils.CreateEngineMaterial(shader);


        var cameraColorTarget = renderer.cameraColorTarget;              // 获取当前渲染的结果
        postPass.Setup(cameraColorTarget, _Material);                    // 设置调用后 处理Pass,初始化参数
        renderer.EnqueuePass(postPass);
    }
}

public class CopyTransparentColorPass : ScriptableRenderPass
{

    const string CommandBufferTag = "AdditionalPostProcessing Pass";      // 标签名字

    public Material m_Material;                                           // 后处理材质
    VolumetricVolume m_VolumetricVolume;                                    // 属性参数组件

    RenderTargetIdentifier m_ColorAttachment;                             // 渲染输入的原图
    RenderTargetHandle m_TemporaryColorTexture01;                         // 临时渲染结果(临时RT)

    public void Setup(RenderTargetIdentifier _ColorAttachment, Material material)
    {

        this.m_ColorAttachment = _ColorAttachment;                               // 初始化输入纹理
        m_Material = material;                                                   // 初始化材质
    }
    public override void Execute(ScriptableRenderContext context, ref RenderingData renderingData)
    {

        var stack = VolumeManager.instance.stack;                                              // 获取所有继承Volume框架的脚本。
        m_VolumetricVolume = stack.GetComponent<VolumetricVolume>();                             // 查找对应的属性参数组件
        var cmd = CommandBufferPool.Get(CommandBufferTag);                                     // 从命令缓冲区池中获取一个带标签的命令缓冲区,该标签名可以在后续帧调试器中见到

        Render(cmd, ref renderingData);                                                          // 调用渲染函数

        context.ExecuteCommandBuffer(cmd);                                                       // 执行命令缓冲区
        CommandBufferPool.Release(cmd);                                                          // 释放缓存区
        cmd.ReleaseTemporaryRT(m_TemporaryColorTexture01.id);                                    // 输出临时RT
    }

    void Render(CommandBuffer cmd, ref RenderingData renderingData)
    {

        // 判断组件是否开启,且非Scene视图摄像机    因为如果不开启非Scene视图 场景也会爆。
        if(m_VolumetricVolume.IsActive() && !renderingData.cameraData.isSceneViewCamera)
        {

            RenderTargetIdentifier source = renderingData.cameraData.renderer.cameraColorTarget;
            RenderTextureDescriptor inRTDesc = renderingData.cameraData.cameraTargetDescriptor;
            inRTDesc.depthBufferBits = 0;

            SetMatData();

            int destination = Shader.PropertyToID("Temp1");
            int BlurRT = Shader.PropertyToID("Temp2");

            //cmd.SetGlobalTexture(BlurRT, source);
            cmd.GetTemporaryRT(destination, inRTDesc.width, inRTDesc.height, 0, FilterMode.Bilinear, RenderTextureFormat.DefaultHDR);
            cmd.GetTemporaryRT(BlurRT, inRTDesc.width, inRTDesc.height, 0, FilterMode.Bilinear, RenderTextureFormat.DefaultHDR);


            cmd.Blit(source, destination, m_Material, 0);
            // 写入参数 获取Shader的数据和Vol组件的绑定
            //cmd.Blit(destination, source, m_Material, 0);
            for (int i = 0; i < m_VolumetricVolume.loop.value; i++)
            {
                cmd.Blit(destination, BlurRT, m_Material, 1);
                cmd.Blit(BlurRT, destination);
            }

            cmd.SetGlobalTexture("_FinalTex", source);
            cmd.Blit(destination, BlurRT, m_Material, 2);
            cmd.Blit(BlurRT, source);

            cmd.ReleaseTemporaryRT(destination);
            cmd.ReleaseTemporaryRT(BlurRT);
        }
    }


    private void SetMatData()
    {
            m_Material.SetInt("_MaxStep", m_VolumetricVolume.maxStep.value);               //
            m_Material.SetFloat("_MaxDistance", m_VolumetricVolume.maxDistance.value);
            m_Material.SetFloat("_LightIntensity", m_VolumetricVolume.lightIntensity.value);
            m_Material.SetFloat("_StepSize", m_VolumetricVolume.stepSize.value);
            m_Material.SetColor("_Color", m_VolumetricVolume.ColorChange.value);

    }
}
问题:但是我们的边缘也模糊了,亮色颜色多出来了,
双边滤波
我们换一种模糊方式,这里使用双边滤波的方法,”保留了图像的边缘信息。
扩展 双边滤波和 高斯模糊有什么区别吗?
双边滤波是一种图像处理技术,它可以在保留边缘信息的同时,对图像进行平滑处理。它的基本思路是同时考虑将要被滤波的像素点的空域信息(domain)和值域信息(range)。因此是一种 combined 滤波方式,因此叫做 bilateral ,即同时考虑两方面的信息
在双边滤波中,两个要素即:closeness 和 similarity ,或者说 domain 和 range ,
其数学表达方式相近。其中积分号前面为归一化因子,这里考虑对所有的像素点进行加权,c 和 s 是 closeness 和 similarity 函数,x 代表要求的点,f (x) 代表该点的像素值。 f (x) –> h (x) 为滤波前后的image。我们最后的滤波函数为:

双边滤波算法介绍与实现_自适应双边滤波-CSDN博客
Unity Shader 实现磨皮效果_unity 给相机 双边滤波-CSDN博客
简单理解就是 双边滤波不处理边缘信息,只是模糊物体内部的部分。
这里我们在Shader中增加双边滤波的算法,具体公式计算查看参考资料。
我们只需要知道
_KernelSize表示核大小。在这段代码中,它用于控制双边模糊的范围.
_Space_Sigma表示空域高斯函数
_Range_Sigma值域高斯函数的标准差
在双边模糊中,空域高斯函数和值域高斯函数都是用于计算像素点之间的权重,
其中空域高斯函数用于计算像素点之间的空间距离,值域高斯函数用于计算像素点之间的颜色差异。
标准差越大,表示像素点之间的差异越大,计算出来的权重也就越小,从而降低了双边模糊的程度。
反之,标准差越小,双边模糊的程度就越大。
代码
half3 BilateralBlur(float2 uv, float space_sigma, float range_sigma){
                float weight_sum = 0;
                float3 color_sum = 0;


                float3 color_origin = SAMPLE_TEXTURE2D(_MainTex, sampler_MainTex, uv).rgb;   //  获取原始颜色
                float3 color = 0;

                // (i,j,k,l)
                for(int i = -_KernelSize; i < _KernelSize; i++){
                    for(int j = -_KernelSize; j < _KernelSize; j++){
                        //空域高斯
                        float2 varible = uv + float2(i * _MainTex_TexelSize.x, j * _MainTex_TexelSize.y);
                        float space_factor = i * i + j * j;
                        space_factor = (-space_factor) / (2 * space_sigma * space_sigma);
                        float space_weight = 1/(space_sigma * space_sigma * 2 * PI) * exp(space_factor);     // 空域权重space_weight

                        //值域高斯
                        float3 color_neighbor = SAMPLE_TEXTURE2D(_MainTex, sampler_MainTex, varible).rgb;
                        float3 color_distance = (color_neighbor - color_origin);
                        float value_factor = color_distance.r * color_distance.r ;
                        value_factor = (-value_factor) / (2 * range_sigma * range_sigma);
                        float value_weight = (1 / (2 * PI * range_sigma)) * exp(value_factor);              // 值域权重value_weight

                        weight_sum += space_weight * value_weight;                                          // 像素点的空域权重的 总和
                        color_sum += color_neighbor * space_weight * value_weight;                          // 计算所有像素点的加权颜色总和
                    }
                }

                if(weight_sum > 0){                                                                         // 判断   加权颜色总和/权重总和 = 双边模糊后的颜色值
                    color = color_sum / weight_sum;
                }

                return color;
}下面是这个Pass 中的全代码
// 双边滤波

        Pass
        {

			Name "Example"
			Tags { "LightMode"="UniversalForward" }


            HLSLPROGRAM
            #pragma vertex vert
            #pragma fragment frag


            half3 BilateralBlur(float2 uv, float space_sigma, float range_sigma){
                float weight_sum = 0;
                float3 color_sum = 0;


                float3 color_origin = SAMPLE_TEXTURE2D(_MainTex, sampler_MainTex, uv).rgb;   //  获取原始颜色
                float3 color = 0;

                // (i,j,k,l)
                for(int i = -_KernelSize; i < _KernelSize; i++){
                    for(int j = -_KernelSize; j < _KernelSize; j++){
                        //空域高斯
                        float2 varible = uv + float2(i * _MainTex_TexelSize.x, j * _MainTex_TexelSize.y);
                        float space_factor = i * i + j * j;
                        space_factor = (-space_factor) / (2 * space_sigma * space_sigma);
                        float space_weight = 1/(space_sigma * space_sigma * 2 * PI) * exp(space_factor);     // 空域权重space_weight

                        //值域高斯
                        float3 color_neighbor = SAMPLE_TEXTURE2D(_MainTex, sampler_MainTex, varible).rgb;
                        float3 color_distance = (color_neighbor - color_origin);
                        float value_factor = color_distance.r * color_distance.r ;
                        value_factor = (-value_factor) / (2 * range_sigma * range_sigma);
                        float value_weight = (1 / (2 * PI * range_sigma)) * exp(value_factor);              // 值域权重value_weight

                        weight_sum += space_weight * value_weight;                                          // 像素点的空域权重的 总和
                        color_sum += color_neighbor * space_weight * value_weight;                          // 计算所有像素点的加权颜色总和
                    }
                }

                if(weight_sum > 0){                                                                         // 判断   加权颜色总和/权重总和 = 双边模糊后的颜色值
                    color = color_sum / weight_sum;
                }

                return color;
            }


            v2f vert (appdata v)
            {
                v2f o;
                VertexPositionInputs  PositionInputs = GetVertexPositionInputs(v.positionOS.xyz);
                o.positionCS = PositionInputs.positionCS;
                o.uv = v.texcoord;

                return o;
            }


            half4 frag (v2f i) : SV_Target
            {
                half3 color = 0;
                color = BilateralBlur(i.uv, _Space_Sigma, _Range_Sigma);
                return half4(color, 1);
            }

            ENDHLSL
}注意: 增加 _MainTex_TexelSize 变量属性
RendererFeature
在RendererFeature 中我们增加 变量和 调整Pass
在Set MatData 增加属性
private void SetMatData()
    {
            m_Material.SetInt("_MaxStep", m_VolumetricVolume.maxStep.value);               //
            m_Material.SetFloat("_MaxDistance", m_VolumetricVolume.maxDistance.value);
            m_Material.SetFloat("_LightIntensity", m_VolumetricVolume.lightIntensity.value);
            m_Material.SetFloat("_StepSize", m_VolumetricVolume.stepSize.value);
            m_Material.SetColor("_Color", m_VolumetricVolume.ColorChange.value);
            m_Material.SetFloat("_BlurInt", m_VolumetricVolume.BlurInt.value);
            m_Material.SetFloat("_Brightness", m_VolumetricVolume.Brightness.value);


            m_Material.SetFloat("_Space_Sigma", m_VolumetricVolume.Space_S.value);
            m_Material.SetFloat("_Range_Sigma", m_VolumetricVolume.Space_R.value);
            m_Material.SetFloat("_KernelSize", m_VolumetricVolume.KernelSize.value);

    }
在Render 中 增加属性
for (int i = 0; i < m_VolumetricVolume.loop.value; i++)
            {
                cmd.Blit(destination, BlurRT, m_Material, 2);
                cmd.Blit(BlurRT, destination);
            }

            cmd.SetGlobalTexture("_FinalTex", source);
            cmd.Blit(destination, BlurRT, m_Material, 3);
            cmd.Blit(BlurRT, source);
效果
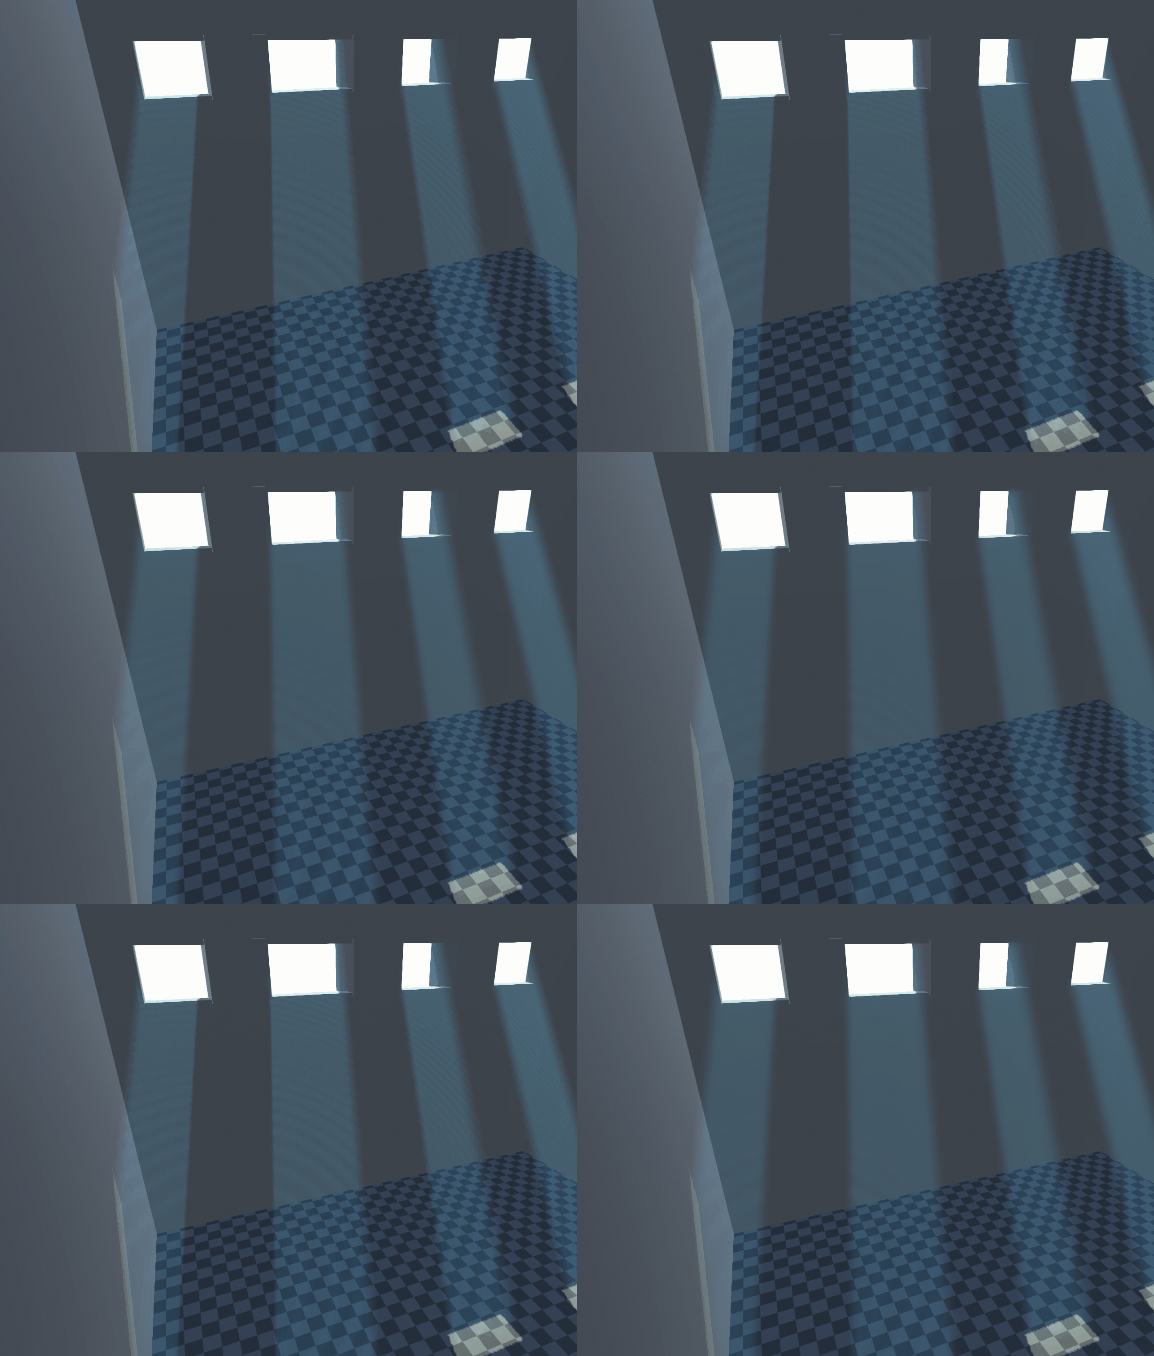
我们看到,亮色部分的边缘没有颜色溢出来。完成。
全代码
Shader
Shader "Hidden/VolumetricShader"
{
    Properties
    {
        _MainTex ("Texture", 2D) = "white" {}
        _Color ("_Color", color) = (1,1,1,1)
        _MaxStep ("_MaxStep",float) = 200      //设置最大步数
        _MaxDistance ("_MaxDistance",float) = 1000   //最大步进距离
        _LightIntensity ("_LightIntensity",float) = 0.01 //每次步进叠加的光照强度
        _StepSize ("_StepSize" , float) = 0.1	 //每次步进距离
    }
    SubShader
    {
        Tags { "RenderType"="Opaque" "RenderPipeline"="UniversalPipeline"}
        ZWrite Off
		ZTest Always
		Cull Off


        HLSLINCLUDE

        #include "Packages/com.unity.render-pipelines.universal/ShaderLibrary/Core.hlsl"
        #include "Packages/com.unity.render-pipelines.universal/ShaderLibrary/Lighting.hlsl"


        CBUFFER_START(UnityPerMaterial)
        float4 _MainTex_ST, _MainTex_TexelSize;
        float4 _Color;
        half _Brightness;
        float _MaxDistance;
        float _MaxStep;
        float _StepSize;
        float _LightIntensity;

        float _BlurInt;

        float _KernelSize;
        float _Space_Sigma, _Range_Sigma;
        CBUFFER_END

            struct appdata
            {
                float4 positionOS : POSITION;
                float2 texcoord : TEXCOORD0;
            };

            struct v2f
            {
                float2 uv : TEXCOORD0;
                float4 positionCS : SV_POSITION;
            };

            TEXTURE2D(_MainTex);                          SAMPLER(sampler_MainTex);
            TEXTURE2D(_FinalTex);                         SAMPLER(sampler_FinalTex);
            TEXTURE2D(_CameraDepthTexture);               SAMPLER(sampler_CameraDepthTexture);

        ENDHLSL

        // 体积光
        Pass
        {
            HLSLPROGRAM
            #pragma vertex vert
            #pragma fragment frag


            // 接收阴影所需关键字
            #pragma multi_compile _ _MAIN_LIGHT_SHADOWS                    //接受阴影
            #pragma multi_compile _ _MAIN_LIGHT_SHADOWS_CASCADE            //产生阴影
            #pragma multi_compile _ _ADDITIONAL_LIGHTS_VERTEX _ADDITIONAL_LIGHTS
            #pragma multi_compile _ _SHADOWS_SOFT                         //软阴影


            // 输入 UV和深度
            float4 GetTheWorldPos(float2 ScreenUV, float Depth)
            {

                float3 ScreenPos = float3(ScreenUV, Depth);                                  // 获取屏幕空间位置
                float4 normalScreenPos = float4(ScreenPos * 2.0 - 1.0, 1.0);                 // 映射到屏幕中心点
                float4 ndcPos = mul(unity_CameraInvProjection, normalScreenPos);             // 计算到ndc空间下的位置
                ndcPos = float4(ndcPos.xyz / ndcPos.w, 1.0);

                float4 sencePos = mul(unity_CameraToWorld, ndcPos * float4(1,1,-1,1));      // 反推世界空间位置
                sencePos = float4(sencePos.xyz, 1.0);
                return sencePos;
            }
            // 阴影函数
            float Getshadow(float3 posWorld)
            {
                float4 shadowCoord = TransformWorldToShadowCoord(posWorld);                  // 获取阴影坐标
                float shadow = MainLightRealtimeShadow(shadowCoord);

                return shadow;
            }

            v2f vert (appdata v)
            {
                v2f o;
                VertexPositionInputs  PositionInputs = GetVertexPositionInputs(v.positionOS.xyz);
                o.positionCS = PositionInputs.positionCS;
                o.uv = TRANSFORM_TEX(v.texcoord, _MainTex);

                return o;
            }


            half4 frag (v2f i) : SV_Target
            {

                float2 uv = i.uv;
                float depth = SAMPLE_TEXTURE2D(_CameraDepthTexture, sampler_CameraDepthTexture, uv).r;
                depth = 1 - depth;   // 得到深度值


                float3 ro = _WorldSpaceCameraPos.xyz;                    // 相机在世界空间中的位置
                float3 worldPos = GetTheWorldPos(uv, depth).xyz;         // 屏幕纹理坐标和深度值重构出当前像素在世界空间中的位置


                //return float4(worldPos,1);
                //定义光线起始点 到 摄像机,
                float3 rd = normalize(worldPos - ro);     // 像素位置 到  摄像机位置
                float3 currentPos = ro;                   //  初始化一个 摄像机位置

                //
                float m_length = min(length(worldPos - ro), _MaxDistance);      // 使用 length 函数计算出当前像素到相机之间的距离


                float delta = _StepSize;       // 步长大小  控制每次迭代的步长
                float totalInt = 0;
                float d = 0;


                // 光线进步计算
                for(int j = 0; j < _MaxStep; j++)
                {
                    d += delta;
                    if(d > m_length) break;   // 判断距离大于设定的距离 不在生成
                    currentPos += delta * rd;               // 根据步长 delta 和方向向量 rd 计算出当前像素的位置 currentPos
                    totalInt += _LightIntensity * Getshadow(currentPos);   // 然后使用 Getshadow 函数计算出当前像素位置的阴影值
                }


                Light mylight = GetMainLight();                                //获取场景主光源
                half4 LightColor = half4(mylight.color,1);                     //获取主光源的颜色

                half3 lightCol = totalInt * LightColor * _Color.rgb * _Color.a;
                half3 oCol = SAMPLE_TEXTURE2D(_MainTex, sampler_MainTex, uv).rgb;
                half3 dCol = lightCol + oCol;                  //原图和 计算后的图叠加


                return float4(lightCol, 1);
                //return m_length;
                //return float4(dCol, 1);
            }
            ENDHLSL
        }

        // 高斯模糊
        Pass
        {

            HLSLPROGRAM
            #pragma vertex vert
            #pragma fragment frag

            v2f vert (appdata v)
            {
                v2f o;
                VertexPositionInputs  PositionInputs = GetVertexPositionInputs(v.positionOS.xyz);
                o.positionCS = PositionInputs.positionCS;
                o.uv = v.texcoord;

                return o;
            }


            half4 frag (v2f i) : SV_Target
            {

                float4 col = float4(0, 0, 0, 0);

                float blurrange = _BlurInt / 300;

                col += SAMPLE_TEXTURE2D(_MainTex, sampler_MainTex, i.uv + float2(0.0, 0.0)) * 0.147716f;
                col += SAMPLE_TEXTURE2D(_MainTex, sampler_MainTex, i.uv + float2(blurrange, 0.0)) * 0.118318f;
                col += SAMPLE_TEXTURE2D(_MainTex, sampler_MainTex, i.uv + float2(0.0, -blurrange)) * 0.118318f;
                col += SAMPLE_TEXTURE2D(_MainTex, sampler_MainTex, i.uv + float2(0.0, blurrange)) * 0.118318f;
                col += SAMPLE_TEXTURE2D(_MainTex, sampler_MainTex, i.uv + float2(-blurrange, 0.0)) * 0.118318f;

                col += SAMPLE_TEXTURE2D(_MainTex, sampler_MainTex, i.uv + float2(blurrange, blurrange)) * 0.0947416f;
                col += SAMPLE_TEXTURE2D(_MainTex, sampler_MainTex, i.uv + float2(-blurrange, -blurrange)) * 0.0947416f;
                col += SAMPLE_TEXTURE2D(_MainTex, sampler_MainTex, i.uv + float2(blurrange, -blurrange)) * 0.0947416f;
                col += SAMPLE_TEXTURE2D(_MainTex, sampler_MainTex, i.uv + float2(-blurrange, blurrange)) * 0.0947416f;

                return col;

            }

            ENDHLSL
        }

        // 双边滤波

        Pass
        {

			Name "Example"
			Tags { "LightMode"="UniversalForward" }


            HLSLPROGRAM
            #pragma vertex vert
            #pragma fragment frag


            half3 BilateralBlur(float2 uv, float space_sigma, float range_sigma){
                float weight_sum = 0;
                float3 color_sum = 0;


                float3 color_origin = SAMPLE_TEXTURE2D(_MainTex, sampler_MainTex, uv).rgb;   //  获取原始颜色
                float3 color = 0;

                // (i,j,k,l)
                for(int i = -_KernelSize; i < _KernelSize; i++){
                    for(int j = -_KernelSize; j < _KernelSize; j++){
                        //空域高斯
                        float2 varible = uv + float2(i * _MainTex_TexelSize.x, j * _MainTex_TexelSize.y);
                        float space_factor = i * i + j * j;
                        space_factor = (-space_factor) / (2 * space_sigma * space_sigma);
                        float space_weight = 1/(space_sigma * space_sigma * 2 * PI) * exp(space_factor);     // 空域权重space_weight

                        //值域高斯
                        float3 color_neighbor = SAMPLE_TEXTURE2D(_MainTex, sampler_MainTex, varible).rgb;
                        float3 color_distance = (color_neighbor - color_origin);
                        float value_factor = color_distance.r * color_distance.r ;
                        value_factor = (-value_factor) / (2 * range_sigma * range_sigma);
                        float value_weight = (1 / (2 * PI * range_sigma)) * exp(value_factor);              // 值域权重value_weight

                        weight_sum += space_weight * value_weight;                                          // 像素点的空域权重的 总和
                        color_sum += color_neighbor * space_weight * value_weight;                          // 计算所有像素点的加权颜色总和
                    }
                }

                if(weight_sum > 0){                                                                         // 判断   加权颜色总和/权重总和 = 双边模糊后的颜色值
                    color = color_sum / weight_sum;
                }

                return color;
            }


            v2f vert (appdata v)
            {
                v2f o;
                VertexPositionInputs  PositionInputs = GetVertexPositionInputs(v.positionOS.xyz);
                o.positionCS = PositionInputs.positionCS;
                o.uv = v.texcoord;

                return o;
            }


            half4 frag (v2f i) : SV_Target
            {
                half3 color = 0;
                color = BilateralBlur(i.uv, _Space_Sigma, _Range_Sigma);
                return half4(color, 1);
            }

            ENDHLSL
        }

        // 合并两个图像
        Pass
        {

            HLSLPROGRAM
            #pragma vertex vert
            #pragma fragment frag

            v2f vert (appdata v)
            {
                v2f o;
                VertexPositionInputs  PositionInputs = GetVertexPositionInputs(v.positionOS.xyz);
                o.positionCS = PositionInputs.positionCS;
                o.uv = v.texcoord;

                return o;
            }

            half4 frag (v2f i) : SV_Target
            {

                half3 oCol = SAMPLE_TEXTURE2D(_MainTex, sampler_MainTex, i.uv).rgb;
                half3 lCol = SAMPLE_TEXTURE2D(_FinalTex, sampler_FinalTex, i.uv).rgb;

                half3 dCol = lCol + oCol;                  //原图和 计算后的图叠加


                return float4(dCol,1);
            }
            ENDHLSL

        }

        //

    }

}
Volume
using UnityEngine;
using UnityEngine.Rendering;
using UnityEngine.Rendering.Universal;

[System.Serializable,]
public sealed class VolumetricVolume : VolumeComponent, IPostProcessComponent
{
    [Tooltip("是否开启效果")]
    public BoolParameter VolumeLight = new BoolParameter(true);

    public ColorParameter ColorChange = new ColorParameter(Color.white, true);
    [Range(0, 3)]
	public ClampedFloatParameter lightIntensity = new ClampedFloatParameter(0.05f, 0f, 0.1f);       // 体积光确定
    public ClampedFloatParameter stepSize = new ClampedFloatParameter(0.1f, 0.1f, 0.5f);                                      // 步长大小
    public FloatParameter maxDistance = new FloatParameter(1000);                                   // 最大渲染距离
    public IntParameter maxStep = new IntParameter(200);                                            // 最大迭代次数

    public ClampedIntParameter loop = new ClampedIntParameter(3, 1, 10);

    // 这里是高斯模糊的属性
    public ClampedFloatParameter BlurInt = new ClampedFloatParameter(0.3f, 0.0f, 1f);
    public ClampedFloatParameter Brightness = new ClampedFloatParameter(0.3f, 0.0f, 10f);

    // 这里是 双边滤波的属性
    public ClampedFloatParameter Space_S = new ClampedFloatParameter(0.3f, 0.1f, 5f);
    public ClampedFloatParameter Space_R = new ClampedFloatParameter(0.3f, 0.1f, 5f);
    public ClampedFloatParameter KernelSize = new ClampedFloatParameter(0.5f, 0.1f, 30f);

    // 实现接口
    public bool IsActive() => VolumeLight == true;
    public bool IsTileCompatible() => false;
}
RendererFeature
using UnityEngine;
using UnityEngine.Rendering;
using UnityEngine.Rendering.Universal;

public class VolumLightFeature : ScriptableRendererFeature
{

    [System.Serializable]
    public class Settings
    {
        public RenderPassEvent renderPassEvent = RenderPassEvent.AfterRenderingTransparents;   // 渲染层级 = 透明物体渲染后
        public Shader shader;
    }
    public Settings settings = new Settings();

    VolumeLightingPass volumelightingPass;

    public override void Create()
    {
        this.name = "VolumLight";                                                                  // 外部显示的名字
        volumelightingPass = new VolumeLightingPass(RenderPassEvent.AfterRenderingTransparents, settings.shader);
    }
    public override void AddRenderPasses(ScriptableRenderer renderer, ref RenderingData renderingData)
    {
        renderer.EnqueuePass(volumelightingPass);
    }
}

public class VolumeLightingPass : ScriptableRenderPass
{

    const string CommandBufferTag = "AdditionalPostProcessing Pass";      // 标签名字

    public Material m_Material;                                           // 后处理材质
    VolumetricVolume m_VolumetricVolume;                                    // 属性参数组件


    public VolumeLightingPass(RenderPassEvent evt, Shader volLightingshader)
    {
        renderPassEvent = evt;
        var shader = volLightingshader;

        if (shader == null)
        {
            Debug.LogError("没有Shader");
            return;
        }
        m_Material = CoreUtils.CreateEngineMaterial(volLightingshader);
    }


    public override void Execute(ScriptableRenderContext context, ref RenderingData renderingData)
    {
        if (m_Material == null)
        {
            return;
        }

        if (!renderingData.cameraData.postProcessEnabled)
        {
            return;
        }

        var stack = VolumeManager.instance.stack;                                              // 获取所有继承Volume框架的脚本。
        m_VolumetricVolume = stack.GetComponent<VolumetricVolume>();                             // 查找对应的属性参数组件
        var cmd = CommandBufferPool.Get(CommandBufferTag);                                     // 从命令缓冲区池中获取一个带标签的命令缓冲区,该标签名可以在后续帧调试器中见到

        Render(cmd, ref renderingData);                                                          // 调用渲染函数

        context.ExecuteCommandBuffer(cmd);                                                       // 执行命令缓冲区
        CommandBufferPool.Release(cmd);                                                          // 释放缓存区
    }

    void Render(CommandBuffer cmd, ref RenderingData renderingData)
    {

        // 判断组件是否开启,且非Scene视图摄像机    因为如果不开启非Scene视图 场景也会爆。
        if(m_VolumetricVolume.IsActive() && !renderingData.cameraData.isSceneViewCamera)
        {

            RenderTargetIdentifier source = renderingData.cameraData.renderer.cameraColorTarget;
            RenderTextureDescriptor inRTDesc = renderingData.cameraData.cameraTargetDescriptor;
            inRTDesc.depthBufferBits = 0;

            SetMatData();

            int destination = Shader.PropertyToID("Temp1");
            int BlurRT = Shader.PropertyToID("Temp2");

            //cmd.SetGlobalTexture(BlurRT, source);
            cmd.GetTemporaryRT(destination, inRTDesc.width, inRTDesc.height, 0, FilterMode.Bilinear, RenderTextureFormat.DefaultHDR);
            cmd.GetTemporaryRT(BlurRT, inRTDesc.width, inRTDesc.height, 0, FilterMode.Bilinear, RenderTextureFormat.DefaultHDR);


            cmd.Blit(source, destination, m_Material, 0);
            //cmd.Blit(destination, source, m_Material, 0);


            for (int i = 0; i < m_VolumetricVolume.loop.value; i++)
            {
                cmd.Blit(destination, BlurRT, m_Material, 2);
                cmd.Blit(BlurRT, destination);
            }

            cmd.SetGlobalTexture("_FinalTex", source);
            cmd.Blit(destination, BlurRT, m_Material, 3);
            cmd.Blit(BlurRT, source);

            cmd.ReleaseTemporaryRT(destination);
            cmd.ReleaseTemporaryRT(BlurRT);
        }
    }


    private void SetMatData()
    {
            m_Material.SetInt("_MaxStep", m_VolumetricVolume.maxStep.value);               //
            m_Material.SetFloat("_MaxDistance", m_VolumetricVolume.maxDistance.value);
            m_Material.SetFloat("_LightIntensity", m_VolumetricVolume.lightIntensity.value);
            m_Material.SetFloat("_StepSize", m_VolumetricVolume.stepSize.value);
            m_Material.SetColor("_Color", m_VolumetricVolume.ColorChange.value);
            m_Material.SetFloat("_BlurInt", m_VolumetricVolume.BlurInt.value);
            m_Material.SetFloat("_Brightness", m_VolumetricVolume.Brightness.value);


            m_Material.SetFloat("_Space_Sigma", m_VolumetricVolume.Space_S.value);
            m_Material.SetFloat("_Range_Sigma", m_VolumetricVolume.Space_R.value);
            m_Material.SetFloat("_KernelSize", m_VolumetricVolume.KernelSize.value);

    }
}
总结
实现体积光的方法主要是使用光线进步方法, 由我们的摄像机朝屏幕渲染的每一个像素发射一条射线,根据深度判断这个像素是否在阴影中,如果不在阴影中就向光源的方向进行 ray-marching 计算光的强度,这些不在阴影中就是我们的体积光。
具体属性
VolumeLight 否启用体积光效果
ColorChange 体积光的颜色, alpha 也可以控制体积光的强度
lightIntensity 体积光的强度
stepSize 体积光的步长大小
maxDistance 体积光最大的渲染距离
maxStep 体积光最大的迭代次数
所以在增大 体积光的步长时候我们看到有类型圆形的一个扩散效果。
体积光步长增大,
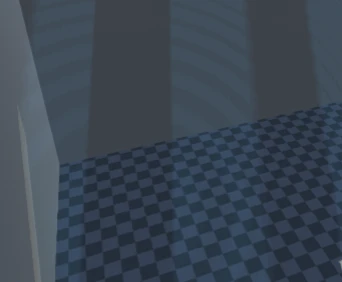
2. 模糊的使用,因为我们想降低步长,所会出现类似上面的效果,那我们就需要使用模糊进行,
这里第一种使用的高斯模糊,会把整个屏幕的像素进行修改,这不是我们想要的效果。
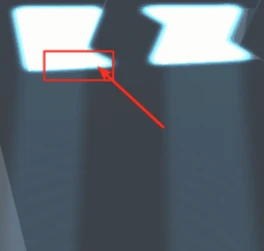
然后这里使用双边滤波(滤镜)的方法,这里补充了模糊的实现方法,双边滤波可以保留边缘的信息同时模糊物体信息。
3. 双边滤波(滤镜)主要用于平滑图像并保留图像的边缘信息。
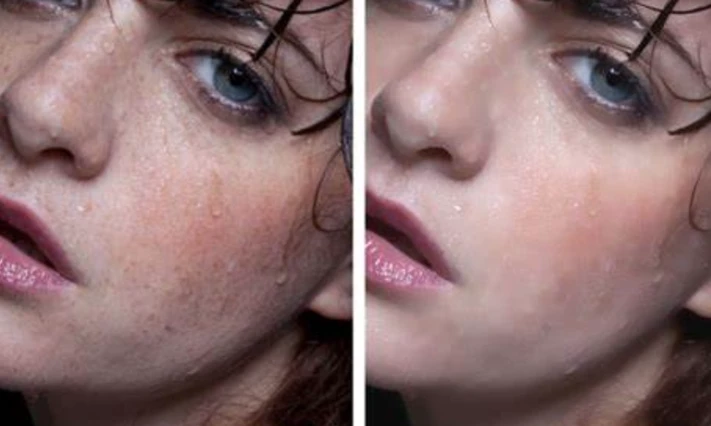
在双边滤波中,每个像素点的新值是由它周围的像素点加权平均得到的。
双边滤波的核函数是空间域核与像素范围域核的综合结果:在图像的平坦区域,像素值变化很小,对应的像素范围域权重接近于1,此时空间域权重起主要作用,相当于进行高斯模糊;在图像的边缘区域,像素值变化很大,像素范围域权重变大,从而保持了边缘的信息。
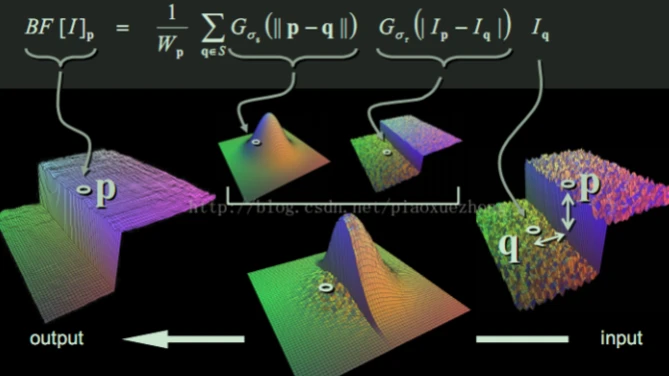
权重由两个部分组成:空间权重和值域权重。
空间权重表示像素之间的空间距离,距离越远,权重越小;
值域权重表示像素之间的灰度差异,差异越大,权重越小。这样做可以保留图像中的边缘信息,因为边缘处的像素值变化剧烈,值域权重会比较小,从而保留了边缘处的细节信息。
优点:
是可以平滑图像并保留细节信息,同时对噪声有一定的抑制作用。
缺点
是算法复杂度较高,计算量大,对于大尺寸的图像,可能需要较长的处理时间。
单独定义一个Sahder,查看图像之间的变化。
Shader
Shader "Hidden/VShader"
{
    Properties
    {
        _MainTex ("Texture", 2D) = "white" {}
        _Space_Sigma ("Space Sigma", Range(0.1,5)) = 1         // 空域高斯函数
        _Range_Sigma("Range Sigma", Range(0.1,5)) = 2

        _KernelSize("Kernel Size", Range(0.5,10)) = 2    // 双边模糊的范围

    }
    SubShader
    {
        Tags { "RenderType"="Opaque" "RenderPipeline"="UniversalPipeline"}
        LOD 100

        HLSLINCLUDE

        #include "Packages/com.unity.render-pipelines.universal/ShaderLibrary/Core.hlsl"

        CBUFFER_START(UnityPerMaterial)
        float4 _MainTex_ST;
        float4 _MainTex_TexelSize;
        float _KernelSize;
        float _Space_Sigma;
        float _Range_Sigma;
        CBUFFER_END

            struct appdata
            {
                float4 positionOS : POSITION;
                float2 texcoord : TEXCOORD0;
            };

            struct v2f
            {
                float2 uv : TEXCOORD0;
                float4 positionCS : SV_POSITION;
            };

            TEXTURE2D(_MainTex);                          SAMPLER(sampler_MainTex);
        ENDHLSL


        Pass
        {


            HLSLPROGRAM
            #pragma vertex vert
            #pragma fragment frag


            half3 BilateralBlur(float2 uv, float space_sigma, float range_sigma){
                float weight_sum = 0;
                float3 color_sum = 0;


                float3 color_origin = SAMPLE_TEXTURE2D(_MainTex, sampler_MainTex, uv).rgb;   //  获取原始颜色
                float3 color = 0;

                // (i,j,k,l)
                for(int i = -_KernelSize; i < _KernelSize; i++){
                    for(int j = -_KernelSize; j < _KernelSize; j++){
                        //空域高斯
                        float2 varible = uv + float2(i * _MainTex_TexelSize.x, j * _MainTex_TexelSize.y);
                        float space_factor = i * i + j * j;
                        space_factor = (-space_factor) / (2 * space_sigma * space_sigma);
                        float space_weight = 1/(space_sigma * space_sigma * 2 * PI) * exp(space_factor);     // 空域权重space_weight

                        //值域高斯
                        float3 color_neighbor = SAMPLE_TEXTURE2D(_MainTex, sampler_MainTex, varible).rgb;
                        float3 color_distance = (color_neighbor - color_origin);
                        float value_factor = color_distance.r * color_distance.r ;
                        value_factor = (-value_factor) / (2 * range_sigma * range_sigma);
                        float value_weight = (1 / (2 * PI * range_sigma)) * exp(value_factor);              // 值域权重value_weight

                        weight_sum += space_weight * value_weight;                                          // 像素点的空域权重的 总和
                        color_sum += color_neighbor * space_weight * value_weight;                          // 计算所有像素点的加权颜色总和
                    }
                }

                if(weight_sum > 0){                                                                         // 判断   加权颜色总和/权重总和 = 双边模糊后的颜色值
                    color = color_sum / weight_sum;
                }

                return color;
            }


            v2f vert (appdata v)
            {
                v2f o;
                VertexPositionInputs  PositionInputs = GetVertexPositionInputs(v.positionOS.xyz);
                o.positionCS = PositionInputs.positionCS;
                o.uv = TRANSFORM_TEX(v.texcoord, _MainTex);

                return o;
            }


            half4 frag (v2f i) : SV_Target
            {
                float2 uv = i.uv;
                half3 color = 0;


                color = BilateralBlur(uv, _Space_Sigma, _Range_Sigma);
                return half4(color, 1);
            }
            ENDHLSL
        }
    }
}资料
Unity Shader学习:体积光(Volumetric Light) - 知乎 (zhihu.com)
URP简易光线步进体积光 - 知乎 (zhihu.com)
URP使用RendererFeature实现体积光 - 知乎 (zhihu.com)
Unity快速实现平行光体积光(URP) - syb7384 - 博客园 (cnblogs.com)
【UnityShader】双边滤波(Bilateral Filtering)(5.2) - 知乎 (zhihu.com)
Unity Shader-GodRay,体积光(BillBoard,Volume Shadow,Raidal Blur,Ray-Marching)_houdini体积光_puppet_master的博客-CSDN博客
在 Unity 中实现体积光渲染 - 知乎 (zhihu.com)
