

导语
2023-4-11
对于机器学习er配置环境一直是个头疼的事,尤其是在windows系统中。WSL可以实现在windows电脑上运行linux系统。
利用wsl 部署深度学习训练环境,无论是从便捷性上还是性能上均有优势。
博主浏览目前wsl配置深度学习环境的各种文章,采坑无数,终于完成了最详细的教程。
目前现在很多网上的教程都是老版本的,由于现在很多环境和软件的升级,很多不必要的操作就能直接省去!
这个教程就一个字:新!相比以往的老教程,无需走很多弯路!下面开始吧!
需要在WSL上玩深度学习,需要以下几个条件
win11,最好更新到最新版本
电脑上有显卡,Nvdia
安装显卡驱动及CUDA和CuDNN(第一章)
WSL 安装及 WLS2安装好Ubuntu20.04(本人之前试过22.04,有些版本不兼容的问题,无法跑通,时间多的同学可以尝试)(第二章)
在做好准备工作后,本文将介绍两种方法在WSL部署深度学习环境
Docker法(光速部署,不需要在WSL内安装任何驱动,方便迁移)(第三章)
wls2本地法(在WSL2直接安装CUDA)(第四章)
1、windows显卡环境及CUDA安装
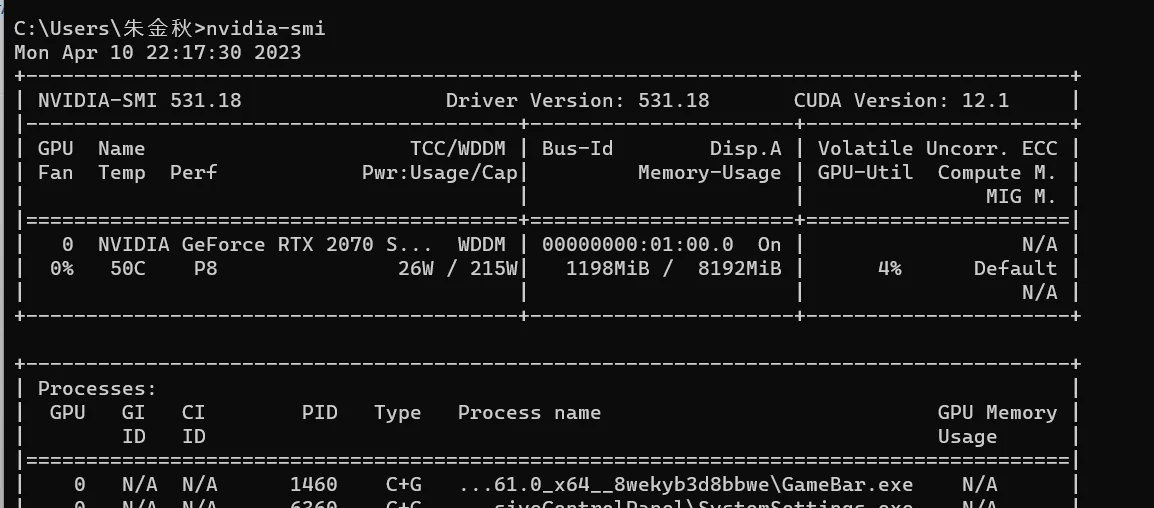
安装显卡驱动截止2023年,4月,全系显卡驱动已经指出GPU in Windows Subsystem for Linux (WSL) | NVIDIA Developer查看显卡驱动版本,及最大支持cuda版本,例如,如下图,本人最大支持12.1cuda
nvidia-smi
安装合适的cuda版本和CudnnCUDA Toolkit Archive | NVIDIA Developer
cuDNN Download | NVIDIA Developer
安装教程网上很多,推荐
(35条消息) CUDA与cuDNN安装教程(超详细)_kylinmin的博客-CSDN博客
2、WSL 安装Ubuntu
2.1 wsl安装
如果你的windows为11版本,那么安装wsl会非常方便,这里教程可以参考微软官方wsl。wsl有两个版本,wsl1和wsl2,具体安装过程见下。一般我们默认使用wsl2版本。
安装 WSL | Microsoft Learn
wsl的安装这里不介绍了,图太多。百度教程很多,这里就主要介绍下WSL安装Ubuntu。
以下步骤均在WSL2安装好的背景下镜像。
2.2 安装Ubuntu
查看发行版本,
wsl.exe --list --online
如果遇到以下错误
无法从“https://raw.githubusercontent.com/microsoft/WSL/master/distributions/DistributionInfo.json”中提取列表分发。无法解析服务器的名称或地址

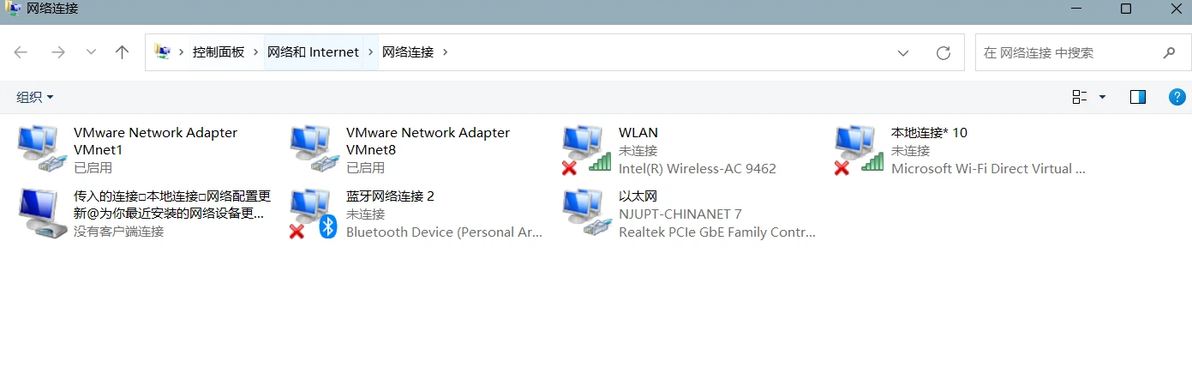
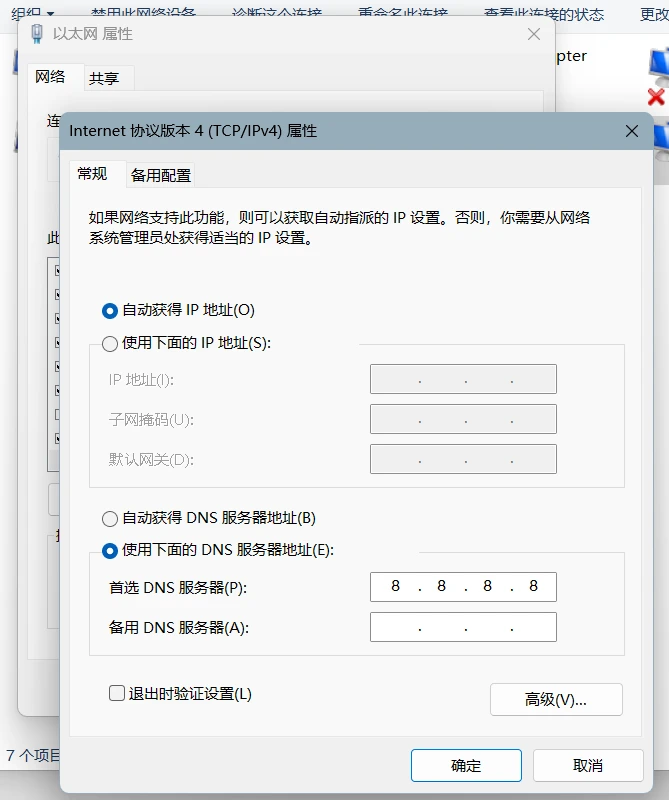
修改dns服务器
---,选择你连接的网络,右键属性,将ipv4 DNS设置为。
然后即可显示分装版本。
安装合适版本
建议选择20.04。22.04版本我试过,有不少坑点。
wsl --install -d Ubuntu-20.04
2.3 迁移至非系统盘
这一步主要是为了减少C盘的占用空间,默认WSL装 的linux子系统在C盘
docker-data默认安装在c盘,且设置中难以更改,因此采用如下操作。
1、shutdown 子系统
wsl --shutdown
2、导出Ubuntu
wsl --export Ubuntu-20.04 F:\Ubuntu\ubuntu.tar
3、注销docker-desktop和docker-desktop-data
wsl --unregister Ubuntu-20.04
4、导入
wsl --import Ubuntu-20.04 F:\Ubuntu\ F:\Ubuntu\ubuntu.tar --version 2
5、删除压缩包
del D:\docker-desktop-data\docker-desktop-data.tar del D:\docker-desktop-data\docker-desktop-data.tar
重新启动docker
2.4 更改镜像源
这一步主要是为了加速linux各种包的下载速度。
首先做一个备份,这里就把Ubuntu默认安装的镜像源备份,接着更改源
sudo cp /etc/apt/sources.list /etc/apt/sources.list.bak sudo vim /etc/apt/sources.list
##进入vim 清空所有文本,复制清华源进vim编辑器中
打开如下源进行更新。注意Ubuntu版本选择20.04
ubuntu | 镜像站使用帮助 | 清华大学开源软件镜像站 | Tsinghua Open Source Mirror

更新一下
sudo apt-get update sudo apt-get upgrade
一般情况下:
在win11版本wsl和最新版(2023.4)的NVIDIA驱动场景下,在WSL2内,通过已经可以穿透显示显卡信息。

3、wls-Docker运行深度学习环境
适用Linux Docker配置深度学习环境。该方法使用Docker直接部署深度学习环境,方便快捷,并且不影响子系统本地
3.1 docker desktop安装
Install Docker Desktop on Windows
在windows上安装docker-Desktop别选4.17.1版本!!!!该版本无法调用gpus all目前4.18.0已结修复该bug
设置1、镜像源将如下代码加入Docker Engine中

"registry-mirrors": [ "https://registry.docker-cn.com", "http://hub-mirror.c.163.com", "https://docker.mirrors.ustc.edu.cn" ],
2- 系统设置
打开两个按钮
---->--->
---->--->

测试是否安装成功,在wsl Ubuntu系统下输入,
docker run hello-world
3.2 wsl 切换docker数据存储位置
docker-data默认安装在c盘,占用很大空间,且设置中难以更改,因此采用如下操作。
1、shutdown docker
wsl --shutdown
2、导出docker-desktop和docker-desktop-data
wsl --export docker-desktop-data F:\wsl2\docker-desktop-data.tar wsl --export docker-desktop F:\wsl2\docker-desktop.tar
3、注销docker-desktop和docker-desktop-data
wsl --unregister docker-desktop-data wsl --unregister docker-desktop
4、导入
wsl --import docker-desktop-data F:\wsl2\docker-desktop-data F:\wsl2\docker-desktop-data.tar --version wsl --import docker-desktop F:\wsl2\docker-desktop F:\wsl2\docker-desktop.tar --version 2
5、删除压缩包
del F:\wsl2\docker-desktop-data.tar del F:\wsl2\docker-desktop-data.tar
重新启动docker
3.4 调用docker gpu
dock 官网给的条件已结满足,由于目前版本已结最新,可直接调用,无需安装其他内容。
Starting with Docker Desktop 3.1.0, Docker Desktop supports WSL 2 GPU Paravirtualization (GPU-PV) on NVIDIA GPUs. To enable WSL 2 GPU Paravirtualization, you need:
A machine with an NVIDIA GPU(有英伟达显卡)
The latest Windows Insider version from the Dev Preview ring(windows版本更细)
Beta drivers from NVIDIA supporting WSL 2 GPU Paravirtualization(最新显卡驱动即可)
Update WSL 2 Linux kernel to the latest version using wsl --update from an elevated command prompt(最新WSL版本)
Make sure the WSL 2 backend is enabled in Docker Desktop (Docker中设置WSL 2 backend勾选上)
运行如下代码测试
docker run --rm -it --gpus=all nvcr.io/nvidia/k8s/cuda-sample:nbody nbody -gpu -benchmark
如果得到,则说明安装成功。
Run "nbody -benchmark [-numbodies=<numBodies>]" to measure performance. -fullscreen (run n-body simulation in fullscreen mode) -fp64 (use double precision floating point values for simulation) -hostmem (stores simulation data in host memory) -benchmark (run benchmark to measure performance) -numbodies=<N> (number of bodies (>= 1) to run in simulation) -device=<d> (where d=0,1,2.... for the CUDA device to use) -numdevices=<i> (where i=(number of CUDA devices > 0) to use for simulation) -compare (compares simulation results running once on the default GPU and once on the CPU) -cpu (run n-body simulation on the CPU) -tipsy=<file.bin> (load a tipsy model file for simulation) > NOTE: The CUDA Samples are not meant for performance measurements. Results may vary when GPU Boost is enabled. > Windowed mode > Simulation data stored in video memory > Single precision floating point simulation > 1 Devices used for simulation MapSMtoCores for SM 7.5 is undefined. Default to use 64 Cores/SM GPU Device 0: "GeForce RTX 2060 with Max-Q Design" with compute capability 7.5 > Compute 7.5 CUDA device: [GeForce RTX 2060 with Max-Q Design] 30720 bodies, total time for 10 iterations: 69.280 ms = 136.219 billion interactions per second = 2724.379 single-precision GFLOP/s at 20 flops per interaction
设置支持 GPU 的映像可能需要一段时间。如果重复运行基于 GPU 的脚本,您可以使用 重复使用容器。
使用最新的 TensorFlow GPU 映像在容器中启动 shell 会话:
docker run --gpus all -it tensorflow/tensorflow:latest-gpu bash
测试是否gpu可用
>>> tf.config.list_physical_devices() [PhysicalDevice(name='/physical_device:CPU:0', device_type='CPU'), PhysicalDevice(name='/physical_device:GPU:0', device_type='GPU')]
3.5 自定义自己docker
出发点:
考虑到目前官方docker-hub中提供的imag并不能满足日常的开发包的需要,且如果容器丢失或删除,所有包的数据和项目文件均会丢失。因此,我们可以定制自己的image。并将container的项目文件映射到自己的本地文件目录中。
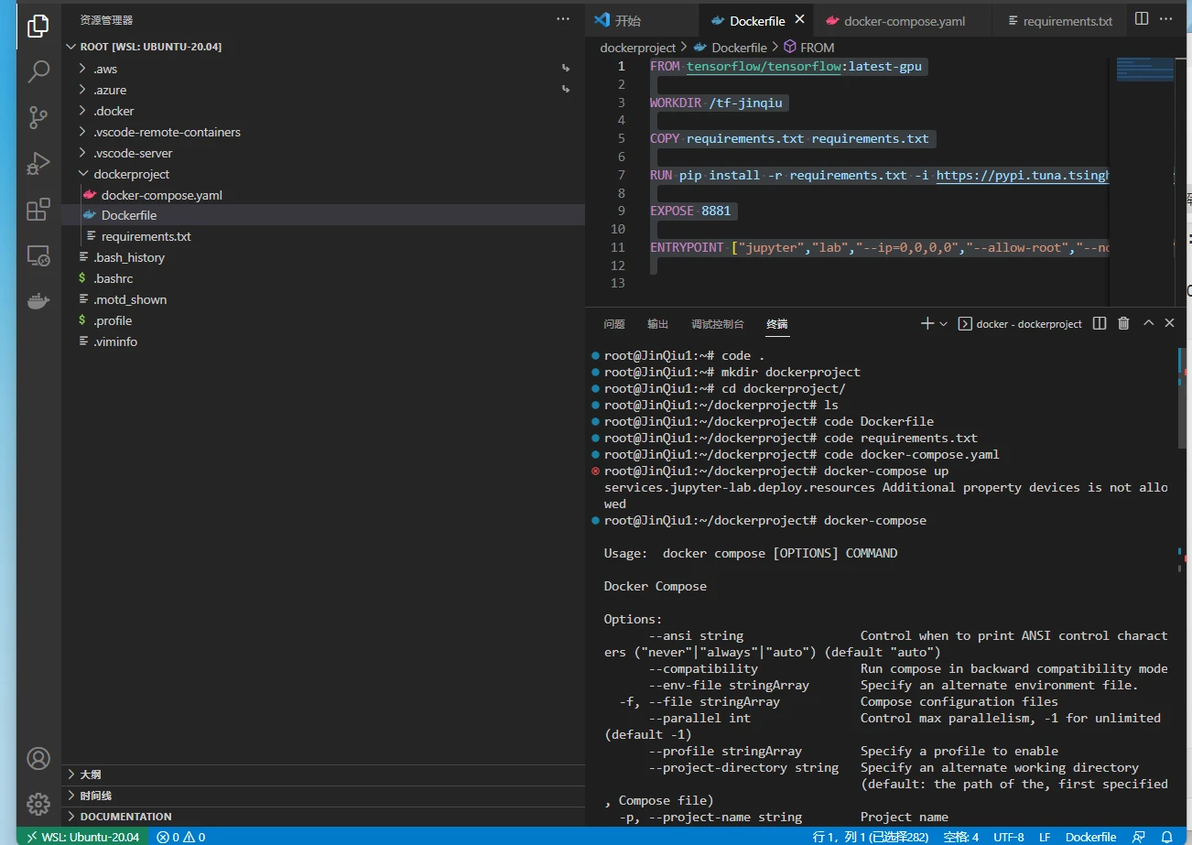
进入vscode,安装wsl 插件,连接wls,打开终端,如下图,当左下角绿色显式WSL:Ubutun...为连接成功
创建一个以后存docker镜像的目录
mkdir docker-deeplearning-project cd docker-deeplearning-project
3.5.1 自定义所需要安装的包
我们想要在 的基础上增加一些别的包,以满足日常需求,可以使用如下方法。
创建额外的requirments.txt
安装以下包,这些包可以随各位去配
torch那可以指定版本,在torch官网可以挑选
jupyterlab pandas matplotlib torch --index-url https://download.pytorch.org/whl/cu118 torchvision --index-url https://download.pytorch.org/whl/cu118 torchaudio --index-url https://download.pytorch.org/whlcu118
3.5.2 建立Dockerfile
code Dockerfile
Dockerfile输入一下代码:
FROM:拉取现有base image
WORKDIR:定制工作目录
COPY 拷贝本地目录的requirements.txt到当前dockerfile中,通过此去安装额外的requirments包,
RUN 运行安装程序,-i 指定镜像源
EXPOSE 开辟一定端口
ENTRYPOINT 定义入口点,通过列表构建命令
FROM tensorflow/tensorflow:latest-gpu WORKDIR /tf-jinqiu COPY requirements.txt requirements.txt RUN pip install -r requirements.txt -i https://pypi.tuna.tsinghua.edu.cn/simple some-package EXPOSE 8881 ENTRYPOINT ["jupyter","lab","--ip=0.0.0.0","--allow-root","--no-browser"]

3.5.3建立docker-compose.yaml
code docker-compose.yaml
解析:
version:版本
services:定义服务
jupyter-lab:image名称
build: . 在当前目录
ports:映射端口
volumes:保存访问文件的部分。将其映射到本地文件中
deploy:share GPU
version: '1.0' services: jupyter-lab: build: . ports: - "8881:8881" volumes: - /tf-jinqiu:/tf-jinqiu deploy: resources: reservations: devices: - driver: nvidia count: 1 capabilities: [gpu]
3.5.4 运行并测试
docker-compose up
出现如下输出,则证明安装成功。

复制底下的:http://127.0.0.1:8888/lab?token=d6e406efda3edf086b2baf4296a9400d53bee0d4221e1b9e
即可jupyter -lab
测试pytorch和TensorFlow ,gpu版本均能运行!!!
注意文件映射位置:
因此我们项目地址可以存在container中中。
开发项目的地址为中设置的。因此在container中和wls ubuntu 目录下均有映射的文件。
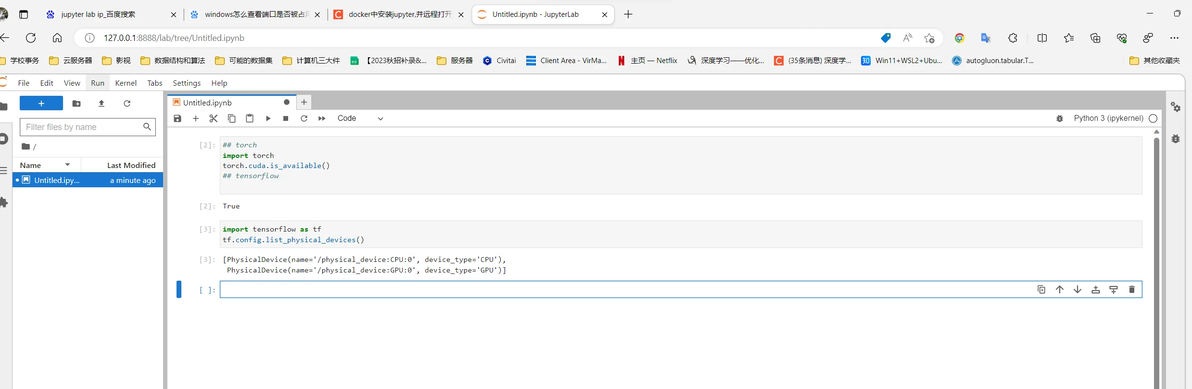
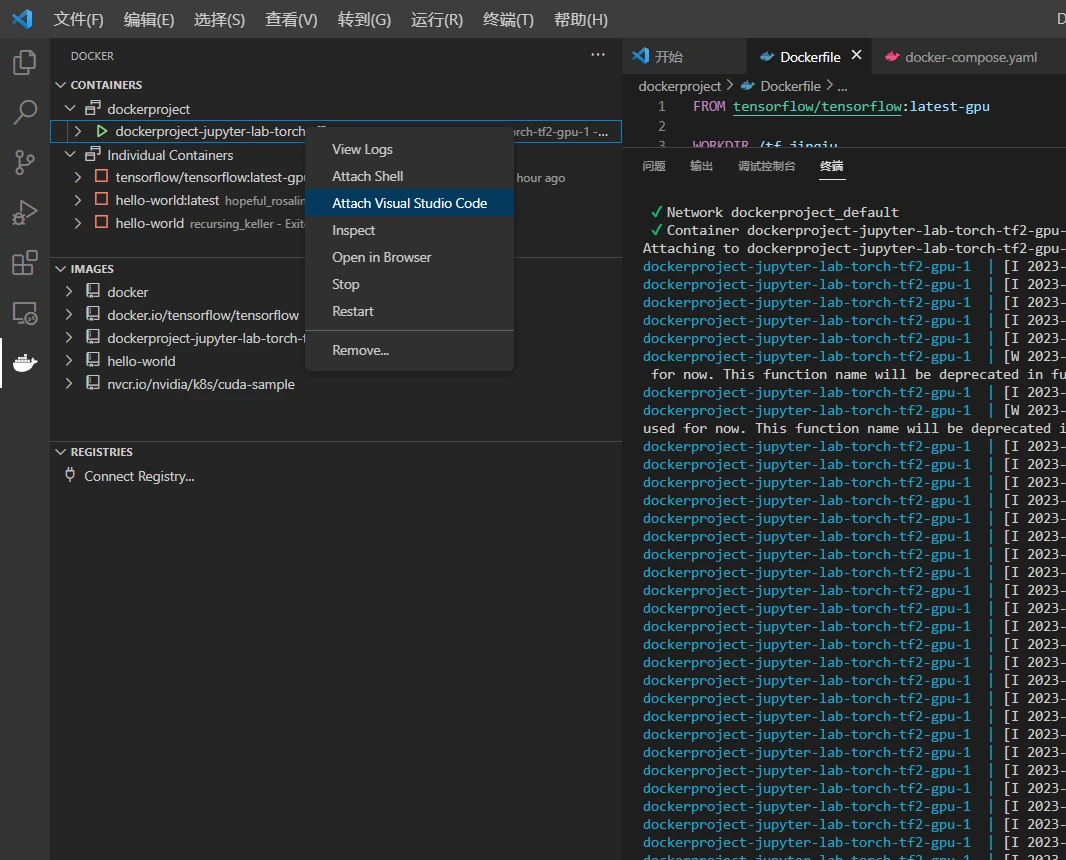
进入vscode docker中,在容器中右键 Attach Visual Studio Code即可进入容器内,进行相关project的开发。
3.5.6上传dockerhub
保存自己docker的方式,可以采用docker-file配合docker-compose.yaml的方式,也可采用将整个镜像上传至Docker-hub中,一劳永逸。
保存dockerhub中,每次换机器只需要从docker中拉取镜像,即可快速部署相关环境。
登录docker
docker login -u zhujinqiu # zhujinqiu为自己的账号
docker容器变成镜像
// 找到运行中的容器 (复制你要打包的容器的id) docker ps // 打包为镜像 (86d78d59b104:容器的id 、 my_centos:我们要打包成的镜像的名字) docker commit zhujinqiu my_centos // 找到打包的镜像 docker images
将镜像打为标签
// my_centos:镜像的名字 、 zhujinqiu:我们docker仓库的用户名 、 my_centos:我们刚才新建的仓库名 、 v1:版本号,可以不设置 docker tag my_centos zhujinqiu/my_centos:v1
将镜像上传到镜像仓库
docker push zhujinqiu/my_centos:v1
下载自己的镜像
// 记得先登录 docker login // 根据版本号拉取 docker pull zhujinqiu/my_centos:v1
修改镜像名字
// d583c3ac45fd ID 后者是需要修改的名字 docker tag d583c3ac45fd myname:latest
4、wsl本地运行深度学习环境
该方法不借助Docker,直接在本地配置好WSL-Cuda,并安装各类深度学习框架,类似于把Windows上跑的模型搬到WSL跑。
该方法只需要安装Cuda。并不要装显卡驱动和Cudnn(已经支持本地Windows映射)。
4.1 安装wsl Cuda
CUDA Toolkit 12.1 Downloads | NVIDIA Developer
根据驱动情况、pytorch、Tensorflow情况选择合适的wsl——cuda版本。需要更改如下适应“12-1为11-8”
wget https://developer.download.nvidia.com/compute/cuda/repos/wsl-ubuntu/x86_64/cuda-wsl-ubuntu.pin sudo mv cuda-wsl-ubuntu.pin /etc/apt/preferences.d/cuda-repository-pin-600 wget https://developer.download.nvidia.com/compute/cuda/11.8.0/local_installers/cuda-repo-wsl-ubuntu-11-8-local_11.8.0-1_amd64.deb sudo dpkg -i cuda-repo-wsl-ubuntu-11-8-local_11.8.0-1_amd64.deb sudo cp /var/cuda-repo-wsl-ubuntu-11-8-local/cuda-*-keyring.gpg /usr/share/keyrings/ sudo apt-get update sudo apt-get -y install cuda
安装完需要,设置环境变量
vim ~/.bashrc
在最后加入,配置环境变量
export PATH=/usr/bin:$PATH export PATH=/usr/local/cuda-11.8/bin:$PATH export LD_LIBRARY_PATH=/usr/local/cuda-11.8/lib64:$LD_LIBRARY_PATH
更新下source
source ~/.bashrc
使用nvcc -V验证安装成功与否
nvcc -V
4.2 安装pytorch环境
1、miniconda安装
# 下载安装包 wget -c https://repo.anaconda.com/miniconda/Miniconda3-latest-Linux-x86_64.sh chmod 777 Miniconda3-latest-Linux-x86_64.sh # 安装conda bash Miniconda3-latest-Linux-x86_64.sh
安装完需要,设置环境变量
vim ~/.bashrc
更新下source
source ~/.bashrc
配置miniconda环境变量
export PATH=~/miniconda3/bin:$PATH
4.3 创建虚拟环境与pytorch安装、tensorflow安装
conda create -n env_pytorch python=3.8 # conda env list 查看虚拟环境list # 激活 conda activate env_pytorch
1、安装pytorch
Start Locally | PyTorch
根据cuda版本选择合适的torchgpu版本
## -i 清华镜像加速 安装torchgpu pip3 install torch torchvision torchaudio --index-url https://download.pytorch.org/whl/cu118 -i https://pypi.tuna.tsinghua.edu.cn/simple some-package
2、安装tensorflow
ps:新版本直接安装即可
TensorFlow (google.cn)
# Requires the latest pip pip install --upgrade pip # Current stable release for CPU and GPU pip install tensorflow
4.4 测试gpu
## torch import torch torch.cuda.is_available() ## tensorflow import tensorflow as tf tf.config.list_physical_devices()
