


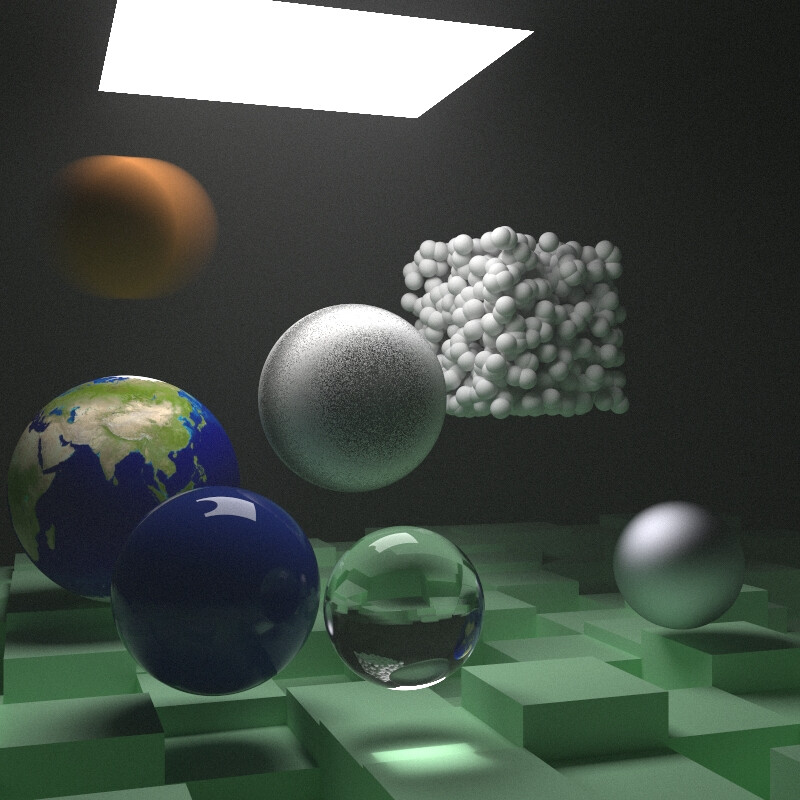
本文基于 《Ray Tracing The Next Week》(https://raytracing.github.io/books/RayTracingTheNextWeek.html#)该文,对于上一章节中我们实现的光线追踪渲染器进行升级,并渲染得到上面这张图像。主要内容为 引入光追中的时间概念来实现运动模糊、通过BVH空间划分加速光追过程、实现体积物体的散射渲染并对之前的大气散射做修改、在光追中引入物体的移动/旋转方式。
另外需要说明的是,本文中的一些渲染图片是直接使用的 RayTracing The Next Week 中的图像,而读者的代码运行结果可能会与之有些差异,这是因为在上一章中我们的多线程和大气散射部分存在些问题,这些我打算放在下一章再去修复。
运动模糊
在现实中,相机的运动模糊是由于相机拍照时,其快门的关闭是一个过程,在这段时间中底片会持续接收到光线,那么这一过程中运动的物体反射来的光线就会都呈现在底片上,进而形成了运动模糊现象。
那么对于光线追踪,我们也可以让我们的相机持续一段时间不停的发射射线,最后对这些射线结果取平均,来实现运动模糊效果。
但更好的一种方法是,我们可以参考之前实现景深的方法。在之前实现景深的方法中,我们也可也添加一个遍历结构,来从光圈中发射射线,然后对这些射线结果取平均,但实际上这个遍历问题可以转换为一个概率问题。遍历叠加后取平均这个过程实际上就是在计算一个概率,对于景深问题这个就是在计算相机发射的光线有多少概率是发生偏移的,因此我们最终没有增加循环结构,而是直接让本来发射出的射线根据一个随光圈半径变化的概率而产生偏移。在运动模糊中我们同样可以这么做,即让原本的光线更加一个均匀的概率,让这些光线拥有一个自己的随机时间,每个射线在自己对应的时刻对场景进行碰撞检测,记录自己的渲染结果,这样最后所有光线叠加的结果就是最终的效果。
这样做的好处在于,我们在调试渲染时,不需要每次都去调整一大堆循环结构的循环次数等参数,而是可以直接通过增加每像素发射的射线数,即可增加相机每个时刻发射的射线数量,应为该数量本来等于一个均匀概率 * 总射线数。
接下来我们开始修改射线类和相机类,让射线存储其自身的时刻,让相机能够设置其拍摄的开始时刻和结束时刻,并且在生成射线时给射线随机分配一个这之间的时刻。
[ray.h] 记录时刻
#ifndef RAY_INCLUDE
#define RAY_INCLUDE

#include "vec3.h"

class ray
{
    public:
        point3 orig;
        vec3 dir;
        double tm;

    public:
        ray() {}
        ray(const point3& origin, const vec3& dir, double time = 0.0) : orig(origin), dir(dir), tm(time){}

        point3 origin() const {return orig;}
        vec3 direction() const {return dir;}
        double time() const { return tm; }

        point3 at(double t) const
        {
            return orig + t * dir;
        }
};

#endif[camera.h] 记录时刻
#ifndef CAMERA_H
#define CAMERA_H

#include "constant.h"

class camera
{
    public:
        point3 orgigin;
        vec3 u, v, w;
        point3 lower_left_corner;
        vec3 horizontal;
        vec3 vertical;
        double lens_radius;
        double time0, time1;
    public:
        camera(point3 lookfrom, point3 lookat, vec3 vup, double fov, double aspect_ratio, double aperture, double focus_dist, double _time0 = 0, double _time1 = 0)
        {
            auto theta = degrees_to_radians(fov);
            auto h = tan(theta * 0.5);
            auto viewport_height = 2.0 * h * focus_dist;
            auto viewport_width = aspect_ratio * viewport_height;

            w = unit_vector(lookfrom - lookat);
            u = unit_vector(cross(vup, w));
            v = cross(w, u);

            orgigin = lookfrom;
            horizontal = viewport_width * u;
            vertical = viewport_height * v;

            lower_left_corner = orgigin - horizontal*0.5 - vertical*0.5 - focus_dist * w;

            lens_radius = aperture * 0.5;

            time0 = _time0;
            time1 = _time1;
        }

        ray get_ray(double s, double t) const
        {
            vec3 rd = lens_radius * random_in_unit_disk();
            vec3 offset = u * rd.x() + v * rd.y();
            return ray(orgigin + offset, unit_vector(lower_left_corner + s*horizontal + t*vertical - orgigin - offset), random_double(time0, time1));
        }
};

#endif现在我们的相机和射线可以记录时间了,但是物体还不能够随着时间产生变化。接下来我们来创建一个球心可以随时间做线性变化的球体类 moving_sphere,虽然其球心随时间一直变化,但对于一个时刻而言,其球心是确定的,那么在射线击中它时,它也有一个确定的球心,我们可以通过 射线本身记录的时刻来确定该球心。因此其 hit 函数就可以通过传入的射线上的时刻来确定球心,然后做正常的球-射线碰撞计算。
[moving_sphere.h] 移动球体
#ifndef MOVING_SPHERE_H
#define MOVING_SPHERE_H

#include "hittable.h"
#include "vec3.h"

class moving_sphere : public hittable
{
public:
    point3 center0, center1;
    double radius;
    shared_ptr<material> mat_ptr;
    double time0, time1;
public:
    moving_sphere() {}
    moving_sphere(point3 cen0, point3 cen1, double _time0, double _time1, double r, shared_ptr<material> m) : center0(cen0), center1(cen1), time0(_time0), time1(_time1), radius(r), mat_ptr(m) {}

    virtual bool hit(const ray& r, double t_min, double t_max, hit_record& rec) const override;

    point3 center(double time) const;
};

point3 moving_sphere::center(double time) const
{
    return center0 + ((time - time0) / (time1 - time0)) * (center1 - center0);
}

bool moving_sphere::hit(const ray& r, double t_min, double t_max, hit_record& rec) const
{
    vec3 oc = r.origin() - center(r.time());
    auto a = r.direction().length_squared();
    auto half_b = dot(oc, r.direction());
    auto c = oc.length_squared() - radius * radius;

    auto discriminant = half_b * half_b - a * c;
    if (discriminant < 0.0) return false;
    auto sqrtd = sqrt(discriminant);

    auto root = (-half_b - sqrtd) / a;
    if (root < t_min || root > t_max)
    {
        root = (-half_b + sqrtd) / a;
        if (root < t_min || root > t_max)
        {
            return false;
        }
    }

    rec.t = root;
    rec.p = r.at(root);
    vec3 outward_normal = (rec.p - center(r.time())) / radius;
    rec.set_face_normal(r, outward_normal);
    rec.mat_ptr = mat_ptr;

    return true;
}
#endif我们的射线除了由相机发出,在击中物体后还会根据物体的材质进行散射,因此在散射时我们需要进行修改来传递射线上的时间信息。
[material.h] 散射射线记录时间
class lambertian : public material {
    ...
        virtual bool scatter(
            const ray& r_in, const hit_record& rec, color& attenuation, ray& scattered
        ) const override {
            auto scatter_direction = rec.normal + random_unit_vector();

            // Catch degenerate scatter direction
            if (scatter_direction.near_zero())
                scatter_direction = rec.normal;

            scattered = ray(rec.p, scatter_direction, r_in.time());
            attenuation = albedo;
            return true;
        }
        ...
};

class metal : public material {
    ...
        virtual bool scatter(
            const ray& r_in, const hit_record& rec, color& attenuation, ray& scattered
        ) const override {
            vec3 reflected = reflect(unit_vector(r_in.direction()), rec.normal);
            scattered = ray(rec.p, reflected + fuzz*random_in_unit_sphere(), r_in.time());
            attenuation = albedo;
            return (dot(scattered.direction(), rec.normal) > 0);
        }
        ...
};

class dielectric : public material {
    ...
        virtual bool scatter(
            ...
            scattered = ray(rec.p, direction, r_in.time());
            return true;
        }
        ...
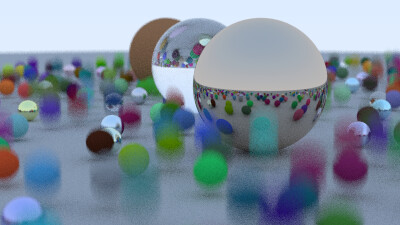
};接下来我们对上一篇文章的结尾场景添加运动模糊效果,我们的相机快门在时刻0开启,在时刻1关闭,漫反射球体在这段时间进行(0, r/2, 0) 的偏移
[main.cpp] 移动球体
...
#include "moving_sphere.h"

...
hittable_list random_scene() {
    hittable_list world;

    auto ground_material = make_shared<lambertian>(color(0.5, 0.5, 0.5));
    world.add(make_shared<sphere>(point3(0,-1000,0), 1000, ground_material));

    for (int a = -11; a < 11; a++) {
        for (int b = -11; b < 11; b++) {
            auto choose_mat = random_double();
            point3 center(a + 0.9*random_double(), 0.2, b + 0.9*random_double());

            if ((center - vec3(4, 0.2, 0)).length() > 0.9) {
                shared_ptr<material> sphere_material;

                if (choose_mat < 0.8) {
                    // diffuse
                    auto albedo = color::random() * color::random();
                    sphere_material = make_shared<lambertian>(albedo);
                    auto center2 = center + vec3(0, random_double(0,.5), 0);
                    world.add(make_shared<moving_sphere>(
                        center, center2, 0.0, 1.0, 0.2, sphere_material));
                } else if (choose_mat < 0.95) {
                    // metal
                    auto albedo = color::random(0.5, 1);
                    auto fuzz = random_double(0, 0.5);
                    sphere_material = make_shared<metal>(albedo, fuzz);
                    world.add(make_shared<sphere>(center, 0.2, sphere_material));
                } else {
                    // glass
                    sphere_material = make_shared<dielectric>(1.5);
                    world.add(make_shared<sphere>(center, 0.2, sphere_material));
                }
            }
        }
    }

    auto material1 = make_shared<dielectric>(1.5);
    world.add(make_shared<sphere>(point3(0, 1, 0), 1.0, material1));

    auto material2 = make_shared<lambertian>(color(0.4, 0.2, 0.1));
    world.add(make_shared<sphere>(point3(-4, 1, 0), 1.0, material2));

    auto material3 = make_shared<metal>(color(0.7, 0.6, 0.5), 0.0);
    world.add(make_shared<sphere>(point3(4, 1, 0), 1.0, material3));

    return world;
}[main.cpp] 设置相机快门
int main() {

    // Image

    auto aspect_ratio = 16.0 / 9.0;
    int image_width = 400;
    int samples_per_pixel = 100;
    const int max_depth = 50;

    ...

    // Camera

    point3 lookfrom(13,2,3);
    point3 lookat(0,0,0);
    vec3 vup(0,1,0);
    auto dist_to_focus = 10.0;
    auto aperture = 0.1;
    int image_height = static_cast<int>(image_width / aspect_ratio);


camera cam(lookfrom, lookat, vup, 20, aspect_ratio, aperture, dist_to_focus, 0.0, 1.0);得到图像:
树结构包围盒(Bounding Volume Hierarchies: BVH)
我们现在渲染时对每次对场景中物体做射线检测都需要遍历一边场景中的所有物体,该时间成本与场景中物体数量是呈线性的。因此我们可以通过将空间划分为二叉树结构来加速这一遍历过程。
其划分思路为,先把整个场景内的物体划分到一个包围盒中,然后把物体按照某种方式进行划分和排序,左半边划分到左节点下的包围盒内,右半边划分到右节点下的包围盒内。之后左右节点也分别按照这样的方式向下继续创建各自的左右节点,以此递归,直到节点下只剩一个碰撞体。其结构如下图所示。
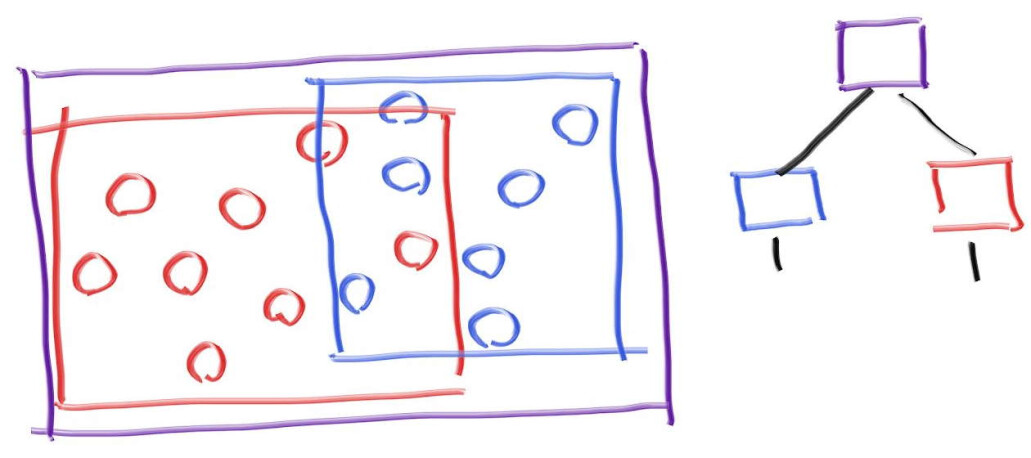
那么我们会发现,对于上图结构,射线有可能从红色和蓝色包围盒之间贯穿过去,即射线既能够击中红色包围盒也能够击中蓝色包围盒,此时我们选择距离射线最近的包围盒作为击中结果。
那么我们会发现,对于上图这种划分方式,我们最终选择的击中结果可能不是最正确的,因为两个包围盒有相交的范围。因此一个合理的空间划分方式就至关重要。对于空间划分 和 射线检测这样的场景下通常的方法是使用轴对齐包围盒(Axis-Aligned Bounding Boxes: AABB)
轴对齐包围盒即一个包围盒其六个面的法线都是与世界坐标系的坐标轴平行
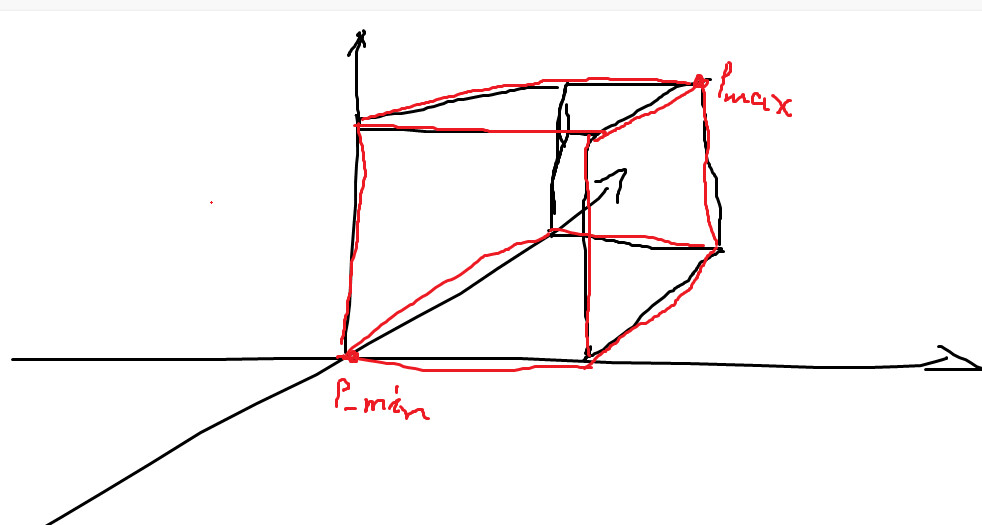
基于这样的特点,我们只需要知道该包围盒一条对角线上的两个点的坐标就可以表示该包围盒(其它的点坐标都可以通过这两个点计算出来),通常我们会记录上图中标出的 左下角 和 右上角这两个点,p_min 点坐标的xyz分量都是包围盒所有点中最小的,p_max 点坐标的xyz分量都是包围盒所有点中最大的。
接下来我们来探讨该包围盒如何与射线进行碰撞检测。我们先看 2D 情形下,包围盒被压扁为一个平面区域,其可以由 x0, x1, y0, y1 四个值来表示,即 (x0, y0) (x1, y1) 两个点来表示
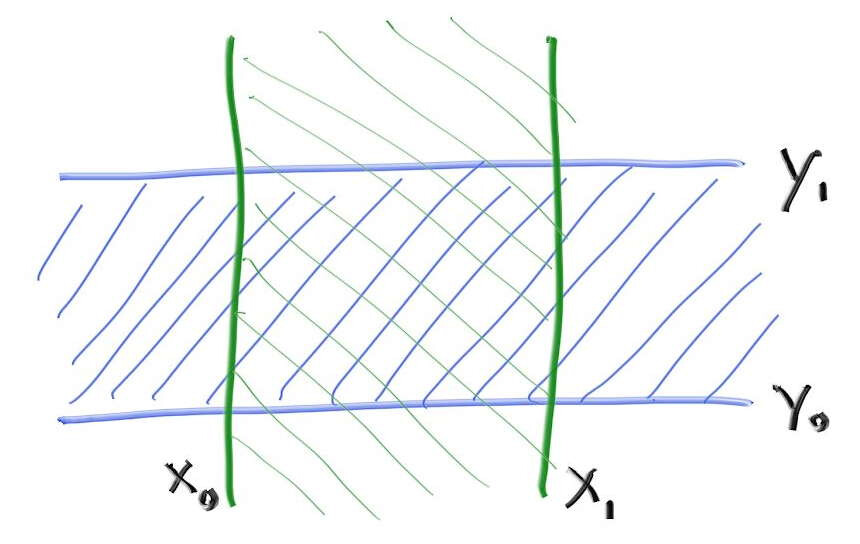
那么对于 x0 和 x1 平面我们会有这样的相交情况:
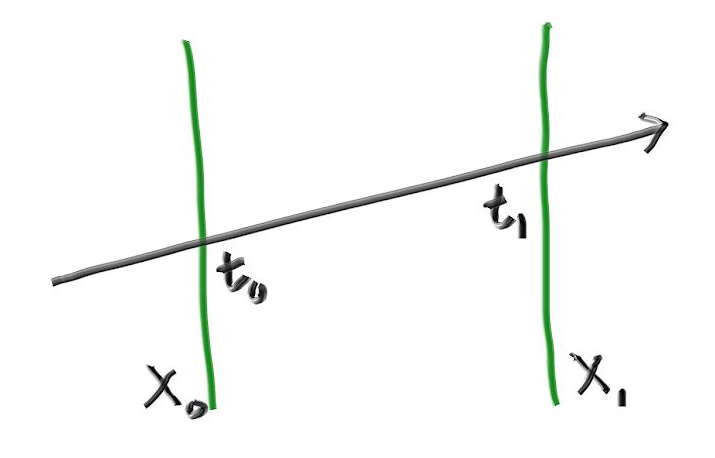
根据射线表达式 P(t)=A+tb
我们可以在 x 分量上得到:
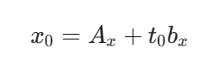
可得:
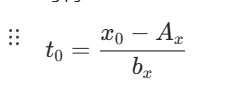
同理可得:
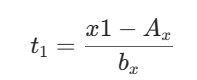
那么对于 y0 和 y1 平面,我们同样可以得到:
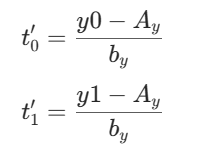
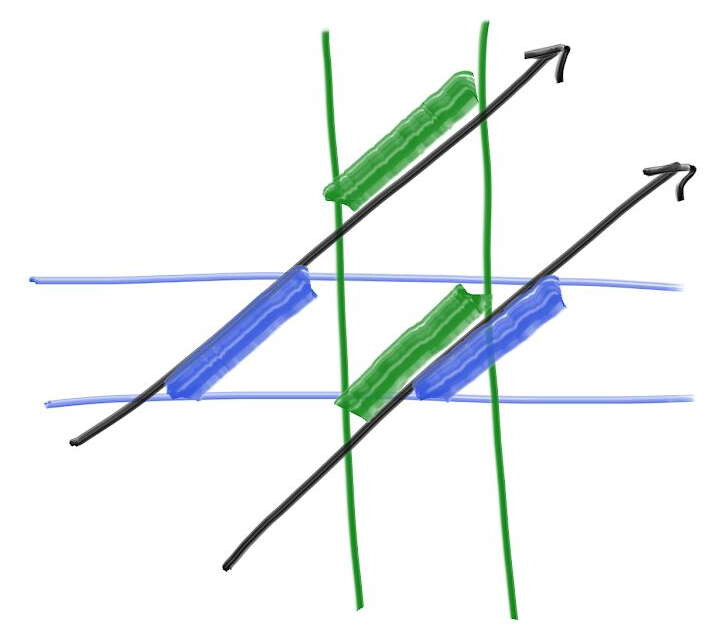
如图,射线对 x0、x1 面的相交区域为绿色区域,对 y0,y1 面的相交区域为 蓝色区域,那么只有绿色和蓝色的相交区域才是真正的射线与包围盒的相交区域。
翻译成伪代码即:
compute (tx0, tx1)
compute (ty0, ty1)
return overlap?( (tx0, tx1), (ty0, ty1))而对于三维情况该规律同样适用,我们只需要增加z这个维度即可:
compute (tx0, tx1)
compute (ty0, ty1)
compute (tz0, tz1)
return overlap?( (tx0, tx1), (ty0, ty1), (tz0, tz1))为了判断这几个轴的维度间是否相交,我们需要分别对 (tx0,tx1) (ty0, ty1) (tz0, tz1) 做排序。以上图为例,我们可以发现对于相交区域,我们做排序让 tx0 < tx1,ty0 < ty1,那么只有当 max(tx0, ty0) < min(tx1, ty1) 时,这两段区域才会相交。
其伪代码为:
bool overlap(d, D, e, E, f, F)
    f = max(d, e)
    F = min(D, E)
return (f < F)因此我们有:
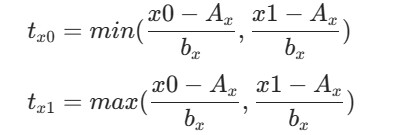
这里会出现一个问题是,如果 bx 为 0,那么就会出现结果为无穷的情况,但好在这种情况下 t0 和 t1 会要么都是正无穷,要么都是负无穷,这样的结果并不会影响我们后面计算的正确性。
但还有一个问题是,如果 bx 为 0,且 (x0 - Ax) 或者 (x1 - Ax) 也为 0,那么就会出现结果为 NaN 的情况,这种情况我们会在后面进行讨论。
基于这些我们就可以设计出我们的 aabb 包围盒了:
[aabb.h] AABB包围盒类
#ifndef AABB_H
#define AABB_H

#include "rtweekend.h"

class aabb {
    public:
        aabb() {}
        aabb(const point3& a, const point3& b) { minimum = a; maximum = b;}

        point3 min() const {return minimum; }
        point3 max() const {return maximum; }

        bool hit(const ray& r, double t_min, double t_max) const {
            for (int a = 0; a < 3; a++) {
                auto t0 = fmin((minimum[a] - r.origin()[a]) / r.direction()[a],
                               (maximum[a] - r.origin()[a]) / r.direction()[a]);
                auto t1 = fmax((minimum[a] - r.origin()[a]) / r.direction()[a],
                               (maximum[a] - r.origin()[a]) / r.direction()[a]);
                t_min = fmax(t0, t_min);
                t_max = fmin(t1, t_max);
                if (t_max <= t_min)
                    return false;
            }
            return true;
        }

        point3 minimum;
        point3 maximum;
};

#endif
在代码实现当中,如果出现了 NaN 情况,那么比较就会返回 false,这样也会得到正确的结果,应该出现 NaN则说明射线与包围盒相切,我们将相切情况排除到相交范围外。
对于 AABB-射线 相交的代码实现,Andrew Kensler 在 Pixar 中实现的版本在各个编译器上都能以很好的效率运行,因此我们将其作为首选:
[aabb.h] AABB-射线相交实现
inline bool aabb::hit(const ray& r, double t_min, double t_max) const {
    for (int a = 0; a < 3; a++) {
        auto invD = 1.0f / r.direction()[a];
        auto t0 = (min()[a] - r.origin()[a]) * invD;
        auto t1 = (max()[a] - r.origin()[a]) * invD;
        if (invD < 0.0f)
            std::swap(t0, t1);
        t_min = t0 > t_min ? t0 : t_min;
        t_max = t1 < t_max ? t1 : t_max;
        if (t_max <= t_min)
            return false;
    }
    return true;
}实现了 AABB包围盒后,我们就可以给所有碰撞体添加其对应的包围盒了。我们现在 hittable 类中抽象出包围盒函数,如果该碰撞体能够创建出包围盒就返回true,并输出其包围盒,否则返回false。因为像对于无限大的平面之类的物体我们就无法通过包围盒来对其进行包围:
[hittable.h] 包围盒函数
#include "aabb.h"
...

class hittable {
    public:
        ...
        virtual bool hit(const ray& r, double t_min, double t_max, hit_record& rec) const = 0;
        virtual bool bounding_box(double time0, double time1, aabb& output_box) const = 0;
        ...
};对于球体,其包围盒创建十分简单:
[sphere.h] 球体包围盒
class sphere : public hittable {
    public:
        ...
        virtual bool hit(
            const ray& r, double t_min, double t_max, hit_record& rec) const override;

        virtual bool bounding_box(double time0, double time1, aabb& output_box) const override;
        ...
};

...
bool sphere::bounding_box(double time0, double time1, aabb& output_box) const {
    output_box = aabb(
        center - vec3(radius, radius, radius),
        center + vec3(radius, radius, radius));
    return true;
}对于移动球体 moving_sphere,我们可以计算出其在 t0 时刻的包围盒 box0 和 在 t1 时刻的包围盒 box1,然后再计算出一个能将 box0,box1 都包裹进去的包围盒作为最终的包围盒。
基于 AABB包围盒,p_min 中所有分量是所有点中最小的,p_max 中所有分量是所有点中最大的,我们可以得到计算包裹两个AABB包围盒的方法:
[aabb.h] 计算包裹两个包围盒的大包围盒
aabb surrounding_box(aabb box0, aabb box1) {
    point3 small(fmin(box0.min().x(), box1.min().x()),
                 fmin(box0.min().y(), box1.min().y()),
                 fmin(box0.min().z(), box1.min().z()));

    point3 big(fmax(box0.max().x(), box1.max().x()),
               fmax(box0.max().y(), box1.max().y()),
               fmax(box0.max().z(), box1.max().z()));

    return aabb(small,big);
}那么就可以得到 moving_sphere 的包围盒:
[moving_sphere.h] 创建包围盒
...
#include "aabb.h"
...

class moving_sphere : public hittable {
    public:
        ...
        virtual bool hit(
            const ray& r, double t_min, double t_max, hit_record& rec) const override;

        virtual bool bounding_box(
            double _time0, double _time1, aabb& output_box) const override;
        ...
};

...
bool moving_sphere::bounding_box(double _time0, double _time1, aabb& output_box) const {
    aabb box0(
        center(_time0) - vec3(radius, radius, radius),
        center(_time0) + vec3(radius, radius, radius));
    aabb box1(
        center(_time1) - vec3(radius, radius, radius),
        center(_time1) + vec3(radius, radius, radius));
    output_box = surrounding_box(box0, box1);
    return true;
}对于碰撞体列表 hittable_list,我们遍历其中物体,对于遍历的第一个物体,先对其创建包围盒,如果遍历中遇到不能创建包围盒的物体,那么我们就认为这个列表不能够创建包围盒,否则就对物体创建包围盒并不断的用更大的包围盒对其进行包裹,最后这个大包围盒就是列表的包围盒:
[hittable_list.h] 创建包围盒
...
#include "aabb.h"
...

class hittable_list : public hittable {
    public:
        ...
        virtual bool hit(
            const ray& r, double t_min, double t_max, hit_record& rec) const override;

        virtual bool bounding_box(
            double time0, double time1, aabb& output_box) const override;
    ...
};

...
bool hittable_list::bounding_box(double time0, double time1, aabb& output_box) const {
    if (objects.empty()) return false;

    aabb temp_box;
    bool first_box = true;

    for (const auto& object : objects) {
        if (!object->bounding_box(time0, time1, temp_box)) return false;
        output_box = first_box ? temp_box : surrounding_box(output_box, temp_box);
        first_box = false;
    }

    return true;
}接下来我们开始设计 BVH 树,与传统的二叉树表达方式相同,我们用节点的方式来设计BVH树,用树的根节点来表示整棵树。
每个节点有左、右两个节点,且每个节点都是一个带有 AABB包围盒的碰撞体:
[bvh.h] bvh树节点
#ifndef BVH_H
#define BVH_H

#include "rtweekend.h"

#include "hittable.h"
#include "hittable_list.h"


class bvh_node : public hittable {
    public:
        bvh_node();

        bvh_node(const hittable_list& list, double time0, double time1)
            : bvh_node(list.objects, 0, list.objects.size(), time0, time1)
        {}

        bvh_node(
            const std::vector<shared_ptr<hittable>>& src_objects,
            size_t start, size_t end, double time0, double time1);

        virtual bool hit(
            const ray& r, double t_min, double t_max, hit_record& rec) const override;

        virtual bool bounding_box(double time0, double time1, aabb& output_box) const override;

    public:
        shared_ptr<hittable> left;
        shared_ptr<hittable> right;
        aabb box;
};

bool bvh_node::bounding_box(double time0, double time1, aabb& output_box) const {
    output_box = box;
    return true;
}

#endif注意,我们这里BVH节点的左右节点指向的是 hittable,而不是 bvh_node,因为我们 BVH树的根节点其包裹的通常不再是 bvh 节点,而是 sphere、hittable_list 这样具体的碰撞体。
其 hit 函数很简单,分别对左右两个节点做hit,如果有一个节点成功则返回true,并返回距离最近的碰撞信息:
[bvh.h] hit函数
bool bvh_node::hit(const ray& r, double t_min, double t_max, hit_record& rec) const {
    if (!box.hit(r, t_min, t_max))
        return false;

    bool hit_left = left->hit(r, t_min, t_max, rec);
    bool hit_right = right->hit(r, t_min, hit_left ? rec.t : t_max, rec);

    return hit_left || hit_right;
}这里返回最近的碰撞信息,是通过修改传入子节点的 t_max 来实现的。如果 hit_right 能在 rec_left.t 之前就与射线产生碰撞,那么就说明 rec_right 是与射线最近的碰撞信息,否则就是 rec_left 是最近的信息。
接下来就是对场景进行划分,创建我们的 BVH 树了。我们遵循下面的步骤进行划分:
随机选择一个轴
对物体在这个轴上进行排序
排序后的物体数组,一半划分给左节点,一半划分给右节点
子节点继续递归执行上面的步骤,直到最终指向一个物体
由于节点的包围盒必须包裹其两个子节点的包围盒,因此也可也通过递归得到
由于 bvh 的 hit 函数之后返回一个碰撞信息,即最终之后选择一个节点。那么如果一个节点,其右子节点为空,那么我们可以让该节点的右节点指向左节点,这样就可以构成一个完整二叉树,我们也就不需要去处理节点为空的情况。那么在创建叶子节点其父节点时,此时可能只剩下一个碰撞体无法再继续二分,因此其应该只有一个节点去指向最终这个物体,此时我们就可以让其两个节点都指向该物体,以创建完整二叉树。还有一种情况是刚好剩下两个物体,此时我们只需要对这两个物体进行比较然后放入对应的两个节点即可。
[bvh.h] 创建bvh树
#include <algorithm>
...

bvh_node::bvh_node(
    std::vector<shared_ptr<hittable>>& src_objects,
    size_t start, size_t end, double time0, double time1
) {
    auto objects = src_objects; // Create a modifiable array of the source scene objects

    int axis = random_int(0,2);
    auto comparator = (axis == 0) ? box_x_compare
                    : (axis == 1) ? box_y_compare
                                  : box_z_compare;

    size_t object_span = end - start;

    if (object_span == 1) {
        left = right = objects[start];
    } else if (object_span == 2) {
        if (comparator(objects[start], objects[start+1])) {
            left = objects[start];
            right = objects[start+1];
        } else {
            left = objects[start+1];
            right = objects[start];
        }
    } else {
        std::sort(objects.begin() + start, objects.begin() + end, comparator);

        auto mid = start + object_span/2;
        left = make_shared<bvh_node>(objects, start, mid, time0, time1);
        right = make_shared<bvh_node>(objects, mid, end, time0, time1);
    }

    aabb box_left, box_right;

    if (  !left->bounding_box (time0, time1, box_left)
       || !right->bounding_box(time0, time1, box_right)
    )
        std::cerr << "No bounding box in bvh_node constructor.\n";

    box = surrounding_box(box_left, box_right);
}这里用到的 random_int 函数在 constant.h 中对其进行实现:
[constant.h] 整型随机数
inline int random_int(int min, int max) {
    // Returns a random integer in [min,max].
    return static_cast<int>(random_double(min, max+1));
}同样还有AABB包围盒在各个轴上的比较器:
[bvh.h] 包围盒在轴上的比较器
inline bool box_compare(const shared_ptr<hittable> a, const shared_ptr<hittable> b, int axis) {
    aabb box_a;
    aabb box_b;

    if (!a->bounding_box(0,0, box_a) || !b->bounding_box(0,0, box_b))
        std::cerr << "No bounding box in bvh_node constructor.\n";

    return box_a.min().e[axis] < box_b.min().e[axis];
}


bool box_x_compare (const shared_ptr<hittable> a, const shared_ptr<hittable> b) {
    return box_compare(a, b, 0);
}

bool box_y_compare (const shared_ptr<hittable> a, const shared_ptr<hittable> b) {
    return box_compare(a, b, 1);
}

bool box_z_compare (const shared_ptr<hittable> a, const shared_ptr<hittable> b) {
    return box_compare(a, b, 2);
}之后在 main.cpp 中我们创建 bvh 树来划分我们的场景,会发现渲染时间加快了许多
[main.cpp]
...
#include "bvh.h"

int main(int argc, char* argv[])
{
	...

	bvh_node bvh(world, 0, 0);

	...

	for (int y = thread_group_y - 1; y >= 0; --y)
	{
		for (int x = 0; x < thread_group_x; ++x)
		{
			clock_t dual_time = clock();
			double progress = ((thread_group_y - y) * thread_group_x + x) * 1.0 / (thread_group_x * (thread_group_y + 1));
			std::cerr << "\rprgoress: " << progress << " " << "The run time is: " << (double)(dual_time - start_time) / CLOCKS_PER_SEC << "s" << ' ' << std::flush;
			for (int k = thread_group_y_count - 1; k >= 0; --k)
			{
				for (int z = 0; z < thread_group_x_count; ++z)
				{
					int j = y * thread_group_y_count + k;
					int i = x * thread_group_x_count + z;
					if (j * image_width + i > image_width * image_height) continue;
					threads[k * thread_group_x_count + z] = std::thread(ray_tracing_thread, i, j, samples_per_pixel, image_width, image_height, colors, cam, bvh, max_depth);
				}
			}

			for (int k = thread_group_y_count - 1; k >= 0; --k)
			{
				for (int z = 0; z < thread_group_x_count; ++z)
				{
					threads[k * thread_group_x_count + z].join();
				}
			}
		}
	}

	...
}纹理
我们将物体表面颜色抽象出一个纹理类 texture,它可以是单一的颜色,也可以是程序生成的颜色,或者是从已有的贴图中采样。
[texture.h] 纹理类
#ifndef TEXTURE_H
#define TEXTURE_H

#include "rtweekend.h"

class texture {
    public:
        virtual color value(double u, double v, const point3& p) const = 0;
};

class solid_color : public texture {
    public:
        solid_color() {}
        solid_color(color c) : color_value(c) {}

        solid_color(double red, double green, double blue)
          : solid_color(color(red,green,blue)) {}

        virtual color value(double u, double v, const vec3& p) const override {
            return color_value;
        }

    private:
        color color_value;
};

#endif通过纹理获取颜色我们就需要物体表面的纹理坐标,因此在我们的射线检测信息结构体中存储击中点的纹理坐标
[hittable.h] 存储击中点纹理坐标
struct hit_record {
    vec3 p;
    vec3 normal;
    shared_ptr<material> mat_ptr;
    double t;
    double u;
    double v;
    bool front_face;
...对于球体,我们可以通过极坐标的方式定义其纹理坐标
[sphere.h] 球体纹理坐标
class sphere : public hittable {
    ...
    private:
        static void get_sphere_uv(const point3& p, double& u, double& v) {
            // p: a given point on the sphere of radius one, centered at the origin.
            // u: returned value [0,1] of angle around the Y axis from X=-1.
            // v: returned value [0,1] of angle from Y=-1 to Y=+1.
            //     <1 0 0> yields <0.50 0.50>       <-1  0  0> yields <0.00 0.50>
            //     <0 1 0> yields <0.50 1.00>       < 0 -1  0> yields <0.50 0.00>
            //     <0 0 1> yields <0.25 0.50>       < 0  0 -1> yields <0.75 0.50>

            auto theta = acos(-p.y());
            auto phi = atan2(-p.z(), p.x()) + pi;

            u = phi / (2*pi);
            v = theta / pi;
        }
};在球体的hit函数中,设置击中点的纹理坐标
[sphere.h] 设置纹理坐标
bool sphere::hit(...) {
    ...

    rec.t = root;
    rec.p = r.at(rec.t);
    vec3 outward_normal = (rec.p - center) / radius;
    rec.set_face_normal(r, outward_normal);
    get_sphere_uv(outward_normal, rec.u, rec.v);
    rec.mat_ptr = mat_ptr;

    return true;
}在球体的hit函数中,设置击中点的纹理坐标
[sphere.h] 设置纹理坐标
bool sphere::hit(...) {
    ...

    rec.t = root;
    rec.p = r.at(rec.t);
    vec3 outward_normal = (rec.p - center) / radius;
    rec.set_face_normal(r, outward_normal);
    get_sphere_uv(outward_normal, rec.u, rec.v);
    rec.mat_ptr = mat_ptr;

    return true;
}有了纹理类之后,我们就可以用纹理类来替换之前材质中用单一颜色表示的反照率albedo
[matrial.h] 更新albedo
#include "texture.h"

...
class lambertian : public material {
    public:
        shared_ptr<texture> albedo;
    public:
        lambertian(const color& a) : albedo(make_shared<solid_color>(a)) {}
        lambertian(shared_ptr<texture> a) : albedo(a) {}

        virtual bool scatter(
            const ray& r_in, const hit_record& rec, color& attenuation, ray& scattered
        ) const override {
            auto scatter_direction = rec.normal + random_unit_vector();

            // Catch degenerate scatter direction
            if (scatter_direction.near_zero())
                scatter_direction = rec.normal;

            scattered = ray(rec.p, scatter_direction, r_in.time());
            attenuation = albedo->value(rec.u, rec.v, rec.p);
            return true;
        }
};我们可以根据正弦函数和余弦函数它们正负号交替的特点,来制作一个程序生成的棋盘格纹理:
[texture.h] 棋盘格纹理
class checker_texture : public texture {
    public:
        checker_texture() {}

        checker_texture(shared_ptr<texture> _even, shared_ptr<texture> _odd)
            : even(_even), odd(_odd) {}

        checker_texture(color c1, color c2)
            : even(make_shared<solid_color>(c1)) , odd(make_shared<solid_color>(c2)) {}

        virtual color value(double u, double v, const point3& p) const override {
            auto sines = sin(10*p.x())*sin(10*p.y())*sin(10*p.z());
            if (sines < 0)
                return odd->value(u, v, p);
            else
                return even->value(u, v, p);
        }

    public:
        shared_ptr<texture> odd;
        shared_ptr<texture> even;
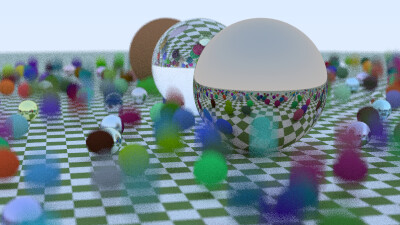
};我们可以把场景中的地面给换上棋盘格纹理
[main.cpp] 地面换上棋盘格纹理
hittable_list random_scene() {
    hittable_list world;

    auto checker = make_shared<checker_texture>(color(0.2, 0.3, 0.1), color(0.9, 0.9, 0.9));
    world.add(make_shared<sphere>(point3(0,-1000,0), 1000, make_shared<lambertian>(checker)));

    for (int a = -11; a < 11; a++) {
...得到图像:
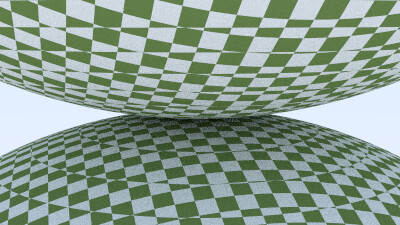
之后我们会创建多种场景,因此我们可以在 main.cpp 中通过 switch case 的方式来在各个场景中进行切换。现在我们就再创建一个棋盘格纹理检查场景
[min.cpp] 棋盘格检查场景
hittable_list two_spheres() {
    hittable_list objects;

    auto checker = make_shared<checker_texture>(color(0.2, 0.3, 0.1), color(0.9, 0.9, 0.9));

    objects.add(make_shared<sphere>(point3(0,-10, 0), 10, make_shared<lambertian>(checker)));
    objects.add(make_shared<sphere>(point3(0, 10, 0), 10, make_shared<lambertian>(checker)));

    return objects;
}
// World

hittable_list world;

point3 lookfrom;
point3 lookat;
auto vfov = 40.0;
auto aperture = 0.0;

switch (0) {
    case 1:
        world = random_scene();
        lookfrom = point3(13,2,3);
        lookat = point3(0,0,0);
        vfov = 20.0;
        aperture = 0.1;
        break;

    default:
    case 2:
        world = two_spheres();
        lookfrom = point3(13,2,3);
        lookat = point3(0,0,0);
        vfov = 20.0;
        break;
}
bvh_node bvh(world, 0, 1);
// Camera

vec3 vup(0,1,0);
auto dist_to_focus = 10.0;
int image_height = static_cast<int>(image_width / aspect_ratio);

camera cam(lookfrom, lookat, vup, vfov, aspect_ratio, aperture, dist_to_focus, 0.0, 1.0);
...得到图像:
还有一种在图形学中广为使用的程序生成纹理,或者说是程序生成噪声。那就是柏林噪声 Perlin Noise。这是一种晶胞噪声,本文不会给出柏林噪声具体的推导过程和原理解释,只是给出其一种代码实现,感兴趣的话大家可以自行去查找相关知识。
[perlin.h] 柏林噪声类
#ifndef PERLIN_H
#define PERLIN_H

#include "constant.h"

class perlin
{
public:
    perlin()
    {
        ranvec = new vec3[point_count];
        for (int i = 0; i < point_count; ++i)
        {
            ranvec[i] = unit_vector(vec3::random(-1, 1));
        }

        perm_x = perlin_generate_perm();
        perm_y = perlin_generate_perm();
        perm_z = perlin_generate_perm();
    }

    ~perlin()
    {
        delete[] ranvec;
        delete[] perm_x;
        delete[] perm_y;
        delete[] perm_z;
    }

    double noise(const point3& p) const
    {
        auto u = p.x() - floor(p.x());
        auto v = p.y() - floor(p.y());
        auto w = p.z() - floor(p.z());
        auto i = static_cast<int>(floor(p.x()));
        auto j = static_cast<int>(floor(p.y()));
        auto k = static_cast<int>(floor(p.z()));
        vec3 c[2][2][2];

        for (int di = 0; di < 2; di++)
            for (int dj = 0; dj < 2; dj++)
                for (int dk = 0; dk < 2; dk++)
                    c[di][dj][dk] = ranvec[
                        perm_x[(i + di) & 255] ^
                            perm_y[(j + dj) & 255] ^
                            perm_z[(k + dk) & 255]
                    ];

        return perlin_interp(c, u, v, w);
    }

    double turb(const point3& p, int depth = 7) const
    {
        auto accum = 0.0;
        auto temp_p = p;
        auto weight = 1.0;

        for (int i = 0; i < depth; i++)
        {
            accum += weight * noise(temp_p);
            weight *= 0.5;
            temp_p *= 2;
        }

        return fabs(accum);
    }

private:
	static const int point_count = 256;
    vec3* ranvec;
	int* perm_x;
	int* perm_y;
	int* perm_z;

    static int* perlin_generate_perm()
    {
        auto p = new int[point_count];

        for (int i = 0; i < perlin::point_count; i++)
            p[i] = i;

        permute(p, point_count);

        return p;
    }

    static void permute(int* p, int n)
    {
        for (int i = n - 1; i > 0; i--)
        {
            int target = random_int(0, i);
            int tmp = p[i];
            p[i] = p[target];
            p[target] = tmp;
        }
    }

    static double perlin_interp(vec3 c[2][2][2], double u, double v, double w)
    {
        auto uu = u * u * (3 - 2 * u);
        auto vv = v * v * (3 - 2 * v);
        auto ww = w * w * (3 - 2 * w);
        auto accum = 0.0;

        for (int i = 0; i < 2; i++)
            for (int j = 0; j < 2; j++)
                for (int k = 0; k < 2; k++)
                {
                    vec3 weight_v(u - i, v - j, w - k);
                    accum += (i * uu + (1 - i) * (1 - uu))
                        * (j * vv + (1 - j) * (1 - vv))
                        * (k * ww + (1 - k) * (1 - ww))
                        * dot(c[i][j][k], weight_v);
                }

        return accum;
    }
};

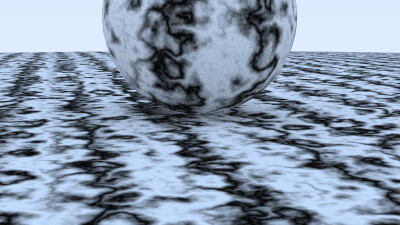
#endif其中 noise函数返回基本的柏林噪声,turb返回一个由多个柏林噪声叠加形成的噪声,通常称为 turb(湍流)噪声,其可以被用来模拟大理石瓷砖上的纹路形状。
对 turb噪声再做一些处理,我们就可以得到更清晰的大理石纹路效果,我们将其作为一种噪声纹理
[texture.h] 噪声纹理
class noise_texture : public texture {
    public:
        noise_texture() {}
        noise_texture(double sc) : scale(sc) {}

        virtual color value(double u, double v, const point3& p) const override {
            return color(1,1,1) * 0.5 * (1 + sin(scale*p.z() + 10*noise.turb(p)));
        }

    public:
        perlin noise;
        double scale;
};我们使用这个噪声纹理来渲染场景,会得到这样的效果:
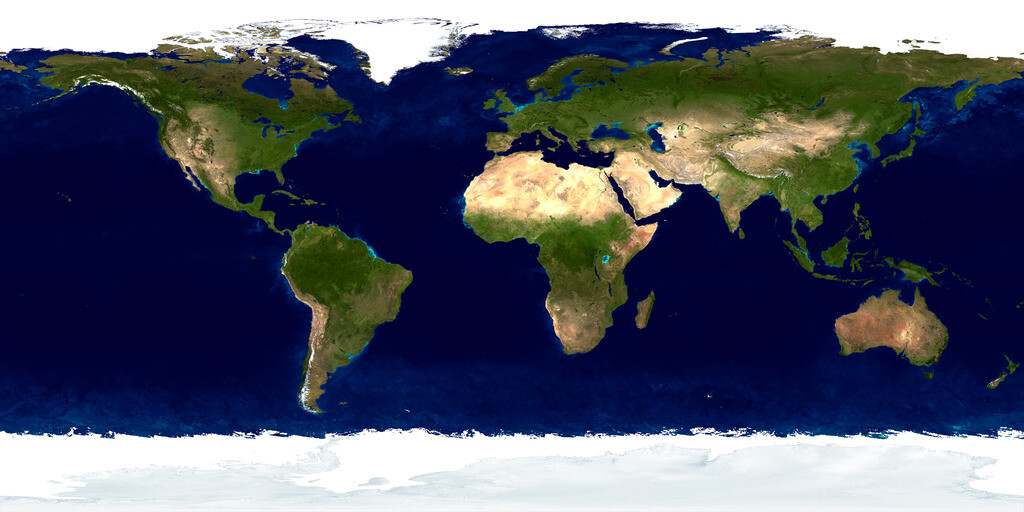
接下来我们通过图像映射的方式直接采样图片来做纹理。既然要使用图像,我们首先就要把图像载入到程序中,这里我们使用stb_image库(https://github.com/nothings/stb)来加载图片。我们得到的图片数据是其像素数据,因此我们需要把纹理坐标映射为图片的像素坐标,我们只需要直到图片的宽高即 image_width 和 image_height,那么与我们的纹理坐标uv相乘即可得到对应的像素坐标,即 i = u * image_width,j = v * image_height,而 stb_image 加载图像返回的数据是一个一维数组,因此还需要将二维坐标转换为一维数组的下标,即 index = j * image_width + i
因此我们就可以实现 image_texture 类了:
[texture.h] image_texture类
#include "constant.h"
#include "m_stb_image.h"
#include "perlin.h"

#include <iostream>

...

class image_texture : public texture {
    private:
        unsigned char *data;
        int width, height;
        int bytes_per_scanline;
    public:
        const static int bytes_per_pixel = 3;

        image_texture()
          : data(nullptr), width(0), height(0), bytes_per_scanline(0) {}

        image_texture(const char* filename) {
            auto components_per_pixel = bytes_per_pixel;

            data = stbi_load(
                filename, &width, &height, &components_per_pixel, components_per_pixel);

            if (!data) {
                std::cerr << "ERROR: Could not load texture image file '" << filename << "'.\n";
                width = height = 0;
            }

            bytes_per_scanline = bytes_per_pixel * width;
        }

        ~image_texture() {
            delete data;
        }

        virtual color value(double u, double v, const vec3& p) const override {
            // If we have no texture data, then return solid cyan as a debugging aid.
            if (data == nullptr)
                return color(0,1,1);

            // Clamp input texture coordinates to [0,1] x [1,0]
            u = clamp(u, 0.0, 1.0);
            v = 1.0 - clamp(v, 0.0, 1.0);  // Flip V to image coordinates

            auto i = static_cast<int>(u * width);
            auto j = static_cast<int>(v * height);

            // Clamp integer mapping, since actual coordinates should be less than 1.0
            if (i >= width)  i = width-1;
            if (j >= height) j = height-1;

            const auto color_scale = 1.0 / 255.0;
            auto pixel = data + j*bytes_per_scanline + i*bytes_per_pixel;

            return color(color_scale*pixel[0], color_scale*pixel[1], color_scale*pixel[2]);
        }
};这里包含的 m_stb_image头文件是按照 stbi_image 的规定对其做一些初始化定义:
[m_stb_image.h]
#ifndef M_STB_IMAGE_H
#define M_STB_IMAGE_H

// Disable pedantic warnings for this external library.
#ifdef _MSC_VER
    // Microsoft Visual C++ Compiler
    #pragma warning (push, 0)
#endif

#define STB_IMAGE_IMPLEMENTATION
#include "external/stb_image.h"

// Restore warning levels.
#ifdef _MSC_VER
    // Microsoft Visual C++ Compiler
    #pragma warning (pop)
#endif

#endif接下来我们使用下面这张图作为采样的贴图:
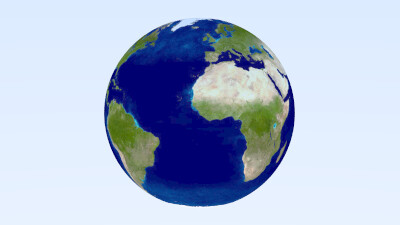
搭建场景
[main.cpp] 搭建场景
hittable_list earth() {
    auto earth_texture = make_shared<image_texture>("D:/RayTracing/Debug/earthmap.jpg");
    auto earth_surface = make_shared<lambertian>(earth_texture);
    auto globe = make_shared<sphere>(point3(0,0,0), 2, earth_surface);

    return hittable_list(globe);
}[main.cpp] 搭建场景
int main() {
    ...
    switch (0) {
        ...
        //default:
        case 3:
            ...
        default:
        case 4:
            world = earth();
            lookfrom = point3(13,2,3);
            lookat = point3(0,0,0);
            vfov = 20.0;
            break;
    }
...得到图像:
矩形
上篇文章我们已经实现了光源材质,接下来我们来创建矩形物体,并创建出矩形光源
我们先来创建一个在 xy 平面上的矩形,那么其法线就是在 z 轴方向上(其也是一种轴对齐矩形,Axis-Align Rect: aarect)。那么我们就可以用 x=x0, x=x1, y=y0, y=y1 这四xy平面上的线来确定矩形在xy平面上的范围,然后用 z=k 来确定该 xy平面在z轴上的位置,从而最终确定矩形的位置和范围,来表达具体的矩形。
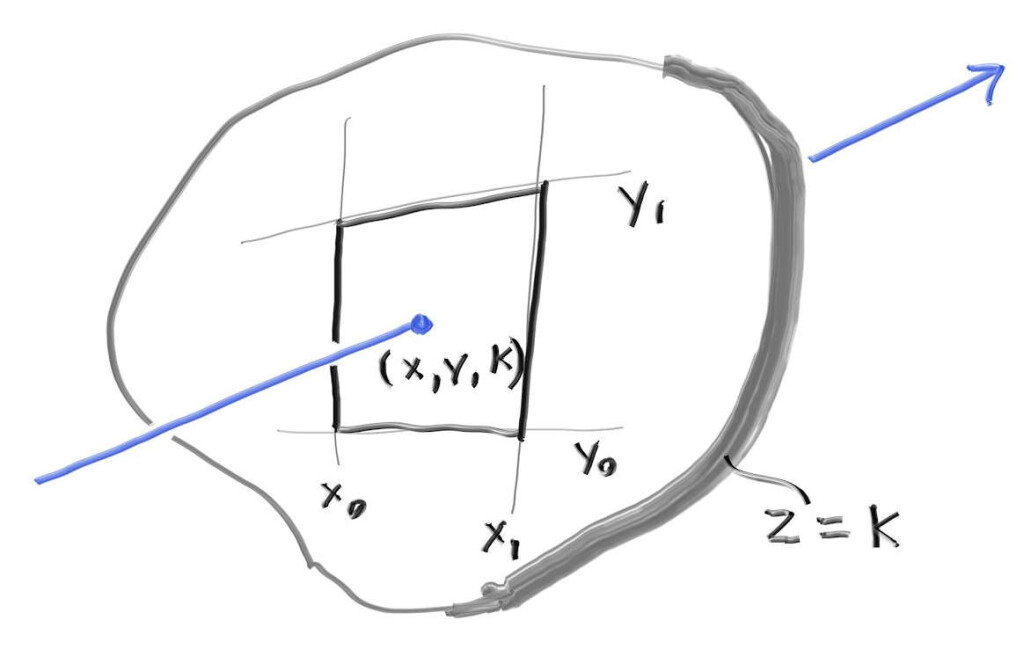
由于该矩形中任何一点,其 z 分量一定为 k,因此我们可以通过
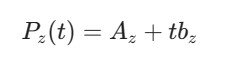
即
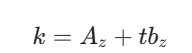
来得到射线与其所在的 xy平面相交的t值:
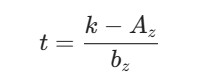
再将t代入回去,得到交点的x,y分量:
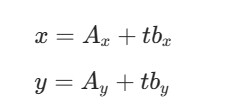
然后只需要判断 x,y 分量是否在 x0~x1 和 y0~y1 范围,即可确定交点是否真的在矩形内,即射线是否真的与矩形相交。
对于矩形的纹理坐标uv,实际就是其坐标分量在其平面范围内的比值,即 u = (x - x0) / (x1 - x0)
对于矩形的包围盒,我们选择通过给矩形增加一个微小的厚度,来创建其包围盒。
那么我们就可以来创建xy平面矩形类了:
[aarect.h] xy平面矩形
#ifndef AARECT_H
#define AARECT_H

#include "constant.h"

#include "hittable.h"

class xy_rect : public hittable {
    public:
        shared_ptr<material> mp;
        double x0, x1, y0, y1, k;
    public:
        xy_rect() {}

        xy_rect(double _x0, double _x1, double _y0, double _y1, double _k,
            shared_ptr<material> mat)
            : x0(_x0), x1(_x1), y0(_y0), y1(_y1), k(_k), mp(mat) {};

        virtual bool hit(const ray& r, double t_min, double t_max, hit_record& rec) const override;

        virtual bool bounding_box(double time0, double time1, aabb& output_box) const override {
            // The bounding box must have non-zero width in each dimension, so pad the Z
            // dimension a small amount.
            output_box = aabb(point3(x0,y0, k-0.0001), point3(x1, y1, k+0.0001));
            return true;
        }
};

#endif[aarect.h] xy平面矩形hit函数
bool xy_rect::hit(const ray& r, double t_min, double t_max, hit_record& rec) const {
    auto t = (k-r.origin().z()) / r.direction().z();
    if (t < t_min || t > t_max)
        return false;
    auto x = r.origin().x() + t*r.direction().x();
    auto y = r.origin().y() + t*r.direction().y();
    if (x < x0 || x > x1 || y < y0 || y > y1)
        return false;
    rec.u = (x-x0)/(x1-x0);
    rec.v = (y-y0)/(y1-y0);
    rec.t = t;
    auto outward_normal = vec3(0, 0, 1);
    rec.set_face_normal(r, outward_normal);
    rec.mat_ptr = mp;
    rec.p = r.at(t);
    return true;
}接下来创建矩形光源测试场景
[main.cpp] 测试场景
hittable_list simple_light() {
    hittable_list objects;

    auto pertext = make_shared<noise_texture>(4);
    objects.add(make_shared<sphere>(point3(0,-1000,0), 1000, make_shared<lambertian>(pertext)));
    objects.add(make_shared<sphere>(point3(0,2,0), 2, make_shared<lambertian>(pertext)));

    auto difflight = make_shared<emission>(color(4,4,4));
    objects.add(make_shared<xy_rect>(3, 5, 1, 3, -2, difflight));

    return objects;
}[main.cpp] 测试场景
#include "constant.h"

#include "camera.h"
#include "color.h"
#include "hittable_list.h"
#include "material.h"
#include "moving_sphere.h"
#include "sphere.h"
#include "aarect.h"

#include <iostream>
...
int main() {
    ...
    switch (0) {
        ...
        default:
        case 5:
            world = simple_light();
            samples_per_pixel = 400;
            background = color(0,0,0);
            lookfrom = point3(26,3,6);
            lookat = point3(0,2,0);
            vfov = 20.0;
            break;
    }
...这里我们让渲染的背景颜色能够通过 background 值进行自定义:
[main.cpp] 设置background color
					int j = y * thread_group_y_count + k;
					int i = x * thread_group_x_count + z;
					if (j * image_width + i > image_width * image_height) continue;
threads[k * thread_group_x_count + z] = std::thread(ray_tracing_thread, i, j, samples_per_pixel, image_width, image_height, colors, cam, background, bvh, max_depth)[main.cpp] 设置background color
void ray_tracing_thread(int i, int j, int samples_per_pixel, int image_width, int image_height, color* colors, camera cam, const color& background, const hittable& world, int max_depth)
{
	color pixel_color(0, 0, 0);
	hit_record rec;
	for (int s = 0; s < samples_per_pixel; ++s)
	{
		auto u = (i + random_double()) / (image_width - 1);
		auto v = (j + random_double()) / (image_height - 1);
		ray r = cam.get_ray(u, v);
		pixel_color += ray_color(r, background, world, max_depth);
	}
	write_color(colors, i, j, image_width, pixel_color, samples_per_pixel);
}[main.cpp] 设置background color
color ray_color(const ray& r, const color& background, const hittable& world, int depth)
{
	if (depth <= 0) return color(0, 0, 0);
	hit_record rec;
	if (world.hit(r, 0.001, infinity, rec))
	{
		color attenuation;
		color emit;
		ray scattered;
		emit = rec.mat_ptr->emitted(rec);
		if (!rec.mat_ptr->scatter(r, rec, attenuation, scattered))
		{
			return emit;
		}
		else
		{
			return emit + attenuation * ray_color(scattered, background, world, depth - 1);
		}
	}
	color back = background;
	return back;
}得到图像:
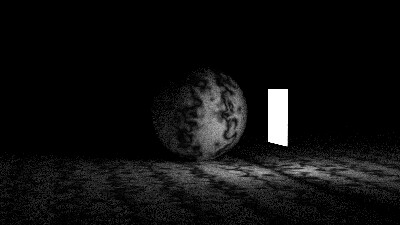
同样我们还可以像上篇文章一样,创建一个球体,然后给其一个光源材质,得到图像:
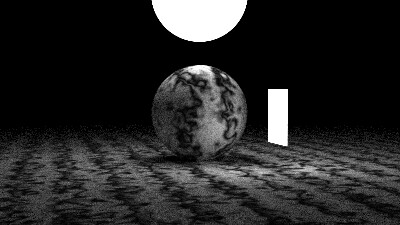
同理我们还可以得到 xz平面、yz平面的矩形:
[aarect.h] xz、yz平面矩形
class xz_rect : public hittable {
    public:
        shared_ptr<material> mp;
        double x0, x1, z0, z1, k;
    public:
        xz_rect() {}

        xz_rect(double _x0, double _x1, double _z0, double _z1, double _k,
            shared_ptr<material> mat)
            : x0(_x0), x1(_x1), z0(_z0), z1(_z1), k(_k), mp(mat) {};

        virtual bool hit(const ray& r, double t_min, double t_max, hit_record& rec) const override;

        virtual bool bounding_box(double time0, double time1, aabb& output_box) const override {
            // The bounding box must have non-zero width in each dimension, so pad the Y
            // dimension a small amount.
            output_box = aabb(point3(x0,k-0.0001,z0), point3(x1, k+0.0001, z1));
            return true;
        }
};

class yz_rect : public hittable {
    public:
        shared_ptr<material> mp;
        double y0, y1, z0, z1, k;
    public:
        yz_rect() {}

        yz_rect(double _y0, double _y1, double _z0, double _z1, double _k,
            shared_ptr<material> mat)
            : y0(_y0), y1(_y1), z0(_z0), z1(_z1), k(_k), mp(mat) {};

        virtual bool hit(const ray& r, double t_min, double t_max, hit_record& rec) const override;

        virtual bool bounding_box(double time0, double time1, aabb& output_box) const override {
            // The bounding box must have non-zero width in each dimension, so pad the X
            // dimension a small amount.
            output_box = aabb(point3(k-0.0001, y0, z0), point3(k+0.0001, y1, z1));
            return true;
        }
};[aarect.h] xz、yz平面矩形hit函数
bool xz_rect::hit(const ray& r, double t_min, double t_max, hit_record& rec) const {
    auto t = (k-r.origin().y()) / r.direction().y();
    if (t < t_min || t > t_max)
        return false;
    auto x = r.origin().x() + t*r.direction().x();
    auto z = r.origin().z() + t*r.direction().z();
    if (x < x0 || x > x1 || z < z0 || z > z1)
        return false;
    rec.u = (x-x0)/(x1-x0);
    rec.v = (z-z0)/(z1-z0);
    rec.t = t;
    auto outward_normal = vec3(0, 1, 0);
    rec.set_face_normal(r, outward_normal);
    rec.mat_ptr = mp;
    rec.p = r.at(t);
    return true;
}

bool yz_rect::hit(const ray& r, double t_min, double t_max, hit_record& rec) const {
    auto t = (k-r.origin().x()) / r.direction().x();
    if (t < t_min || t > t_max)
        return false;
    auto y = r.origin().y() + t*r.direction().y();
    auto z = r.origin().z() + t*r.direction().z();
    if (y < y0 || y > y1 || z < z0 || z > z1)
        return false;
    rec.u = (y-y0)/(y1-y0);
    rec.v = (z-z0)/(z1-z0);
    rec.t = t;
    auto outward_normal = vec3(1, 0, 0);
    rec.set_face_normal(r, outward_normal);
    rec.mat_ptr = mp;
    rec.p = r.at(t);
    return true;
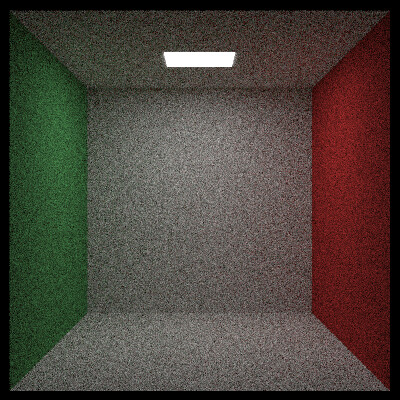
}接下来我们就可以创建一个空的 Cornell Box 场景了,康奈尔盒子是由康奈尔大学的计算机图形学组的Cindy M. Goral,Kenneth E. Torrance,Donald P. Greenberg和Bennett Battaile 在 1984 年发表的论文中创建出的一个渲染场景,而在康奈尔大学中他们也实际建造了与之一样的现实场景,用来验证渲染的正确性。
[main.cpp] cornell box场景
hittable_list cornell_box() {
    hittable_list objects;

    auto red   = make_shared<lambertian>(color(.65, .05, .05));
    auto white = make_shared<lambertian>(color(.73, .73, .73));
    auto green = make_shared<lambertian>(color(.12, .45, .15));
    auto light = make_shared<emission>(color(15, 15, 15));

    objects.add(make_shared<yz_rect>(0, 555, 0, 555, 555, green));
    objects.add(make_shared<yz_rect>(0, 555, 0, 555, 0, red));
    objects.add(make_shared<xz_rect>(213, 343, 227, 332, 554, light));
    objects.add(make_shared<xz_rect>(0, 555, 0, 555, 0, white));
    objects.add(make_shared<xz_rect>(0, 555, 0, 555, 555, white));
    objects.add(make_shared<xy_rect>(0, 555, 0, 555, 555, white));

    return objects;
}[main.cpp] cornell box场景
int main() {
    ...
    switch (0) {
        ...
        //default:
        case 5:
            ...
            break;

        default:
        case 6:
            world = cornell_box();
            aspect_ratio = 1.0;
            image_width = 600;
            samples_per_pixel = 200;
            background = color(0,0,0);
            lookfrom = point3(278, 278, -800);
            lookat = point3(278, 278, 0);
            vfov = 40.0;
            break;
    }
...得到图像:
立方体
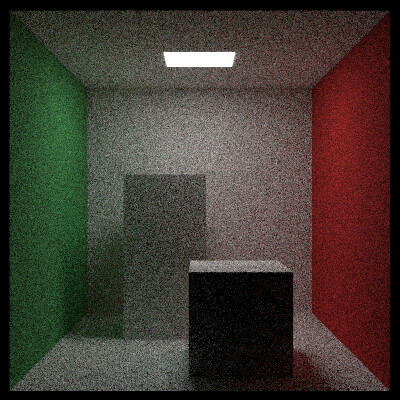
Corrnel Box 中还有两个旋转的立方体,对于轴对齐的盒子我们可以用与AABB包围盒同样的方式来表示,并且其还是由6个轴对齐矩形构成的,因此我们可以轻易的组建出来
[box.h] 立方体类
#ifndef BOX_H
#define BOX_H

#include "constant.h"

#include "aarect.h"
#include "hittable_list.h"

class box : public hittable  {
    public:
        point3 box_min;
        point3 box_max;
        hittable_list sides;

    public:
        box() {}
        box(const point3& p0, const point3& p1, shared_ptr<material> ptr);

        virtual bool hit(const ray& r, double t_min, double t_max, hit_record& rec) const override;

        virtual bool bounding_box(double time0, double time1, aabb& output_box) const override {
            output_box = aabb(box_min, box_max);
            return true;
        }
};

box::box(const point3& p0, const point3& p1, shared_ptr<material> ptr) {
    box_min = p0;
    box_max = p1;

    sides.add(make_shared<xy_rect>(p0.x(), p1.x(), p0.y(), p1.y(), p1.z(), ptr));
    sides.add(make_shared<xy_rect>(p0.x(), p1.x(), p0.y(), p1.y(), p0.z(), ptr));

    sides.add(make_shared<xz_rect>(p0.x(), p1.x(), p0.z(), p1.z(), p1.y(), ptr));
    sides.add(make_shared<xz_rect>(p0.x(), p1.x(), p0.z(), p1.z(), p0.y(), ptr));

    sides.add(make_shared<yz_rect>(p0.y(), p1.y(), p0.z(), p1.z(), p1.x(), ptr));
    sides.add(make_shared<yz_rect>(p0.y(), p1.y(), p0.z(), p1.z(), p0.x(), ptr));
}

bool box::hit(const ray& r, double t_min, double t_max, hit_record& rec) const {
    return sides.hit(r, t_min, t_max, rec);
}

#endif在我们的 Corrnel Box 中添加这两个盒子:
[main.cpp] 添加盒子
#include "box.h"
...
objects.add(make_shared<box>(point3(130, 0, 65), point3(295, 165, 230), white));
objects.add(make_shared<box>(point3(265, 0, 295), point3(430, 330, 460), white));得到图像:
移动与旋转
在光线追踪渲染中,对物体进行变换实际上可以转化为对射线进行变换。比如下面这个图展示的对物体进行移动:
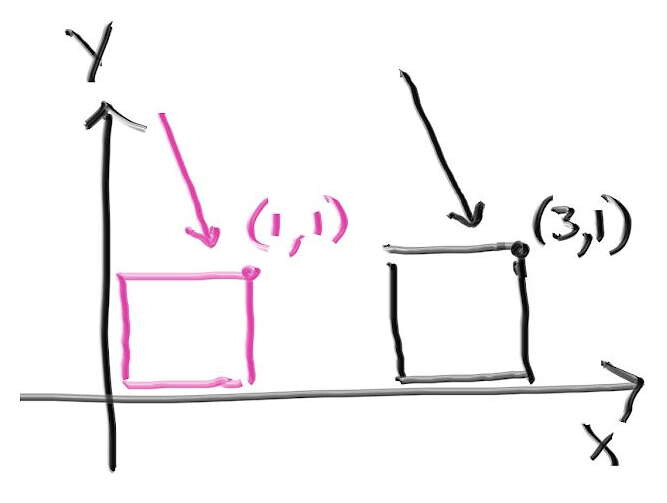
我们要把物体移动到粉色的这个位置,那么我们实际上可以不去移动物体。而是移动射线,将粉色的射线移动到黑色的位置,也就是对射线做反向位移,那么射线就会击中到该物体上的同一个位置,然后再对击中点做正向位移,此时我们算出的击中点坐标就是位移后的坐标。
而对于AABB包围盒,我们只需要直接移动包围盒的两个点p_min 和 p_max 即可直接移动整个包围盒
[hittable.h] 位移类
class translate : public hittable {
    public:
        shared_ptr<hittable> ptr;
        vec3 offset;

    public:
        translate(shared_ptr<hittable> p, const vec3& displacement)
            : ptr(p), offset(displacement) {}

        virtual bool hit(
            const ray& r, double t_min, double t_max, hit_record& rec) const override;

        virtual bool bounding_box(double time0, double time1, aabb& output_box) const override;
};

bool translate::hit(const ray& r, double t_min, double t_max, hit_record& rec) const {
    ray moved_r(r.origin() - offset, r.direction(), r.time());
    if (!ptr->hit(moved_r, t_min, t_max, rec))
        return false;

    rec.p += offset;
    rec.set_face_normal(moved_r, rec.normal);

    return true;
}

bool translate::bounding_box(double time0, double time1, aabb& output_box) const {
    if (!ptr->bounding_box(time0, time1, output_box))
        return false;

    output_box = aabb(
        output_box.min() + offset,
        output_box.max() + offset);

    return true;
}nslate 中的 ptr 就是我们要移动的物体,而其本身就表示移动后的问题,因此其继承自 hittable 类
对于旋转,同样的我们可以先反向旋转射线,射线击中后在对击中点做正向旋转,需要注意的是旋转变换除了改变了击中点的位置坐标,还改变了击中点的法线坐标,因此法线也需要做正向旋转。
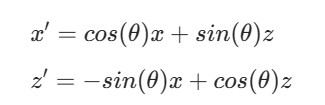
这里我们实现一个绕轴的旋转,例如 对于绕 z 轴旋转,点的 z 分量不会变化,只有 x,y 分量会变化,其公式为:
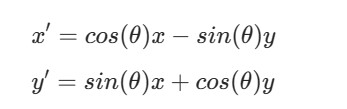
同样
绕y轴旋转:
绕x轴旋转:
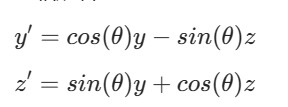
对于 Corrnel Box 场景,里面的两个盒子是绕 y 轴旋转一定角度,因此我们来实现绕y轴的旋转:
[hittable.h] 绕y轴旋转类
class rotate_y : public hittable {
    public:
        shared_ptr<hittable> ptr;
        double sin_theta;
        double cos_theta;
        bool hasbox;
        aabb bbox;

    public:
        rotate_y(shared_ptr<hittable> p, double angle);

        virtual bool hit(
            const ray& r, double t_min, double t_max, hit_record& rec) const override;

        virtual bool bounding_box(double time0, double time1, aabb& output_box) const override {
            output_box = bbox;
            return hasbox;
        }
};其构造函数实现:
[hittable.h] rotate_y 构造函数
rotate_y::rotate_y(shared_ptr<hittable> p, double angle) : ptr(p) {
    auto radians = degrees_to_radians(angle);
    sin_theta = sin(radians);
    cos_theta = cos(radians);
    hasbox = ptr->bounding_box(0, 1, bbox);

    point3 min( infinity,  infinity,  infinity);
    point3 max(-infinity, -infinity, -infinity);

    for (int i = 0; i < 2; i++) {
        for (int j = 0; j < 2; j++) {
            for (int k = 0; k < 2; k++) {
                auto x = i*bbox.max().x() + (1-i)*bbox.min().x();
                auto y = j*bbox.max().y() + (1-j)*bbox.min().y();
                auto z = k*bbox.max().z() + (1-k)*bbox.min().z();

                auto newx =  cos_theta*x + sin_theta*z;
                auto newz = -sin_theta*x + cos_theta*z;

                vec3 tester(newx, y, newz);

                for (int c = 0; c < 3; c++) {
                    min[c] = fmin(min[c], tester[c]);
                    max[c] = fmax(max[c], tester[c]);
                }
            }
        }
    }

    bbox = aabb(min, max);
}hit函数实现:
[hittable.h] rotate_y hit函数实现
bool rotate_y::hit(const ray& r, double t_min, double t_max, hit_record& rec) const {
    auto origin = r.origin();
    auto direction = r.direction();

    origin[0] = cos_theta*r.origin()[0] - sin_theta*r.origin()[2];
    origin[2] = sin_theta*r.origin()[0] + cos_theta*r.origin()[2];

    direction[0] = cos_theta*r.direction()[0] - sin_theta*r.direction()[2];
    direction[2] = sin_theta*r.direction()[0] + cos_theta*r.direction()[2];

    ray rotated_r(origin, direction, r.time());

    if (!ptr->hit(rotated_r, t_min, t_max, rec))
        return false;

    auto p = rec.p;
    auto normal = rec.normal;

    p[0] =  cos_theta*rec.p[0] + sin_theta*rec.p[2];
    p[2] = -sin_theta*rec.p[0] + cos_theta*rec.p[2];

    normal[0] =  cos_theta*rec.normal[0] + sin_theta*rec.normal[2];
    normal[2] = -sin_theta*rec.normal[0] + cos_theta*rec.normal[2];

    rec.p = p;
    rec.set_face_normal(rotated_r, normal);

    return true;
}接下来我们把旋转和位移应用到 Corrnel Box 场景中的两个盒子上,构成我们最终的 Corrnel Box 场景:
[main.cpp] 应用旋转和位移
shared_ptr<hittable> box1 = make_shared<box>(point3(0, 0, 0), point3(165, 330, 165), white);
box1 = make_shared<rotate_y>(box1, 15);
box1 = make_shared<translate>(box1, vec3(265,0,295));
objects.add(box1);

shared_ptr<hittable> box2 = make_shared<box>(point3(0,0,0), point3(165,165,165), white);
box2 = make_shared<rotate_y>(box2, -18);
box2 = make_shared<translate>(box2, vec3(130,0,65));
objects.add(box2);得到图像:
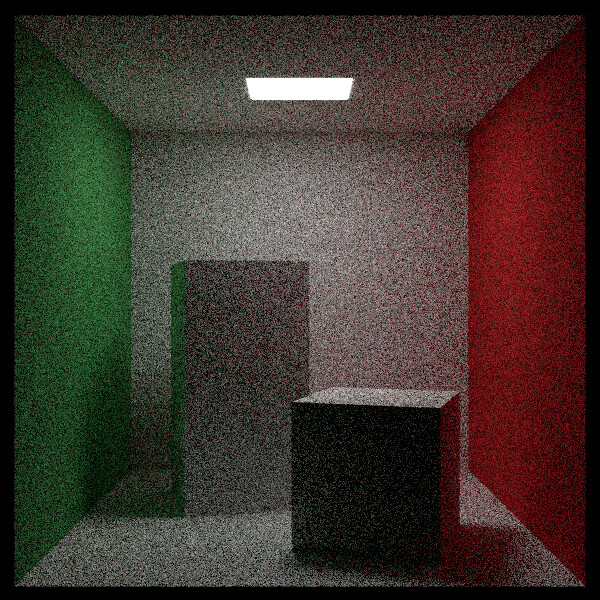
体积
还记得上篇文章中提到的大气散射吗?其原理为大气中散布着大量的粒子,光线在打中这些粒子时能量会被吸收掉一部分,然后剩余的能量发生散射。大气中的粒子浓度在高度上大致是呈指数分布的,即我们经常使用的 exp(-h/H) 这个近似因子。同时其还受到压强、温度、湿度等等因素的影响,在浓度低时,我们看到的天空就比较晴朗,能见度会比较高,在浓度高时就会形成雾或者霾,此时能见度就比较低了。除了整个大气层有这样的特点,像 天上的云、烟囱冒出的烟、燃烧或者爆炸产生的烟雾、地面扬尘、对着面粉吹口气等等都会形成类似的物体,对于这类物体在渲染中我们通常将其抽象为 Volume 体积。
接下来我们会对体积进行更加基于光追原理的实现,其不再只是对光能量进行吸收,还会对光线产生散射影响,因此我们先把上一篇中的大气散射实现给删掉。
[constant.h] 删除旧的大气散射
#ifndef CONSTANT_H
#define CONSTANT_H

...

#include "ray.h"
#include "vec3.h"

//color atmoscatter(double t)
//{
//    double e = exp(-0.25 * t);
//    return ((1.0 - e) * color(.3, .4, .5) + e * color(1, 1, 1));
//}
#endif[material.h] 删除旧大气散射
...
class lambertian : public material
{
public:
    shared_ptr<texture> albedo;

public:
    lambertian(const color& a) : albedo(make_shared<solid_color>(a)) {}
    lambertian(shared_ptr<texture> a) : albedo(a) {}

    virtual bool scatter(const ray& r_in, const hit_record& rec, color& attenuation, ray& scattered) const override
    {
        auto scatter_direction = rec.normal + random_unit_vector();
        // Catch degenerate scatter direction
        if (scatter_direction.near_zero())
            scatter_direction = rec.normal;
        scattered = ray(rec.p, unit_vector(scatter_direction), r_in.time());
        attenuation = albedo->value(rec.u, rec.v, rec.p);
        return true;
    }
};
...
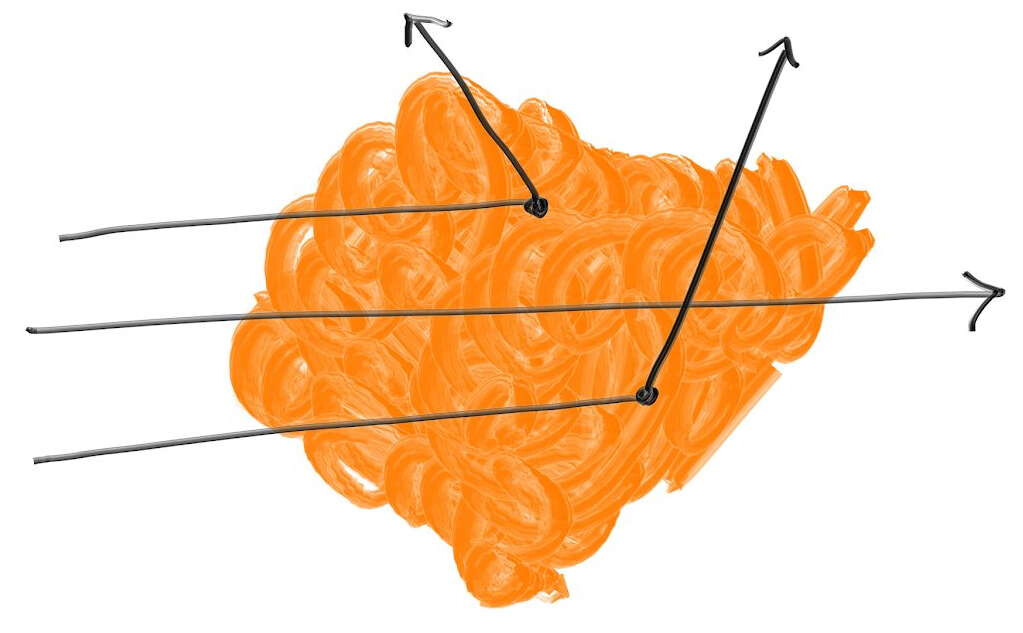
如上图表达了射线在体积内的散射情况。我们可以给体积表面看作一个碰撞体,那么射线就会在其表面有一个交点,接下来如果我们要知道射线发生散射的点,那么就需要知道射线在与表面相交后又经过了多少的距离产生了散射,在光学上我们有公式:
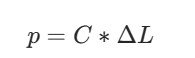
其中 p 与光学密度(optical density)成正比,光学密度表示 光进入介质前的光强(l0)和透过介质后的光强(lt)比的对数即 od = log(l0/l1)
而 C 就是我们所说的散射概率,那么 p/C 即为我们的散射距离,即
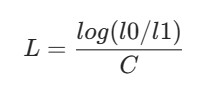
l0/l1 是一个大于 1 的值,我们可以对其取倒数,将其限定在一个 0~1 的范围,于是得到:
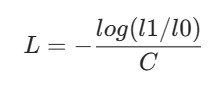
即
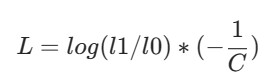
根据体积中只有一种粒子,那么其光学密度应该恒定,而如果有多种粒子那么光学密度就会有变换
这样我们就可以得到射线实际与体积的相交点了,也就是我们的散射点。
对于体积,其散射方向通常与法线无关,因此我们并不关心散射点的法线方向。
体积的材质描述了光学散射的方向和能量的变化,在光学上其被称为 相位函数 phase_function
因此我们可以创建一个拥有固定散射概率 和 随机光学密度的体积:
[constant_medium.h] 体积类
#ifndef CONSTANT_MEDIUM_H
#define CONSTANT_MEDIUM_H

#include "rtweekend.h"

#include "hittable.h"
#include "material.h"
#include "texture.h"

class constant_medium : public hittable {
    public:
        shared_ptr<hittable> boundary;
        shared_ptr<material> phase_function;
        double neg_inv_density;

    public:
        constant_medium(shared_ptr<hittable> b, double d, shared_ptr<texture> a)
            : boundary(b),
              neg_inv_density(-1/d),
              phase_function(make_shared<isotropic>(a))
            {}

        constant_medium(shared_ptr<hittable> b, double d, color c)
            : boundary(b),
              neg_inv_density(-1/d),
              phase_function(make_shared<isotropic>(c))
            {}

        virtual bool hit(
            const ray& r, double t_min, double t_max, hit_record& rec) const override;

        virtual bool bounding_box(double time0, double time1, aabb& output_box) const override {
            return boundary->bounding_box(time0, time1, output_box);
        }
};

#endif其 hit 函数为:
[constant_medium.h] hit函数
bool constant_medium::hit(const ray& r, double t_min, double t_max, hit_record& rec) const {
    // Print occasional samples when debugging. To enable, set enableDebug true.
    const bool enableDebug = false;
    const bool debugging = enableDebug && random_double() < 0.00001;

    hit_record rec1, rec2;

    if (!boundary->hit(r, -infinity, infinity, rec1))
        return false;

    if (!boundary->hit(r, rec1.t+0.0001, infinity, rec2))
        return false;

    if (debugging) std::cerr << "\nt_min=" << rec1.t << ", t_max=" << rec2.t << '\n';

    if (rec1.t < t_min) rec1.t = t_min;
    if (rec2.t > t_max) rec2.t = t_max;

    if (rec1.t >= rec2.t)
        return false;

    if (rec1.t < 0)
        rec1.t = 0;

    const auto ray_length = r.direction().length();
    const auto distance_inside_boundary = (rec2.t - rec1.t) * ray_length;
    const auto hit_distance = neg_inv_density * log(random_double());

    if (hit_distance > distance_inside_boundary)
        return false;

    rec.t = rec1.t + hit_distance / ray_length;
    rec.p = r.at(rec.t);

    if (debugging) {
        std::cerr << "hit_distance = " <<  hit_distance << '\n'
                  << "rec.t = " <<  rec.t << '\n'
                  << "rec.p = " <<  rec.p << '\n';
    }

    rec.normal = vec3(1,0,0);  // arbitrary
    rec.front_face = true;     // also arbitrary
    rec.mat_ptr = phase_function;

    return true;
}我们在hit函数中做了许多判断,原因在于对于体积 我们的射线是可以在里面进行穿梭移动的。不像其它的硬表面物体光学在击中表面后就立马发生散射离开表面,并且光学无法穿入其内部。因此我们要在光学在体积内部的情况做出一些额外判断。
接下来我们实现一个各向同性的散射函数,即光线会均匀随机的选择一个方向作为散射方向
[material.h] 各向同性散射函数
class isotropic : public material {
    public:
        shared_ptr<texture> albedo;

    public:
        isotropic(color c) : albedo(make_shared<solid_color>(c)) {}
        isotropic(shared_ptr<texture> a) : albedo(a) {}

        virtual bool scatter(
            const ray& r_in, const hit_record& rec, color& attenuation, ray& scattered
        ) const override {
            scattered = ray(rec.p, random_in_unit_sphere(), r_in.time());
            attenuation = albedo->value(rec.u, rec.v, rec.p);
            return true;
        }
};最终场景
最后我们创建一个场景,来把本篇中的所有内容都给展现出来。
我们用一堆有随机高度的盒子作为地面
放置一个矩形光源
放置一个移动球体
放置一个玻璃球和金属球
再放置一个玻璃球并以其为表面创建一个蓝色体积雾
再创建一个表面为半径很大的球体的体积雾,作为我们的"大气层"
放置一个采样地球贴图纹理的球
放置一个纹理为柏林噪声的球
在创建一堆球并将其旋转和移动到一个立方体区域内
[main.cpp] 最终场景
...

hittable_list final_scene() {
    hittable_list boxes1;
    auto ground = make_shared<lambertian>(color(0.48, 0.83, 0.53));

    const int boxes_per_side = 20;
    for (int i = 0; i < boxes_per_side; i++) {
        for (int j = 0; j < boxes_per_side; j++) {
            auto w = 100.0;
            auto x0 = -1000.0 + i*w;
            auto z0 = -1000.0 + j*w;
            auto y0 = 0.0;
            auto x1 = x0 + w;
            auto y1 = random_double(1,101);
            auto z1 = z0 + w;

            boxes1.add(make_shared<box>(point3(x0,y0,z0), point3(x1,y1,z1), ground));
        }
    }

    hittable_list objects;

    objects.add(make_shared<bvh_node>(boxes1, 0, 1));

    auto light = make_shared<emission>(color(7, 7, 7));
    objects.add(make_shared<xz_rect>(123, 423, 147, 412, 554, light));

    auto center1 = point3(400, 400, 200);
    auto center2 = center1 + vec3(30,0,0);
    auto moving_sphere_material = make_shared<lambertian>(color(0.7, 0.3, 0.1));
    objects.add(make_shared<moving_sphere>(center1, center2, 0, 1, 50, moving_sphere_material));

    objects.add(make_shared<sphere>(point3(260, 150, 45), 50, make_shared<dielectric>(1.5)));
    objects.add(make_shared<sphere>(
        point3(0, 150, 145), 50, make_shared<metal>(color(0.8, 0.8, 0.9), 1.0)
    ));

    auto boundary = make_shared<sphere>(point3(360,150,145), 70, make_shared<dielectric>(1.5));
    objects.add(boundary);
    objects.add(make_shared<constant_medium>(boundary, 0.2, color(0.2, 0.4, 0.9)));
    boundary = make_shared<sphere>(point3(0, 0, 0), 5000, make_shared<dielectric>(1.5));
    objects.add(make_shared<constant_medium>(boundary, .0001, color(1,1,1)));

    auto emat = make_shared<lambertian>(make_shared<image_texture>("earthmap.jpg"));
    objects.add(make_shared<sphere>(point3(400,200,400), 100, emat));
    auto pertext = make_shared<noise_texture>(0.1);
    objects.add(make_shared<sphere>(point3(220,280,300), 80, make_shared<lambertian>(pertext)));

    hittable_list boxes2;
    auto white = make_shared<lambertian>(color(.73, .73, .73));
    int ns = 1000;
    for (int j = 0; j < ns; j++) {
        boxes2.add(make_shared<sphere>(point3::random(0,165), 10, white));
    }

    objects.add(make_shared<translate>(
        make_shared<rotate_y>(
            make_shared<bvh_node>(boxes2, 0.0, 1.0), 15),
            vec3(-100,270,395)
        )
    );

    return objects;
}

int main() {
    ...
    switch (0) {
        ...
        default:
        case 8:
            world = final_scene();
            aspect_ratio = 1.0;
            image_width = 800;
            samples_per_pixel = 10000;
            background = color(0,0,0);
            lookfrom = point3(478, 278, -600);
            lookat = point3(278, 278, 0);
            vfov = 40.0;
            break;
    ...
}得到图像:
