

1.调整系统DNS服务
在上一篇文章《 [Linux软路由第二弹] - 5.设置PPPoE拨号和防火墙 》中,Linux 路由器已正常联网,但还未能给内网设备提供网络服务。
在上版构建 Linux 路由器的文章中,使用了 来提供内网的 DNS 和 DHCP 服务。但当前内网中已有独立 ADH 服务器提供 DNS 服务,因此本文选择使用更加轻量的组件 。
首先需要关闭 Ubuntu 默认使用的 服务,避免 端口被占用,逐条执行以下命令,将系统 服务关闭:
## 停止 systemd-resolved 服务
sudo systemctl disable --now systemd-resolved.service

## 禁用 systemd-resolved 服务
sudo systemctl mask systemd-resolved.service
移除系统当前使用的 DNS 配置文件:
## 移除 DNS 配置文件
sudo rm -rvf /etc/resolv.conf使用 编辑器创建 DNS 配置文件,执行以下命令:
## 创建新的 DNS 配置文件
sudo nano /etc/resolv.conf在编辑器对话框中输入以下内容,并保存。
注意:其中 search 参数为本地域名,请请根据实际情况进行调整。
# This configuration file is customized by fox
# Optimize local resolv for linux router
# The search parameter needs to be customized

nameserver ::1
nameserver 127.0.0.1
options edns0 timeout:1 trust-ad
search fox.local
为了防止系统中其他服务意外修改 DNS 配置文件,需要修改配置文件的权限:
## DNS 配置文件防篡改
sudo chattr +i /etc/resolv.conf
使用以下命令检查权限是否修改成功:
## 检查 DNS 配置文件权限
lsattr /etc/resolv.conf

## 示例输出
----i----------------- /etc/resolv.conf2.配置Dnsmasq服务
的主配置文件一般位于 目录下,但修改主配置文件之前,需要做几步额外操作。按照惯例,配置 之前,需要检查 服务状态,确保该服务开机自启动。
说明:如果看到服务报错,是因为当前服务暂未配置,无需担心。
## 检查 dnsmasq.service
sudo systemctl status dnsmasq.service技术上, 只需要 “一个” 配置文件即可完成配置,本文中拆分配置文件主要是为了维护方便。
说明:以下配置内容参考了 OpenWrt 的相关设置,可根据实际需求进行调整。
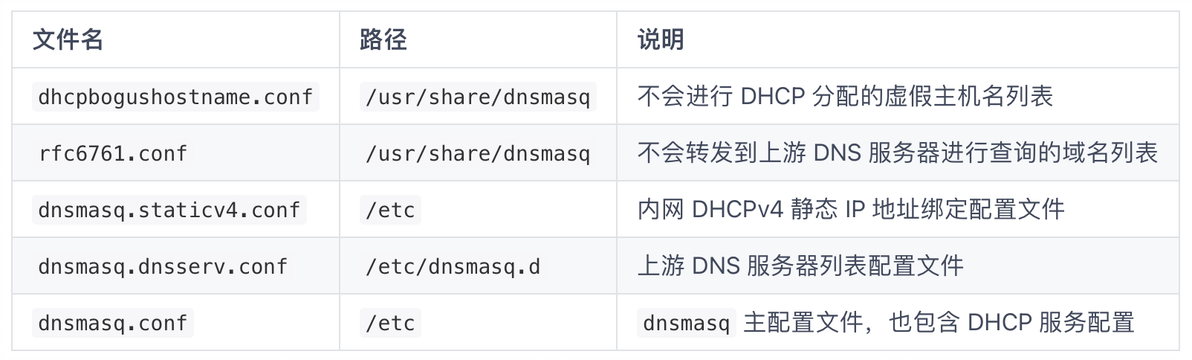
2.1.创建Dnsmasq附加配置
使用 编辑器创建 配置文件,执行以下命令:
## 创建 dhcpbogushostname 配置文件
sudo nano /usr/share/dnsmasq/dhcpbogushostname.conf
在编辑器对话框中输入以下内容,并保存:
# This configuration file is customized by OpenWrt
#
# dhcpbogushostname.conf included configuration file for dnsmasq
#
# includes a list of hostnames that should not be associated with dhcp leases
# in response to CERT VU#598349
# file included by default, option dhcpbogushostname 0  to disable

dhcp-name-match=set:dhcp_bogus_hostname,localhost
dhcp-name-match=set:dhcp_bogus_hostname,wpad
使用 编辑器创建 配置文件,执行以下命令:
## 创建 rfc6761 配置文件
sudo nano /usr/share/dnsmasq/rfc6761.conf在编辑器对话框中输入以下内容,并保存:
# This configuration file is customized by OpenWrt
#
# RFC6761 included configuration file for dnsmasq
#
# includes a list of domains that should not be forwarded to Internet name servers
# to reduce burden on them, asking questions that they won't know the answer to.

server=/bind/
server=/invalid/
server=/local/
server=/localhost/
server=/onion/
server=/test/
2.2.创建静态地址绑定配置
使用 编辑器创建 DHCPv4静态地址绑定 配置文件,执行以下命令:
## 创建 静态地址绑定 配置文件
sudo nano /etc/dnsmasq.staticv4.conf在编辑器对话框中输入以下内容,并保存。
说明:当前该配置文件中静态绑定项为空,具体绑定方法参见配置文件中的示例。
# This configuration file is customized by fox
# Dnsmasq DHCPv4 static leases

# Config Samples
# dhcp-host=00:0c:29:f4:27:c1,172.16.10.254,foxmachine,2h
# dhcp-host=00:0c:29:f4:27:c2,set:dnsv4ha,172.16.10.253,foxmachine-1,2d
# dhcp-host=00:0c:29:f4:27:c3,set:gwpass,172.16.10.252,foxmachine-2,1w
# dhcp-host=00:0c:29:f4:27:c4,set:gwpass,set:dnsv4ha,172.16.10.251,foxmachine-3,infinite
2.3.创建DNS服务器配置
使用 编辑器创建 上游DNS服务器 配置文件,执行以下命令:
## 创建 上游DNS服务器 配置文件
sudo nano /etc/dnsmasq.d/dnsmasq.dnsserv.conf在编辑器对话框中输入以下内容,并保存。
说明:演示的上游 DNS 服务器均为内网 ADH 服务器地址,请根据实际情况进行调整。
# This configuration file is customized by fox
# Dnsmasq main dns servers

server=172.16.1.2
server=172.16.1.3

server=fd10::2
server=fd10::3
2.4.修改Dnsmasq主配置
修改 主配置文件之前,使用以下命令将其备份:
## 备份 Dnsmasq 主配置文件
sudo mv /etc/dnsmasq.conf /etc/dnsmasq.conf.bak使用 编辑器创建 配置文件,执行以下命令:
## 创建 Dnsmasq 主配置文件
sudo nano /etc/dnsmasq.conf在编辑器对话框中输入以下内容,并保存。
说明:请检查配置文件中关于本地域名以及 DHCP 服务器相关配置项,并根据实际情况进行调整。
# This configuration file is customized by fox
# Optimize dnsmasq parameters for linux router

# Main Config

conf-dir=/etc/dnsmasq.d/,*.conf
conf-file=/etc/dnsmasq.conf
conf-file=/etc/dnsmasq.staticv4.conf
conf-file=/usr/share/dnsmasq/dhcpbogushostname.conf
conf-file=/usr/share/dnsmasq/rfc6761.conf

log-facility=/var/log/dnsmasq.log
log-async=20

cache-size=512
edns-packet-max=1232

except-interface=pppoe-out1
ra-param=bridge1,60,1800

domain=fox.local
local=/fox.local/

bind-dynamic
bogus-priv
dhcp-authoritative
dhcp-rapid-commit
domain-needed
enable-ra
expand-hosts
filterwin2k
localise-queries
local-service
log-dhcp
no-negcache
no-resolv

# DHCP Server Config

dhcp-broadcast=tag:needs-broadcast
dhcp-ignore-names=tag:dhcp_bogus_hostname
dhcp-leasefile=/var/lib/misc/dnsmasq.leases

dhcp-option=dnsv4,6,172.16.1.2,172.16.1.3
dhcp-option=dnsv4ha,6,172.16.1.1
dhcp-option=gwpass,3,172.16.1.5

dhcp-option=dnsv6,option6:dns-server,[fd10::2],[fd10::3]
dhcp-option=dnsv6ha,option6:dns-server,[fd10::1]

dhcp-range=set:dnsv4,172.16.1.101,172.16.1.150,1d
dhcp-range=set:dnsv6,::,constructor:bridge1,slaac
至此,服务器 DNS 和 DHCP 设置步骤完成。
