

0.前期准备
在上一篇文章《 [Linux软路由第二弹] - 3.Ubuntu服务器初始化 》中,Linux 路由器已经安装了必要软件,现在开始设置服务器网络。
由于网络设置中涉及网桥,需要根据实际情况判断是否需要关闭 PVE 服务器内其他路由系统,或断开 Ubuntu Server 的上级物理路由器,并将 Ubuntu Server 连接光猫。
1.移除旧网络设置
Ubuntu 系统默认使用 Netplan 进行网络设置,为了避免干扰,需要将其配置文件移除。
## 移除 Ubuntu Netplan 配置文件
sudo rm -rvf /etc/netplan/*一并移除旧的运行时 Systemd Network 配置文件。
## 移除 运行时 网络配置文件
sudo rm -rvf /run/systemd/network/*2.设置网桥
本机网络配置文件一般放在 /etc/systemd/network 目录下。创建网桥之前,需要检查 systemd-networkd.service 服务状态,确保该服务开机自启动。
## 检查 systemd-networkd.service
sudo systemctl status systemd-networkd.service服务状态为 enabled; preset: enabled ,则表示该服务已开机自启动:
## 示例输出
● systemd-networkd.service - Network Configuration
     Loaded: loaded (/lib/systemd/system/systemd-networkd.service; enabled; preset: enabled)
     Active: active (running) since Tue 2022-11-01 04:56:34 UTC; 8min ago
TriggeredBy: ● systemd-networkd.socket
       Docs: man:systemd-networkd.service(8)
   Main PID: 450 (systemd-network)
     Status: "Processing requests..."
      Tasks: 1 (limit: 2227)
     Memory: 2.9M
        CPU: 110ms
     CGroup: /system.slice/systemd-networkd.service
└─450 /lib/systemd/systemd-networkd2.1.创建网桥设备
使用 nano 编辑器创建 网桥设备 配置文件,执行以下命令:
## 创建 网桥设备 配置文件
sudo nano /etc/systemd/network/25-bridge-device.netdev在编辑器对话框中输入以下内容,并保存:
[NetDev]
Name=bridge1
Kind=bridge

2.2.设置网桥网络
设置网桥网络之前,需要对所使用的网络地址段进行规划,演示参数如下:
IPv4 地址(本机):172.16.1.1
IPv4 子网掩码:255.255.255.0 ( 即 /24 )
IPv6 地址(本机):fd10::1
IPv6 前缀:fd10::/64
根据 RFC-4193 中给出的定义,IPv6 的私有地址 ULA 前缀为 FC00::/7 。
该前缀包含 FC00::/8 和 FD00::/8 两个部分,严格意义上 ULA 目前应该使用 FD00::/8 。
在实际使用场景下,建议使用类似 RFC4193 IPv6 Generator 的工具来生成符合规范的 ULA 地址。
该工具只需要输入接口(例如服务器的 bridge1 )的 MAC 地址即可,
使用 nano 编辑器创建 网桥网络 配置文件,执行以下命令:
## 创建 网桥网络 配置文件
sudo nano /etc/systemd/network/25-bridge-network.network在编辑器对话框中输入以下内容,并保存。
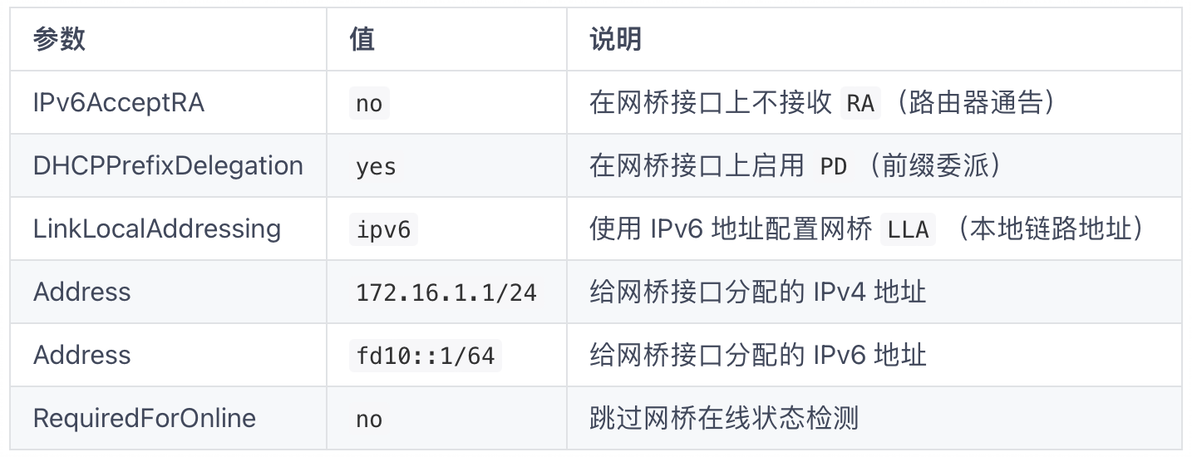
注意:cake 部分为 QoS 参数,请根据实际情况进行调整。
[Match]
Name=bridge1

[Network]
IPv6AcceptRA=no
DHCPPrefixDelegation=yes
LinkLocalAddressing=ipv6

[Address]
Address=172.16.1.1/24

[Address]
Address=fd10::1/64

[CAKE]
Bandwidth=500M
OverheadBytes=38
MPUBytes=84
UseRawPacketSize=yes
FlowIsolationMode=triple
PriorityQueueingPreset=diffserv4

[Link]
RequiredForOnline=no
2.3.设置网桥成员
不同种类的网卡在 Ubuntu Server 中所使用的名称有所不同。
使用以下命令获取当前所有网卡信息:
## 获取网卡信息
cat /proc/net/dev可见 PVE 虚拟机在 q35 机型中 VirtIO 网卡均以 enp6s 开头:
## 示例输出
Inter-|   Receive                                                |  Transmit
 face |bytes    packets errs drop fifo frame compressed multicast|bytes    packets errs drop fifo colls carrier compressed
    lo:    6368      84    0    0    0     0          0         0     6368      84    0    0    0     0       0          0
enp6s18:  266834    4110    0   19    0     0          0         0    47202     163    0    0    0     0       0          0
enp6s19: 1548869    8737    0    0    0     0          0         0    66283     494    0    0    0     0       0          0
enp6s20: 1515926    8372    0    0    0     0          0         0    10382     106    0    0    0     0       0          0
enp6s21: 1516028    8373    0    0    0     0          0         0    10382     106    0    0    0     0       0          0
enp6s22: 1535504 8623 0 0 0 0 0 0 13983 123 0 0 0 0 0 0其中 enp6s18 在本文中将作为 WAN 口连接光猫,因此网桥成员为其余网卡。
使用 nano 编辑器创建 网桥成员 配置文件,执行以下命令:
## 创建 网桥成员 配置文件
sudo nano /etc/systemd/network/25-bridge-ports.network在编辑器对话框中输入以下内容,并保存:
[Match]
Name=enp6s19
Name=enp6s20
Name=enp6s21
Name=enp6s22

[Network]
Bridge=bridge13.设置回环接口
本段回环接口设置主要为了安全加固,为可选设置项。
使用 nano 编辑器创建 回环接口 配置文件,执行以下命令:
## 创建 回环接口 配置文件
sudo nano /etc/systemd/network/50-lo.network由于回环接口的配置文件很长,因此我放在文章结尾处。
4.设置光猫访问
一般情况下,路由器进行 PPPoE 拨号后,光猫将无法访问。
为了访问光猫,需要给连接光猫的网口 enp6s18 增加一个与光猫同网段的静态 IPv4 地址。
演示地址为 192.168.100.2/24 。
注意:给网口添加静态 IPv4 地址时,不要添加默认路由。
使用 nano 编辑器创建 静态IPv4 配置文件,执行以下命令:
## 创建 静态IPv4 配置文件
sudo nano /etc/systemd/network/50-static-onu.network在编辑器对话框中输入以下内容,并保存:
[Match]
Name=enp6s18

[Network]
LinkLocalAddressing=no

[Address]
Address=192.168.100.2/24

[Link]
RequiredForOnline=no5.设置硬件卸载
本段内容主要为了关闭各个接口的硬件卸载(Offload),为可选内容。
使用 nano 编辑器创建 硬件卸载 配置文件,执行以下命令:
## 创建 硬件卸载 配置文件
sudo nano /etc/systemd/network/90-offload.link在编辑器对话框中输入以下内容,并保存:
[Match]
OriginalName=*

[Link]
NamePolicy=keep kernel database onboard slot path
AlternativeNamesPolicy=database onboard slot path
MACAddressPolicy=persistent
GenericSegmentationOffload=no
GenericReceiveOffload=no
TCPSegmentationOffload=no
TCP6SegmentationOffload=no
LargeReceiveOffload=no6.设置内核模块
本段内核模块设置主要针对 Nftables 的一些必要特性进行设置。
使用 nano 编辑器创建 内核模块 配置文件,执行以下命令:
## 创建 内核模块 配置文件
sudo nano /etc/modules-load.d/server_modules.conf在编辑器对话框中输入以下内容,并保存:
# This configuration file is customized by fox
# Optimize netfilter related modules at system boot

nf_conntrack7.设置内核参数
为了能让服务器完成路由器功能,需要对内核参数进行调整。
使用 nano 编辑器编辑 内核参数 配置文件,执行以下命令:
## 编辑 内核参数 配置文件
sudo nano /etc/sysctl.d/99-sysctl.conf在配置文件末尾增加输入以下内容,并保存:
# This configuration file is customized by fox
# Optimize system parameters

kernel.panic = 20
kernel.panic_on_oops = 1

net.core.default_qdisc = fq_codel

net.ipv4.ip_forward = 1
net.ipv4.conf.all.forwarding = 1

net.ipv6.conf.all.forwarding = 1
net.ipv6.conf.default.forwarding = 1

# Other adjustable system parameters

net.ipv4.conf.all.accept_redirects = 0

net.ipv4.conf.all.arp_ignore = 1
net.ipv4.conf.default.arp_ignore = 1

net.ipv4.conf.all.rp_filter=1
net.ipv4.conf.default.rp_filter=1

net.ipv4.conf.all.log_martians = 1

net.ipv4.icmp_ratelimit = 100
net.ipv4.igmp_max_memberships = 100

net.ipv4.route.error_burst = 500
net.ipv4.route.error_cost = 100

net.ipv4.route.redirect_load = 2
net.ipv4.route.redirect_silence = 2048

net.ipv4.tcp_fin_timeout = 30
net.ipv4.tcp_keepalive_time = 120
net.ipv4.tcp_max_orphans = 4096
net.ipv4.tcp_max_tw_buckets = 4096
net.ipv4.tcp_syncookies = 1

net.ipv6.conf.all.accept_ra = 0
net.ipv6.conf.default.accept_ra = 0

net.ipv6.conf.all.use_tempaddr = 0
net.ipv6.conf.default.use_tempaddr = 0

net.netfilter.nf_conntrack_acct=1
net.netfilter.nf_conntrack_tcp_timeout_established=7440
net.netfilter.nf_conntrack_udp_timeout=60
net.netfilter.nf_conntrack_udp_timeout_stream=180
至此,服务器网络设置步骤完成。

环回接口配置文件:
[Match]
Name=lo

# rfc6890
[Route]
Destination=0.0.0.0/8
Type=unreachable
[Route]
Destination=10.0.0.0/8
Type=unreachable
[Route]
Destination=100.64.0.0/10
Type=unreachable
[Route]
Destination=127.0.0.0/8
Type=unreachable
[Route]
Destination=169.254.0.0/16
Type=unreachable
[Route]
Destination=172.16.0.0/12
Type=unreachable
[Route]
Destination=192.0.0.0/24
Type=unreachable
[Route]
Destination=192.0.0.0/29
Type=unreachable
[Route]
Destination=192.0.2.0/24
Type=unreachable
[Route]
Destination=192.88.99.0/24
Type=unreachable
[Route]
Destination=192.168.0.0/16
Type=unreachable
[Route]
Destination=198.18.0.0/15
Type=unreachable
[Route]
Destination=198.51.100.0/24
Type=unreachable
[Route]
Destination=203.0.113.0/24
Type=unreachable
[Route]
Destination=240.0.0.0/4
Type=unreachable
[Route]
Destination=255.255.255.255/32
Type=unreachable
[Route]
Destination=::1/128
Type=unreachable
[Route]
Destination=::/128
Type=unreachable
[Route]
Destination=64:ff9b::/96
Type=unreachable
[Route]
Destination=64:ff9b::/96
Type=unreachable
[Route]
Destination=::ffff:0:0/96
Type=unreachable
[Route]
Destination=100::/64
Type=unreachable
[Route]
Destination=2001::/23
Type=unreachable
[Route]
Destination=2001::/32
Type=unreachable
[Route]
Destination=2001:2::/48
Type=unreachable
[Route]
Destination=2001:db8::/32
Type=unreachable
[Route]
Destination=2001:10::/28
Type=unreachable
[Route]
Destination=2002::/16
Type=unreachable
[Route]
Destination=fc00::/7
Type=unreachable
[Route]
Destination=fe80::/10
Type=unreachable

[Route]
Table=1024
Destination=fc00::/7
Type=throw
[Route]
Table=1024
Destination=::/0
Type=prohibit
[Route]
Table=1024
Destination=10.0.0.0/10
Type=throw
[Route]
Table=1024
Destination=172.16.0.0/12
Type=throw
[Route]
Table=1024
Destination=192.168.0.0/16
Type=throw
[Route]
Table=1024
Destination=0.0.0.0/0
Type=prohibit

[RoutingPolicyRule]
Priority=10000
From=fc00::/7
Table=1024
