


帅哥(靓仔)、美女,点个关注后续不迷路!
本章目录
0x02 Containerd 简单尝试使用
1.镜像拉取与运行
2.创建和使用网络
3.与宿主机和其它容器共享文件
4.Docker 与 Containerd 并用配置
5.镜像加速配置
0x03 Containerd 与 Docker CLI 工具命令表
ctr 命令 - Containerd 管理命令详细
crictl 命令 - Kubernetes 管理命令详解
Containerd 跟 Docker 的区别说明
作者: WeiyiGeek
原文地址:https://blog.weiyigeek.top/2021/6-27-570.html
0x02 Containerd 简单尝试使用
描述: 此处以上面Ubuntu的安装Containerd的环境下进行演示。
1.镜像拉取与运行
Tips : containerd 默认的三个名称空间(Namespace)是
# - 1.将 hello-world:latest 镜像拉取到默认的名称空间中,将busybox:latest镜像拉取到k8s.io名称空间中。
ctr image pull docker.io/library/hello-world:latest
ctr -n k8s.io image pull docker.io/library/busybox:latest
ctr -n k8s.io image pull registry.cn-hangzhou.aliyuncs.com/google-containers/pause-amd64:3.0

# - 2.分别查看拉取的镜像
ctr image ls && ctr -n k8s.io image ls
  # REF                                  TYPE                                                      DIGEST                                                                  SIZE    PLATFORMS                                                                                                             LABELS
  # docker.io/library/hello-world:latest application/vnd.docker.distribution.manifest.list.v2+json sha256:9f6ad537c5132bcce57f7a0a20e317228d382c3cd61edae14650eec68b2b345c 6.5 KiB linux/386,linux/amd64,linux/arm/v5,linux/arm/v7,linux/arm64/v8,linux/mips64le,linux/ppc64le,linux/s390x,windows/amd64
  # docker.io/library/busybox:latest                                        application/vnd.docker.distribution.manifest.list.v2+json sha256:930490f97e5b921535c153e0e7110d251134cc4b72bbb8133c6a5065cc68580d 752.6 KiB linux/386,linux/amd64,linux/arm/v5,linux/arm/v6,linux/arm/v7,linux/arm64/v8,linux/mips64le,linux/ppc64le,linux/s390x io.cri-containerd.image=managed
  # registry.cn-hangzhou.aliyuncs.com/google-containers/pause-amd64:3.0     application/vnd.docker.distribution.manifest.v2+json      sha256:3b3a29e3c90ae7762bdf587d19302e62485b6bef46e114b741f7d75dba023bd3 306.4 KiB linux/amd64                                                                                                          io.cri-containerd.image=managed


# - 3.运行hello-world:latest和分步运行busybox镜像
ctr run docker.io/library/hello-world:latest hello-world
# Hello from Docker!
# ......
# For more examples and ideas, visit:
#  https://docs.docker.com/get-started/

# 创建一个container(此时还未运行)
ctr -n k8s.io container create docker.io/library/busybox:latest busybox
# 创建一个task并后台运行
ctr -n k8s.io task start -d busybox
# 一步到位: ctr -n k8s.io run -d docker.io/library/busybox:latest busybox


# - 4.查看你创建的容器与Task
ctr container ls && ctr -n k8s.io container ls
  # CONTAINER      IMAGE                                   RUNTIME
  # hello-world    docker.io/library/hello-world:latest    io.containerd.runc.v2
  # CONTAINER    IMAGE                               RUNTIME
  # busybox      docker.io/library/busybox:latest    io.containerd.runc.v2
# 查看该容器在宿主机的PID
ctr -n k8s.io task ls
  # TASK       PID      STATUS
  # busybox    25856    RUNNING
ps ajxf|grep "containerd-shim-runc\|25856"|grep -v grep
      1   25828   25828    3097 ?             -1 Sl       0   0:00 /usr/bin/containerd-shim-runc-v2 -namespace k8s.io -id busybox -address /run/containerd/containerd.sock
  25828   25856   25856   25856 ?             -1 Ss       0   0:00  \_ sh


# - 5.进入到容器内部执行shell命令
ctr -n k8s.io t exec --exec-id $RANDOM -t busybox sh
  # / # uname -a
  # Linux containerd 3.10.0-1062.el7.x86_64 #1 SMP Wed Aug 7 18:08:02 UTC 2019 x86_64 GNU/Linux
  # ---  此处你会发现只有lo网络卡后续我们可以通过CNI插件的形式添加网卡实现外部网络通信 ---
  # / # ip a
  # 1: lo: <LOOPBACK,UP,LOWER_UP> mtu 65536 qdisc noqueue qlen 1000
  #     link/loopback 00:00:00:00:00:00 brd 00:00:00:00:00:00
  #     inet 127.0.0.1/8 scope host lo
  #       valid_lft forever preferred_lft forever
  #     inet6 ::1/128 scope host
  #       valid_lft forever preferred_lft forever

# - 6.删除创建的Task与容器
ctr -n k8s.io t kill -s SIGKILL busybox  # 发送SIGKILL信号量杀死该容器
ctr -n k8s.io task rm busybox
ctr -n k8s.io snapshots rm busybox
ctr -n k8s.io container rm busybox
ctr container rm hello-world
2.创建和使用网络
描述: 在前面我们进入busybox容器中会发现里面只有一张网卡而且无法连接到外部网络之中,所以我们需要借助于CNI(Container Network Interface它是一个云计算基础项目来实现Containerd容器具有网络功能。
项目说明:
2.1) CNI 网络插件(Plugins) : https://github.com/containernetworking/plugins (PS : 当前版本 v0.9.1)
2.2) CNI 容器网络接口-Linux容器网络 : https://github.com/containernetworking/cni
操作流程:
Step 1.CNI插件下载(现在版本可能大于v0.9.1,如有不同请参考官网文档)
# - 1.从containernetworking/plugins的release页面下载最新版本并解压到/usr/local/cni-plugins:
wget https://github.com/containernetworking/plugins/releases/download/v0.9.1/cni-plugins-linux-amd64-v0.9.1.tgz
mkdir -vp /usr/local/cni-plugins && tar xvf cni-plugins-linux-amd64-v0.9.1.tgz -C /usr/local/cni-plugins

# - 2.从containernetworking/cni的release页面下载最新版本并解压到/usr/local/cni-{version}:
wget https://github.com/containernetworking/cni/archive/refs/tags/v0.8.1.tar.gz
tar -zxvf v0.8.1.tar.gz -C /usr/local/Step 2.创建和使用CNI网络插件(https://github.com/containernetworking/cni#running-the-plugins)
# - 使用bridge插件创建一个网卡依赖于一下面的配置文件。

mkdir -p /etc/cni/net.d
cat >/etc/cni/net.d/10-mynet.conf <<EOF
{
  "cniVersion": "0.2.0",
  "name": "mynet",
  "type": "bridge",
  "bridge": "cni0",
  "isGateway": true,
  "ipMasq": true,
  "ipam": {
    "type": "host-local",
    "subnet": "10.22.0.0/16",
    "routes": [
      { "dst": "0.0.0.0/0" }
    ]
  }
}
EOF

cat >/etc/cni/net.d/99-loopback.conf <<EOF
{
  "cniVersion": "0.2.0",
  "name": "lo",
  "type": "loopback"
}
EOF

# - 注意json字符串解析需要依赖jq命令所以我们需要安装(已安装可以跳过)
apt install jq -y

# - 利用CNI网络插件进行激活cni0网卡
cd /usr/local/cni-0.8.1/scripts/
/usr/local/cni-0.8.1/scripts# CNI_PATH=/usr/local/cni-plugins ./priv-net-run.sh echo "Hello World! CNI Plugins."
Hello World! CNI Plugins.

# - 宿主机执行ip a命令即可看到一个cni0的网卡
/usr/local/cni-0.8.1/scripts# ip addr show cni0
3: cni0: <NO-CARRIER,BROADCAST,MULTICAST,UP> mtu 1500 qdisc noqueue state DOWN group default qlen 1000
    link/ether ea:3e:1b:23:66:3a brd ff:ff:ff:ff:ff:ff
    inet 10.22.0.1/16 brd 10.22.255.255 scope global cni0
valid_lft forever preferred_lft foreverStep 3.使containerd容器具备网络功能(使其具备各容器互通、外部网络通信功能)
# - 将busybox容器实现网络通信
ctr -n k8s.io run -d docker.io/library/busybox:latest busybox
ctr -n k8s.io task ls
# TASK PID STATUS
# busybox 43908 RUNNING
pid=$(ctr -n k8s.io t ls|grep busybox|awk '{print $2}')
netnspath=/proc/$pid/ns/net
CNI_PATH=/usr/local/cni-plugins /usr/local/cni-0.8.1/scripts/exec-plugins.sh add $pid $netnspath
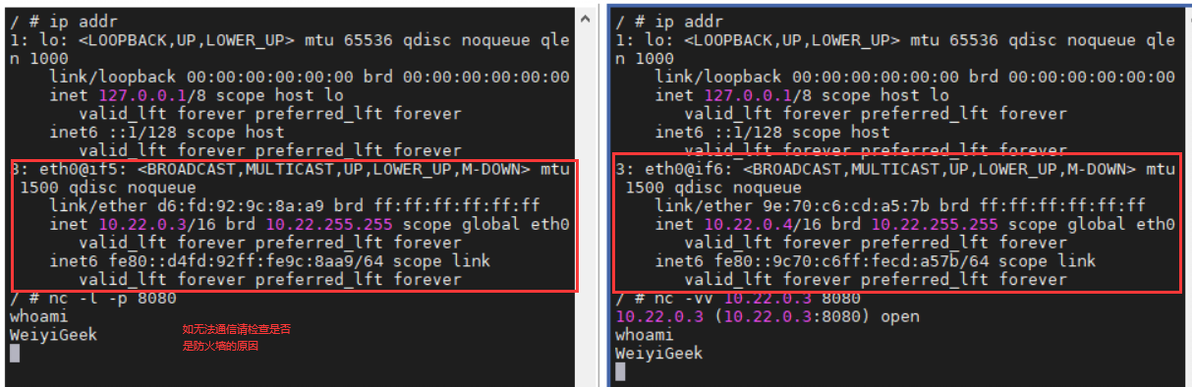
# - 随后进入busybox容器我们将会发现其新增了一张网卡并可以实现外部网络访问:
ctr -n k8s.io task exec --exec-id $RANDOM -t busybox sh -
# / # ip addr
# 1: lo: <LOOPBACK,UP,LOWER_UP> mtu 65536 qdisc noqueue qlen 1000
# link/loopback 00:00:00:00:00:00 brd 00:00:00:00:00:00
# inet 127.0.0.1/8 scope host lo
# valid_lft forever preferred_lft forever
# inet6 ::1/128 scope host
# valid_lft forever preferred_lft forever
# 3: eth0@if5: <BROADCAST,MULTICAST,UP,LOWER_UP,M-DOWN> mtu 1500 qdisc noqueue
# link/ether d6:fd:92:9c:8a:a9 brd ff:ff:ff:ff:ff:ff
# inet 10.22.0.3/16 brd 10.22.255.255 scope global eth0
# valid_lft forever preferred_lft forever
# inet6 fe80::d4fd:92ff:fe9c:8aa9/64 scope link
# valid_lft forever preferred_lft forever
# / # ping 223.6.6.6 # 外网没有问题。
PING 223.6.6.6 (223.6.6.6): 56 data bytes
64 bytes from 223.6.6.6: seq=0 ttl=113 time=7.902 ms
64 bytes from 223.6.6.6: seq=1 ttl=113 time=7.102 ms
# - 在创建一个busybox-1实现互通。
ctr -n k8s.io run -d docker.io/library/busybox:latest busybox-1
pid=$(ctr -n k8s.io t ls|grep busybox-1|awk '{print $2}')
netnspath=/proc/$pid/ns/net
CNI_PATH=/usr/local/cni-plugins /usr/local/cni-0.8.1/scripts/exec-plugins.sh add $pid $netnspath
# - 查看你创建容器的pid进程相关信息
ps ajxf|egrep "containerd-shim-runc|43908|48850"|grep -v grep
# 1 43883 43883 39042 ? -1 Sl 0 0:00 /usr/bin/containerd-shim-runc-v2 -namespace k8s.io -id busybox -address /run/containerd/containerd.sock
# 43883 43908 43908 43908 ? -1 Ss 0 0:00 \_ sh
# 1 48825 48825 39042 ? -1 Sl 0 0:00 /usr/bin/containerd-shim-runc-v2 -namespace k8s.io -id busybox-1 -address /run/containerd/containerd.sock
# 48825 48850 48850 48850 ? -1 Ss 0 0:00 \_ sh
# - 查看创建的busybox-1相关信息
ctr -n k8s.io task exec --exec-id $RANDOM -t busybox-1 sh -
# 3: eth0@if6: <BROADCAST,MULTICAST,UP,LOWER_UP,M-DOWN> mtu 1500 qdisc noqueue
# link/ether 9e:70:c6:cd:a5:7b brd ff:ff:ff:ff:ff:ff
# inet 10.22.0.4/16 brd 10.22.255.255 scope global eth0
# valid_lft forever preferred_lft forever
# inet6 fe80::9c70:c6ff:fecd:a57b/64 scope link
# valid_lft forever preferred_lft forever
Tips : 采用监听在另外的一个容器里面进行通信链接。
3.与宿主机和其它容器共享文件
描述: 在Docker我们常常需要将配置文件或者各类数据映射进入到docker容器之中,便于容器内部程序使用或者数据的持久化。
下面分别简单演示与宿主机或者其它容器共享目录;
(1) 宿主机共享
ctr -n k8s.io c create docker.io/library/busybox:latest busybox-2 --mount type=bind,src=/tmp,dst=/host,options=rbind:rw

ctr -n k8s.io t start -d busybox-2 sh

ctr -n k8s.io t exec -t --exec-id $RANDOM busybox-2 sh
  # / # echo "WeiyiGeek" > /host/name
  # / #
root@containerd:~# cat /tmp/name
WeiyiGeek(2) 其它容器间共享 描述: 本章节对于PID NS共享为例其它的NS共享与该方案类似,下面我们利用docker 与 container 对ns共享设置做一个对比。
首先我们对docker的ns共享进行实验:
[root@docker scripts]# docker run --rm -it -d busybox sh
687c80243ee15e0a2171027260e249400feeeee2607f88d1f029cc270402cdd1
[root@docker scripts]# docker run --rm -it -d --pid="container:687c80243ee15e0a2171027260e249400feeeee2607f88d1f029cc270402cdd1" busybox cat
fa2c09bd9c042128ebb2256685ce20e265f4c06da6d9406bc357d149af7b83d2
[root@docker scripts]# docker ps -a
CONTAINER ID        IMAGE               COMMAND             CREATED             STATUS              PORTS               NAMES
fa2c09bd9c04        busybox             "cat"               2 seconds ago       Up 1 second                             pedantic_goodall
687c80243ee1        busybox             "sh"                22 seconds ago      Up 21 seconds                           hopeful_franklin
[root@docker scripts]# docker exec -it 687c80243ee1 sh
/ # ps aux
PID   USER     TIME  COMMAND
    1 root      0:00 sh
    8 root      0:00 cat
15 root 0:00 sh然后基于containerd的方式实现共享:
$ ctr -n k8s.io t ls
  # TASK         PID      STATUS
  # busybox      43908    RUNNING
  # busybox-1    48850    RUNNING  # 这里的48850即为已有task运行时的pid号
  # busybox-2    50314    RUNNING

$ ctr -n k8s.io c create --with-ns "pid:/proc/48850/ns/pid" v4ehxdz8.mirror.aliyuncs.com/library/python:3.6-slim python # 将 容器中运行 的进程共享注入到 48850 pid之中

$ ctr -n k8s.io t start -d python python  # 启动了一个python的命令

$ ctr -n k8s.io t exec -t --exec-id $RANDOM busybox-1 sh # 至此可以在busybox-1容器中看见刚执行的python命令
/ # ps aux
PID   USER     TIME  COMMAND
    1 root      0:00 sh
   34 root      0:00 python3
   41 root      0:00 sh
   47 root      0:00 ps aux
4.Docker 与 Containerd 并用配置
描述: 事实上,Docker 和 Containerd 是可以同时使用的,只不过 Docker 默认使用的 Containerd 的命名空间不是 default,而是 moby,此处为了更方便我们学习可以将 Docker 与 Containerd 联合使用。 Docker-CE 安装参考链接:https://docs.docker.com/engine/reference/commandline/dockerd/
Step 1.在前面我们完成 containerd 的安装配置并启动后,我们可以在宿主机中安装docker客户端及服务。
echo \
  "deb [arch=amd64 signed-by=/usr/share/keyrings/docker-archive-keyring.gpg] https://download.docker.com/linux/ubuntu \
  $(lsb_release -cs) stable" | sudo tee /etc/apt/sources.list.d/docker.list > /dev/null
apt-update
# - 查看可用版本
apt-cache madison docker-ce
# - 安装指定版本 (20.10.X 版本支持 Docker Scan 特性)
sudo apt-get install docker-ce=5:20.10.7~3-0~ubuntu-focal docker-ce-cli=5:20.10.7~3-0~ubuntu-focalStep 2.编辑/etc/systemd/system/multi-user.target.wants/docker.service文件并为其新增 --containerd如下启动项:--containerd /run/containerd/containerd.sock
vim /etc/systemd/system/multi-user.target.wants/docker.service
ExecStart=/usr/bin/dockerd -H fd:// --containerd=/run/containerd/containerd.sock --cri-containerd --debug

# - 重新加载配置
systemctl daemon-reloadStep 3.添加低权限用户到docker组里并自启Docker。
sudo gpasswd -a ${USER} docker
systemctl enable docker && systemctl status docker
  # ● docker.service - Docker Application Container Engine
  #     Loaded: loaded (/lib/systemd/system/docker.service; enabled; vendor preset: enabled)
  #     Active: active (running) since Mon 2021-07-05 12:47:10 CST; 5min ago
  # TriggeredBy: ● docker.socket
  #       Docs: https://docs.docker.com
  #   Main PID: 129606 (dockerd)
  #       Tasks: 12
  #     Memory: 45.0M
  #     CGroup: /system.slice/docker.service
  #             └─129606 /usr/bin/dockerd -H fd:// --containerd=/run/containerd/containerd.sock --debug

# 或者查看 Dockerd 服务端执行的命令
ps aux|grep docker
  # root      129606  0.0  4.4 1021016 89792 ?       Ssl  12:47   0:00 /usr/bin/dockerd -H fd:// --containerd=/run/containerd/containerd.sock --debug

# 新增docker0网卡信息
# 7: docker0: <BROADCAST,MULTICAST,UP,LOWER_UP> mtu 1500 qdisc noqueue state UP group default
#   link/ether 02:42:23:41:2c:db brd ff:ff:ff:ff:ff:ff
#   inet 172.17.0.1/16 brd 172.17.255.255 scope global docker0
#       valid_lft forever preferred_lft forever
Step 4.打开两个Shell终端一个采用 docker 运行一个 busybox 容器,另外一个查看对比。
$ docker run --rm -it busybox sh
  # / # ip addr
  # 1: lo: <LOOPBACK,UP,LOWER_UP> mtu 65536 qdisc noqueue qlen 1000
  #     link/loopback 00:00:00:00:00:00 brd 00:00:00:00:00:00
  #     inet 127.0.0.1/8 scope host lo
  #       valid_lft forever preferred_lft forever
  # 8: eth0@if9: <BROADCAST,MULTICAST,UP,LOWER_UP,M-DOWN> mtu 1500 qdisc noqueue
  #     link/ether 02:42:ac:11:00:02 brd ff:ff:ff:ff:ff:ff
  #     inet 172.17.0.2/16 brd 172.17.255.255 scope global eth0   # 关键点
  #       valid_lft forever preferred_lft forever
  # / # cat /etc/hosts
  # 127.0.0.1       localhost
  # 172.17.0.2      51dcdf68d3b8

# 采用 ctr 在 moby 名称空间下查看docker创建的容器以及Task PID
$ ctr -n moby c ls
  # CONTAINER                                                           IMAGE    RUNTIME
  # 51dcdf68d3b8bf4c9707c9059e33f9570cb83725355595e77cf433dd3e25b64b    -        io.containerd.runc.v2
$ ctr -n moby t ls
  # TASK                                                                PID       STATUS
  # 51dcdf68d3b8bf4c9707c9059e33f9570cb83725355595e77cf433dd3e25b64b    131926    RUNNING

# 验证获取到的 Task PID 下其 net 相关信息
$ grep "172.17.0.2" /proc/131926/net/fib_trie
  |-- 172.17.0.2
  |-- 172.17.0.2

# 采用 ctr 进入 Docker 创建的容器
$ ctr -n moby t exec -t --exec-id $RANDOM  51dcdf68d3b8bf4c9707c9059e33f9570cb83725355595e77cf433dd3e25b64b sh
  # / # ip addr | grep "172.17.0.2"
  #   inet 172.17.0.2/16 brd 172.17.255.255 scope global eth0
  # / # hostname
  #   51dcdf68d3b8
5.镜像加速配置
描述: 镜像加速的配置就在 cri 插件配置块下面的 registry 配置块,所以需要修改的部分如下:
$ vim /etc/containerd/config.toml
	[plugins."io.containerd.grpc.v1.cri".registry]
      [plugins."io.containerd.grpc.v1.cri".registry.mirrors]
        [plugins."io.containerd.grpc.v1.cri".registry.mirrors."docker.io"]
          endpoint = ["https://xlx9erfu.mirror.aliyuncs.com"]
        [plugins."io.containerd.grpc.v1.cri".registry.mirrors."k8s.gcr.io"]
          endpoint = ["https://registry.aliyuncs.com/k8sxio"]
        [plugins."io.containerd.grpc.v1.cri".registry.mirrors."gcr.io"]
          endpoint = ["xxx"]
插件及其参数解释:
registry.mirrors."xxx" : 表示需要配置 mirror 的镜像仓库。例如,registry.mirrors."docker.io" 表示配置 docker.io 的 mirror。
endpoint : 表示提供 mirror 的镜像加速服务。例如,这里推荐使用西北农林科技大学提供的镜像加速服务作为 docker.io 的 mirror, 或者阿里云的
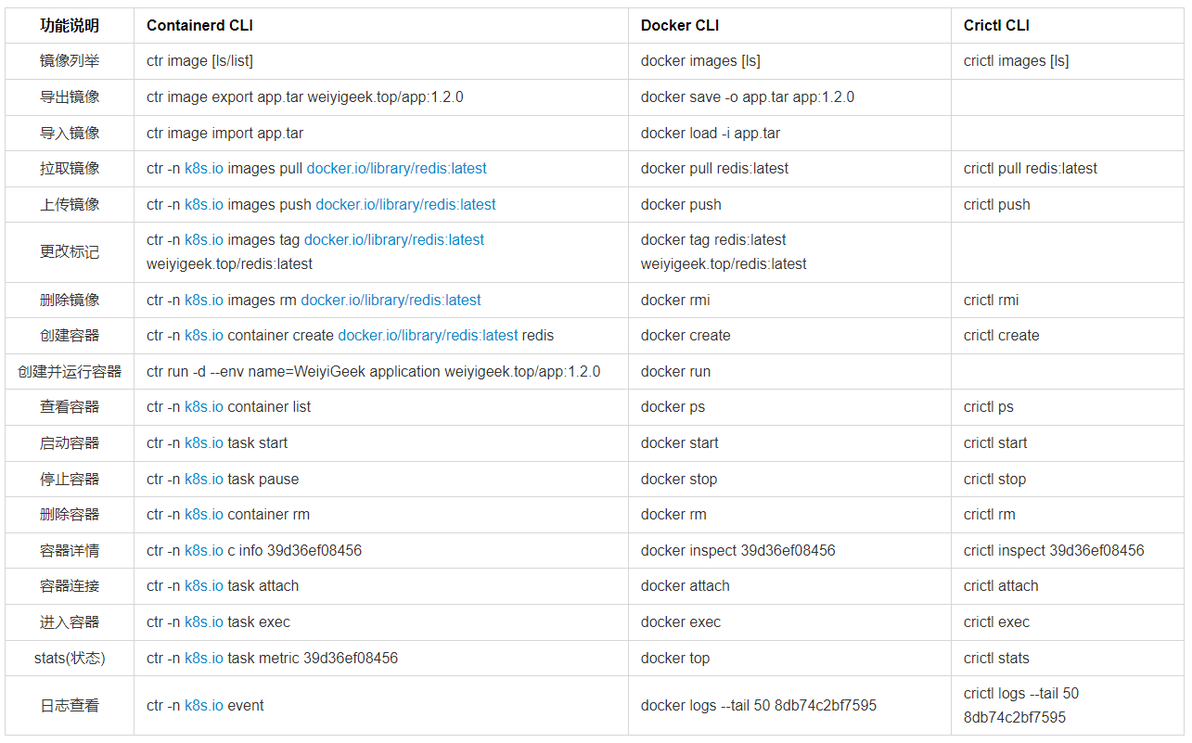
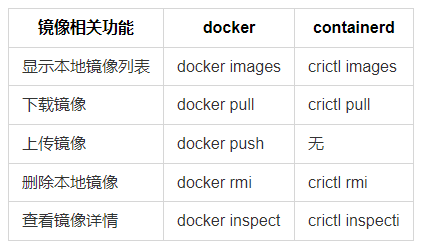
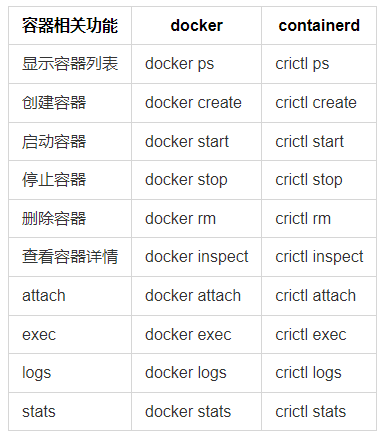
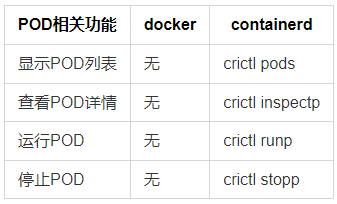
0x03 Containerd 与 Docker CLI 工具命令表
描述: Containerd 和 Docker 在命令使用上的一些区别主要如下:
ctr 命令 - Containerd 管理命令详细
描述: 它是一个不受支持的调试和管理客户端,用于与容器守护进程进行交互。因为它不受支持,所以命令、选项和操作不能保证向后兼容或稳定从集装箱项目的发布到发布。
语法参数:
#USAGE:
  ctr [global options] command [command options] [arguments...]

# GLOBAL OPTIONS:
  --debug                      enable debug output in logs
  --address value, -a value    address for containerds GRPC server (default: "/run/containerd/containerd.sock") [$CONTAINERD_ADDRESS]
  --timeout value              total timeout for ctr commands (default: 0s)
  --connect-timeout value      timeout for connecting to containerd (default: 0s)
  --namespace value, -n value  namespace to use with commands (default: "default") [$CONTAINERD_NAMESPACE]
  --version, -v                print the version

# COMMANDS:
  plugins, plugin            provides information about containerd plugins
  version                    print the client and server versions
  containers, c, container   manage containers
  content                    manage content
  events, event              display containerd events
  images, image, i           manage images
  leases                     manage leases
  namespaces, namespace, ns  manage namespaces
  pprof                      provide golang pprof outputs for containerd
  run                        run a container
  snapshots, snapshot        manage snapshots
  tasks, t, task             manage tasks
  install                    install a new package
  oci                        OCI tools
  shim                       interact with a shim directly (直接与shim交互)
  help, h                    Shows a list of commands or help for one command

# 子命令 #
# Images COMMANDS:
  check       check that an image has all content available locally(找到发生故障的容器后,可以使用以下工具检查其日志)
  export      export images
  import      import images
  list, ls    list images known to containerd
  mount       mount an image to a target path
  unmount     unmount the image from the target
  pull        pull an image from a remote
  push        push an image to a remote
  remove, rm  remove one or more images by reference
  tag         tag an image
  label       set and clear labels for an image

# Container COMMANDS:
  create           create container
  delete, del, rm  delete one or more existing containers
  info             get info about a container
  list, ls         list containers
  label            set and clear labels for a container
  checkpoint       checkpoint a container (检查点容器)
  restore          restore a container from checkpoint(从检查点还原容器)

# run OPTIONS:
  --rm                                    remove the container after running
  --null-io                               send all IO to /dev/null (将容器内标准输出重定向到/dev/null)
  --log-uri value                         log uri
  --detach, -d                            detach from the task after it has started execution(在任务开始执行后从中分离,如没有选项则会等待用户输入并定向到容器内)
  --fifo-dir value                        directory used for storing IO FIFOs
  --cgroup value                          cgroup path (To disable use of cgroup, set to "" explicitly)
  --platform value                        run image for specific platform
  --runc-binary value                     specify runc-compatible binary
  --runc-systemd-cgroup                   start runc with systemd cgroup manager
  --uidmap container-uid:host-uid:length  run inside a user namespace with the specified UID mapping range; specified with the format container-uid:host-uid:length
  --gidmap container-gid:host-gid:length  run inside a user namespace with the specified GID mapping range; specified with the format container-gid:host-gid:length
  --remap-labels                          provide the user namespace ID remapping to the snapshotter via label options; requires snapshotter support
  --cpus value                            set the CFS cpu qouta (default: 0)
  --snapshotter value                     snapshotter name. Empty value stands for the default value. [$CONTAINERD_SNAPSHOTTER]
  --config value, -c value                path to the runtime-specific spec config file
  --cwd value                             specify the working directory of the process
  --env value                             specify additional container environment variables (i.e. FOO=bar)
  --env-file value                        specify additional container environment variables in a file(i.e. FOO=bar, one per line)
  --label value                           specify additional labels (i.e. foo=bar)
  --mount value                           specify additional container mount (ex: type=bind,src=/tmp,dst=/host,options=rbind:ro)
  --net-host                              enable host networking for the container
  --privileged                            run privileged container
  --read-only                             set the containers filesystem as readonly
  --runtime value                         runtime name (default: "io.containerd.runc.v2")
  --tty, -t                               allocate a TTY for the container
  --with-ns value                         specify existing Linux namespaces to join at container runtime (format '<nstype>:<path>')
  --pid-file value                        file path to write the task's pid
  --gpus value                            add gpus to the container (default: 0)
  --allow-new-privs                       turn off OCI spec's NoNewPrivileges feature flag
  --memory-limit value                    memory limit (in bytes) for the container (default: 0)
  --device value                          add a device to a container
  --seccomp                               enable the default seccomp profile
  --rootfs                                use custom rootfs that is not managed by containerd snapshotter
  --no-pivot                              disable use of pivot-root (linux only)
  --cpu-quota value                       Limit CPU CFS quota (default: -1)
  --cpu-period value                      Limit CPU CFS period (default: 0)

# Tasks COMMANDS:
  attach           attach to the IO of a running container
  checkpoint       checkpoint a container
  delete, rm       delete one or more tasks
  exec             execute additional processes in an existing container
  list, ls         list tasks
  kill             signal a container (default: SIGTERM)
  pause            pause an existing container
  ps               list processes for container
  resume           resume a paused container
  start            start a container that has been created
metrics, metric get a single data point of metrics for a task with the built-in Linux runtimeTips : containerd 引入了 namespace 概念, 每个image和container都会在各自的namespace下可见, 目前k8s会使用 k8s.io 以及 default 作为命名空间。 Tips : 当导入本地镜像时ctr不支持压缩。 Tips : 通过创建容器后,只是一个静态的容器,容器中的用户进程并没有启动,所以还需要通过来启动容器进程。 当然也可以用的命令直接创建并运行容器。在进入容器操作时与docker不同的是,必须在命令后指定参数,这个id可以随便写只要唯一就行。 Tips : ctr没有stop容器的功能,只能暂停(ctr task pause)或者杀死(ctr task kill)容器
实际案例:
# 1) 名称空间查看创建或删除
ctr namespace create devops
ctr namespace ls -q
  # devops
  # k8s.io
ctr namespace remove devops


# 2) 镜像查看及其操作
ctr -n k8s.io images ls | grep "busybox"
  # docker.io/library/busybox:1.33.1 application/vnd.docker.distribution.manifest.list.v2+json sha256:930490f97e5b921535c153e0e7110d251134cc4b72bbb8133c6a5065cc68580d 752.6 KiB linux/386,linux/amd64,linux/arm/v5,linux/arm/v6,linux/arm/v7,linux/arm64/v8,linux/mips64le,linux/ppc64le,linux/s390x io.cri-containerd.image=managed
ctr -n k8s.io images ls -q | grep "busybox"   # docker.io/library/busybox:1.33.1
ctr -n k8s.io i rm k8s.gcr.io/pause:3.2       # 删除镜像
ctr -n k8s.io i pull -k k8s.gcr.io/pause:3.2  # 拉取镜像
ctr -n k8s.io i push -k k8s.gcr.io/pause:3.2  # 推送镜像
ctr -n k8s.io i export pause.tar k8s.gcr.io/pause:3.2 # 导出镜像
ctr -n k8s.io i import pause.tar              # 导入镜像
ctr -n k8s.io images check  | grep "busybox"  # 镜像检查
  # docker.io/library/busybox:1.33.1  application/vnd.docker.distribution.manifest.list.v2+json sha256:930490f97e5b921535c153e0e7110d251134cc4b72bbb8133c6a5065cc68580d complete (2/2) 750.1 KiB/750.1 KiB true
ctr -n k8s.io i tag registry.cn-hangzhou.aliyuncs.com/google_containers/pause:3.2 k8s.gcr.io/pause:3.2         # 镜像标记 Tag 更改
ctr -n k8s.io i tag --force registry.cn-hangzhou.aliyuncs.com/google_containers/pause:3.2 k8s.gcr.io/pause:3.2 # 若新镜像 reference 已存在需要先删除新 reference 或者如下方式强制替换
ctr -n k8s.io i label docker.io/library/busybox:1.33.1 name=weiyigeek-test  # 设置镜像标签
  # io.cri-containerd.image=managed,name=weiyigeek-test
ctr -n k8s.io i label docker.io/library/busybox:1.33.1 name=""              # 清除镜像标签
  # io.cri-containerd.image=managed
ctr i mount docker.io/library/nginx:alpine /mnt # 镜像挂载到主机目录 /mnt 中
ctr i unmount /mnt # 将镜像从主机目录上卸载


# 3) 镜像内容编辑,对镜像的更高级操作可以使用子命令 content.
# 在线编辑镜像的 blob 并生成一个新的 digest
→ ctr content ls
→ ctr content edit --editor vim sha256:fdd7fff110870339d34cf071ee90fbbe12bdbf3d1d9a14156995dfbdeccd7923


# 4) 容器查看及其操作
ctr -n k8s.io container ls
  # CONTAINER                                                           IMAGE                                                            RUNTIME
  # 3d840c5cf157c322c1c0839d0166d80550fe49ca53544e1d589bd44f422b1f81    registry.cn-hangzhou.aliyuncs.com/google_containers/pause:3.2    io.containerd.runc.v2
ctr -n k8s.io container create docker.io/library/busybox:latest busybox                       # 创建容器(并没有处于运行状态,只是一个静态的容器)
ctr -n k8s.io container info 39d36ef08456bed24a52bf1c845facbd9f93c35cbd65b16739b4746ab1811cb5 # 查看创建的容器详情(注意这个必须是完整的容器ID)和 docker inspect 类似
ctr -n k8s.io container rm 39d36ef08456bed24a52bf1c845facbd9f93c35cbd65b16739b4746ab1811cb5   # 删除容器
ctr -n k8s.io container label busybox name=weiyigeek-test     # 设置容器标签
  # io.containerd.image.config.stop-signal=SIGTERM,name=weiyigeek-test

# 5) 容器真正运行是由任务(Task)相关操作实现
ctr -n k8s.io task start -d nginx  # 启动容器
ctr -n k8s.io tasks ls
  # TASK     PID      STATUS
  # nginx    12708    RUNNING
ctr -n k8s.io task pause nginx     # 暂停容器
ctr -n k8s.io task resume nginx    # 恢复容器
ctr -n k8s.io task ps nginx        # 查看容器中所有进程的 PID (宿主机中的PID)
ctr -n k8s.io task exec --exec-id 0 -t nginx sh # 进入容器,必须要指定唯一的--exec-id。
ctr -n k8s.io tasks kill -a -s 9 {id}  # 停止容器内的Task
ctr -n k8s.io task metric 37d0ff9d8df20d34c652ee286c17e0626d8838d6d546a28e8246151fffd99b98 # 获取容器的 cgroup 信息,用于获取容器的内存、CPU 和 PID 的限额与使用量。
  # ID                                                                  TIMESTAMP
  # 37d0ff9d8df20d34c652ee286c17e0626d8838d6d546a28e8246151fffd99b98    2021-07-11 03:33:18.421996083 +0000 UTC
  # METRIC                   VALUE
  # memory.usage_in_bytes    65269760
  # memory.limit_in_byte     9223372036854771712
  # memory.stat.cache        4157440
  # cpuacct.usage            44769155237
  # cpuacct.usage_percpu     [22375115908 22394039329 0 0 0 0 0 0 0 0 0 0 0 0 0 0 0 0 0 0 0 0 0 0 0 0 0 0 0 0 0 0 0 0 0 0 0 0 0 0 0 0 0 0 0 0 0 0 0 0 0 0 0 0 0 0 0 0 0 0 0 0 0 0 0 0 0 0 0 0 0 0 0 0 0 0 0 0 0 0 0 0 0 0 0 0 0 0 0 0 0 0 0 0 0 0 0 0 0 0 0 0 0 0 0 0 0 0 0 0 0 0 0 0 0 0 0 0 0 0 0 0 0 0 0 0 0 0]
  # pids.current             43
  # pids.limit               4582


# 6) 一步到位,直接进行容器创建并运行。
ctr -n k8s.io run --null-io --net-host -d
–env PASSWORD=$drone_password
–mount type=bind,src=/etc,dst=/host-etc,options=rbind:rw
–mount type=bind,src=/root/.kube,dst=/root/.kube,options=rbind:rw
-log-uri file:///var/log/xx.log
WeiyiGeek:Test sysreport bash /sysreport/run.sh


# 7) 每一个顶级配置块的命名都是 plugins."io.containerd.xxx.vx.xxx" 这种形式,其实每一个顶级配置块都代表一个插件,其中 io.containerd.xxx.vx 表示插件的类型,vx 后面的 xxx 表示插件的 ID。
ctr plugin ls
  # TYPE                            ID                    PLATFORMS      STATUS
  # io.containerd.content.v1        content               -              ok
  # io.containerd.snapshotter.v1    btrfs                 linux/amd64    error
  # io.containerd.snapshotter.v1    devmapper             linux/amd64    error
Tips: 注意容器默认使用fifo创建日志文件, 有可能因为fifo容量导致业务运行阻塞。 Tips: 注意需要停止容器时需要先停止容器内的Task再删除容器。 Tips: 注意ctr没有stop容器的功能,只能暂停或者杀死容器。 Tips: : 一个 container 对象只是包含了运行一个容器所需的资源及配置的数据结构,意味着 namespaces、rootfs 和容器的配置都已经初始化成功了,只是用户进程(这里是nginx)还没有启动。 Tips: : 一个容器真正的运行起来是由 Task 对象实现的,task 代表任务的意思,可以为容器设置网卡,还可以配置工具来对容器进行监控等。
crictl 命令 - Kubernetes 管理命令详解
描述:crictl 是 CRI 兼容的容器运行时命令行对接客户端, 你可以使用它来检查和调试 Kubernetes 节点上的容器运行时和应用程序。由于该命令是为k8s通过CRI使用containerd而开发的(), 其他非k8s的创建的 crictl 是无法看到和调试的, 简单的说用 运行的容器无法使用 crictl 看到。
Tips: crictl 命令工具 和 它的源代码在 cri-tools 代码库。 Tips: crictl 默认使用命名空间 k8s.io. Tips: cri plugin区别对待pod和container
官方参考: https://github.com/kubernetes-sigs/cri-tools/blob/master/docs/crictl.md
基础配置 描述: 在 k8s 1.19.x 之前 crictl 默认连接到 ,而在1.20.x起默认采用 运行时,当然除此之外还是支持cri-o运行时。
# crictl by default connects on Unix to:
unix:///var/run/dockershim.sock or
unix:///run/containerd/containerd.sock or
unix:///run/crio/crio.sock

# or on Windows to:
npipe:////./pipe/dockershim or
npipe:////./pipe/containerd or
npipe:////./pipe/crio

# For other runtimes, use:
frakti: unix:///var/run/frakti.sock查看或编辑 /etc/crictl.yaml 的内容并设置指定的容器运行时runtime。
$ cat /etc/crictl.yaml
runtime-endpoint: /run/containerd/containerd.sock
image-endpoint: "/run/containerd/containerd.sock"
timeout: 0
debug: false
pull-image-on-create: false
Tips: 除了上面的设置端点外,我们还可以利用其它方式进行临时设置或者指定配置文件。
# 1.通过在配置文件中设置端点并通过 --config 参数指定配置文件
crictl --config=/etc/crictl-demo.yaml

# 2.通过设置参数 --runtime-endpoint 和 --image-endpoint
crictl --runtime-endpoint="/run/containerd/containerd.sock" --image-endpoint="/run/containerd/containerd.sock"
基础语法:
# USAGE:
  crictl [global options] command [command options] [arguments...]

# COMMANDS:
  attach        Attach to a running container
  create        Create a new container (创建容器这里需要先创建 sandbox, 获取sandbox容器的id后再用此id创建业务容器)
  exec          Run a command in a running container
  version       Display runtime version information
  images        List images
  inspect       Display the status of one or more containers (显示一个或多个容器的状态)
  inspecti      Return the status of one or more images (返回一个或者多个镜像的状态)
  inspectp      Display the status of one or more pods (返回一个或者多个Pod的状态)
  imagefsinfo: Return image filesystem info
  logs          Fetch the logs of a container
  port-forward  Forward local port to a pod
  ps            List containers (列出在 k8s.io 命名空间下的业务容器)
  pull          Pull an image from a registry
  runp          Run a new pod
  rm            Remove one or more containers
  rmi           Remove one or more images
  rmp           Remove one or more pods
  pods          List pods (列出在 k8s.io 命名空间下的 sandbox 容器, 在k8s里通常是pause容器)
  start         Start one or more created containers
  info          Display information of the container runtime
  stop          Stop one or more running containers
  stopp         Stop one or more running pods
  update        Update one or more running containers
  config        Get and set crictl options
  stats         List container(s) resource usage statistics
  completion    Output bash shell completion code
  help, h       Shows a list of commands or help for one command

# GLOBAL OPTIONS:
  --config value, -c value            Location of the client config file (default: "/etc/crictl.yaml") [$CRI_CONFIG_FILE]
  --debug, -D                         Enable debug mode
  --image-endpoint value, -i value    Endpoint of CRI image manager service [$IMAGE_SERVICE_ENDPOINT]
  --runtime-endpoint value, -r value  Endpoint of CRI container runtime service (default: "unix:///var/run/dockershim.sock") [$CONTAINER_RUNTIME_ENDPOINT]
  --timeout value, -t value           Timeout of connecting to the server (default: 10s)
实践案例:
# 0) 镜像查看及其操作
crictl images --digests
# IMAGE TAG DIGEST IMAGE ID SIZE
# docker.io/calico/cni v3.18.4 278fd825d089e 021ecb3cb5348 44.7MB
crictl images nginx # - 打印某个镜像
crictl images -q # - 只打印镜像ID
# sha256:8c811b4aec35f259572d0f79207bc0678df4c736eeec50bc9fec37ed936a472a
crictl images -o [json|yaml|table] # - 镜像详细信息
crictl inspecti busybox # - 查看镜像信息
crictl pull busybox # - 拉取 busybox 镜像
crictl push weiyigeek.top/busybox # - 推送 busybox 镜像
crictl rmi docker.io/library/busybox # - 容器删除
# Deleted: docker.io/library/busybox:1.33.1
# Deleted: docker.io/library/busybox:latest
# 1) 容器查看及其操作
crictl ps -a # - 打印在 k8s.io 命名空间下的业务容器
crictl --runtime-endpoint /run/containerd/containerd.sock ps -a | grep kube | grep -v pause # - 查看过滤指定的容器相关信息
# CONTAINER ID IMAGE CREATED STATE NAME ATTEMPT POD ID
# 8db74c2bf7595 ebc659140e762 3 days ago Running calico-node 0 5af3d484b32c0
crictl create f84dd361f8dc51518ed291fbadd6db537b0496536c1d2d6c05ff943ce8c9a54f[创建的 Pod 的 ID] container-config.json pod-config.json # - 创建容器
crictl start 3e025dd50a72d956c4f14881fbb5b1080c9275674e95fb67f965f6478a957d60 # - 启动容器
crictl stop 3e025dd50a72d956c4f14881fbb5b1080c9275674e95fb67f965f6478a957d60 # - 删除容器
crictl exec -i -t 1f73f2d81bf98 ls # - 容器上执行命令
# 2) Pod查看与操作
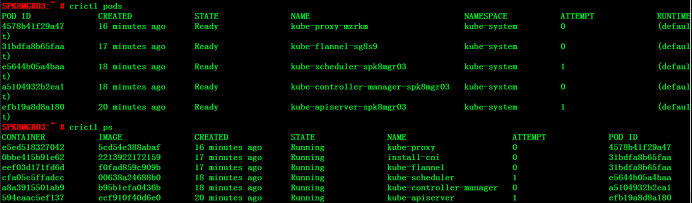
$ crictl pods
# POD ID CREATED STATE NAME NAMESPACE ATTEMPT
# 5af3d484b32c0 4 days ago Ready calico-node-zvst7 kube-system 0
$ crictl pods --name nginx-65899c769f-wv2gp # - 打印某个固定pod.
$ crictl pods --label run=nginx # - 根据标签筛选pod.
$ crictl runp pod-config.json # - 使用 crictl runp 命令应用 JSON 文件并运行沙盒。
$ crictl inspectp --output table $POD_ID # - 用crictl查看pod的信息
$ crictl stopp $POD_ID # - 停止Pod
$ crictl rmp $POD_ID # - 删除Pod
# 3) 日志查看
crictl --runtime-endpoint /run/containerd/containerd.sock logs --tail 50 8db74c2bf7595
# 4) 容器占用资源状态查看
crictl stats
# CONTAINER CPU % MEM DISK INODES
# 8db74c2bf7595 0.69 53.37MB 274.4kB 81
# 5) 额外信息显示,例如版本及其显示有关 Containerd 和 CRI 插件的状态和配置信息
crictl version
# Version: 0.1.0
# RuntimeName: containerd
# RuntimeVersion: 1.5.11
# RuntimeApiVersion: v1alpha2
crictl info -o go-template --template "{{index .status}}" # 格式化输出
# map[conditions:[map[message: reason: status:true type:RuntimeReady] map[message: reason: status:true type:NetworkReady]]]
Tips : 列出的是pod的信息,包括pod所在的命名空间以及状态。
Tips : 列出的是应用容器的信息,而docker ps列出的是初始化容器(pause容器)和应用容器的信息,初始化容器在每个pod启动时都会创建,通常不会关注,从这一点上来说,crictl使用起来更简洁明了一些。
Tips: 用 crictl 创建容器对容器运行时排错很有帮助。 在运行的 Kubernetes 集群中,沙盒会随机的被 kubelet 停止和删除, 下面通过实例进行演示crictl使用。
Step 1.编写运行 Pod 沙盒的 JSON 文件,使用 crictl runp 命令应用 JSON 文件并运行沙盒。
$ cat pod-config.json
{
    "metadata": {
        "name": "nginx-sandbox",
        "namespace": "default",
        "attempt": 1,
        "uid": "hdishd83djaidwnduwk28bcsb"
    },
    "log_directory": "/tmp",
    "linux": {
    }
}

$ crictl runp pod-config.json
f84dd361f8dc51518ed291fbadd6db537b0496536c1d2d6c05ff943ce8c9a54fStep 2.检查沙盒是否处于就绪状态:
$ crictl pods
POD ID              CREATED             STATE               NAME                NAMESPACE           ATTEMPT
f84dd361f8dc5       17 seconds ago      Ready               busybox-sandbox     default             1
Step 3.使用运行时处理程序运行pod沙盒,运行时处理程序需要运行时支持。下面的示例显示如何在containerd运行时上使用runsc处理程序运行pod沙盒。
$ cat pod-config.json
{
    "metadata": {
        "name": "nginx-runsc-sandbox",
        "namespace": "default",
        "attempt": 1,
        "uid": "hdishd83djaidwnduwk28bcsb"
    },
    "log_directory": "/tmp",
    "linux": {
    }
}

$ crictl runp --runtime=runsc pod-config.json
c112976cb6caa43a967293e2c62a2e0d9d8191d5109afef230f403411147548c

$ crictl inspectp c112976cb6caa43a967293e2c62a2e0d9d8191d5109afef230f403411147548c
...
    "runtime": {
      "runtimeType": "io.containerd.runtime.v1.linux",
      "runtimeEngine": "/usr/local/sbin/runsc",
      "runtimeRoot": "/run/containerd/runsc"
    },
...Step 4.拉取 busybox 镜像然后在pod沙盒中使用config文件创建容器
crictl pull busybox:1.33.1
 # Image is up to date for sha256:69593048aa3acfee0f75f20b77acb549de2472063053f6730c4091b53f2dfb02

$ cat pod-config.json
{
    "metadata": {
        "name": "nginx-sandbox",
        "namespace": "default",
        "attempt": 1,
        "uid": "hdishd83djaidwnduwk28bcsb"
    },
    "log_directory": "/tmp",
    "linux": {
    }
}

$ cat container-config.json
{
  "metadata": {
      "name": "busybox"
  },
  "image":{
      "image": "busybox:1.33.1"
  },
  "command": [
      "top"
  ],
  "log_path":"busybox.log",
  "linux": {
  }
}

$ crictl create f84dd361f8dc51518ed291fbadd6db537b0496536c1d2d6c05ff943ce8c9a54f container-config.json pod-config.json
3e025dd50a72d956c4f14881fbb5b1080c9275674e95fb67f965f6478a957d60Step 5.列出容器并检查容器是否处于已创建状并启动容器
$ crictl ps -a
CONTAINER ID        IMAGE               CREATED             STATE               NAME                ATTEMPT
3e025dd50a72d       busybox             32 seconds ago      Created             busybox             0

$ crictl start 3e025dd50a72d956c4f14881fbb5b1080c9275674e95fb67f965f6478a957d60
3e025dd50a72d956c4f14881fbb5b1080c9275674e95fb67f965f6478a957d60

$ crictl ps
CONTAINER ID        IMAGE               CREATED              STATE               NAME                ATTEMPT
3e025dd50a72d       busybox             About a minute ago   Running             busybox             0
Step 6.在容器中执行命令
crictl exec -i -t 3e025dd50a72d956c4f14881fbb5b1080c9275674e95fb67f965f6478a957d60 ls
bin dev etc home proc root sys tmp usr varStep 7.显示容器的统计信息
$ crictl stats
CONTAINER           CPU %               MEM                 DISK              INODES
3e025dd50a72d       0.00                983kB             16.38kB             6
Containerd 跟 Docker 的区别说明
Docker 对容器的管理和操作基本都是通过 containerd 完成的,只是相当对于对其进行了封装,提供一些非常简单的命令进行管理容器生命周期。
Containerd 是一个工业级标准的容器运行时,它强调简单性、健壮性和可移植性,主要在宿主机中管理完整的容器生命周期:容器镜像的传输和存储、容器的执行和管理、存储和网络等。
Kubernetes 调用链对比
在Kubenetes 1.19.x 与 Kubernetes 1.20.x 版本针对runtime分别使用docker、Container的调用链关系。
# Runtime = docker 时的调用链
Kubelet -> Dockerd -> Containerd

# Runtime = containerd 时的调用链
Kubelet -> Containerd命令对比:containerd不支持docker API和docker CLI, 但是可以通过cri-tool实现类似的功能。
配置参数对比:
日志配置参数区别

stream server 区别: 执行 kubectl exec/logs 等命令需要在apiserver跟容器运行时之间建立流转发通道。 Docker API本身提供stream服务,kubelet 内部的 docker-shim 会通过 docker API做流转发, containerd 的stream服务需要单独配置。
[plugins.cri]
  stream_server_address = "127.0.0.1"
  stream_server_port = "0"
  enable_tls_streaming = false
Tips: 从k8s1.11引入了 , 从而使得只需要监听本地地址即可。
CNI 网络区别
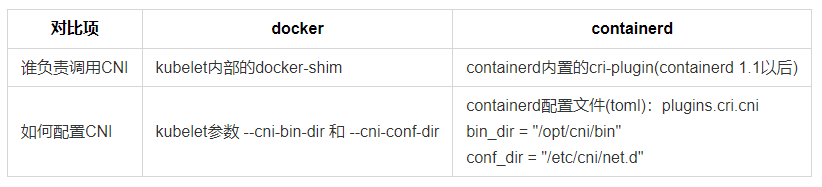
名称空间(Namespace): Docker没有namespace名称空间,而Containerd是支持namespaces的,对于上层编排系统的支持,主要区分了3个命名空间分别是k8s.io、moby和default,以上我们用crictl操作的均在k8s.io命名空间完成如查看镜像列表就需要加上-n参数 .

containerd 名称空间中资源查看
原文地址:https://blog.weiyigeek.top/2021/6-27-570.html
本文至此完毕,更多技术文章,尽情期待下一章节!
已发布的相关历史文章(点击即可进入)
1.我在B站学云原生之Containerd容器运行时基础介绍与Ubuntu系统中安装配置实践
1.我在B站学云原生之快速拥抱下一代容器引擎Podman来替代Docker容器
2.我在B站学云原生之快速拥抱下一代容器引擎Podman常用命令浅析与简单配置
1.我在B站学云原生之Kubernetes基础入门学习概述系统架构及组件浅析
2.我在B站学云原生之Kubernetes基础概念名词浅析与简单实践指南
3.我在B站学云原生之Kubernetes入门实践CentOS系统上安装部署K8S单控制平面环境
4.我在B站学云原生之Kubernetes入门实践CentOS系统上手动安装部署K8S集群环境
网页链接5.我在B站学云原生之Kubernetes入门实践Ubuntu系统上安装部署K8S单控制平面环境
6.我在B站学云原生之Kubernetes入门实践Ubuntu系统上安装部署高可用的K8S集群环境
欢迎各位志同道合的朋友一起学习交流,如文章有误请在下方留下您宝贵的经验知识,个人邮箱地址【master#weiyigeek.top】或者 个人公众号【WeiyiGeek】联系我。
更多文章来源于【WeiyiGeek Blog - 为了能到远方,脚下的每一步都不能少】 个人博客。
个人主页: 【 https://weiyigeek.top 】
博客地址: 【 https://blog.weiyigeek.top 】

https://weiyigeek.top - Always keep a beginner's mind, don't forget the beginner's mind
专栏书写不易,如果您觉得这个专栏还不错的,请给这篇专栏【点个赞、投个币、收个藏、关个注,转个发、留个言】,这将对我的肯定,谢谢!。
echo "【点个赞】,动动你那粗壮的拇指或者芊芊玉手,亲!"
printf("%s", "【投个币】,万水千山总是情,投个硬币行不行,亲!")
fmt.Printf("【收个藏】,阅后即焚不吃灰,亲!")
System.out.println("【关个注】,后续浏览查看不迷路哟,亲!")
console.info("【转个发】,让更多的志同道合的朋友一起学习交流,亲!")
cout << "【留个言】,文章写得好不好、有没有错误,一定要留言哟,亲! " << endl;

谢谢,各位帅哥、美女四连支持!!这就是我的动力!
更多网络安全、系统运维、应用开发、全栈文章,尽在【个人博客 - https://blog.weiyigeek.top】站点,谢谢支持!
