

ssh 到刚装好的服务器中,看下当前网络信息,主要记录网卡的名称。
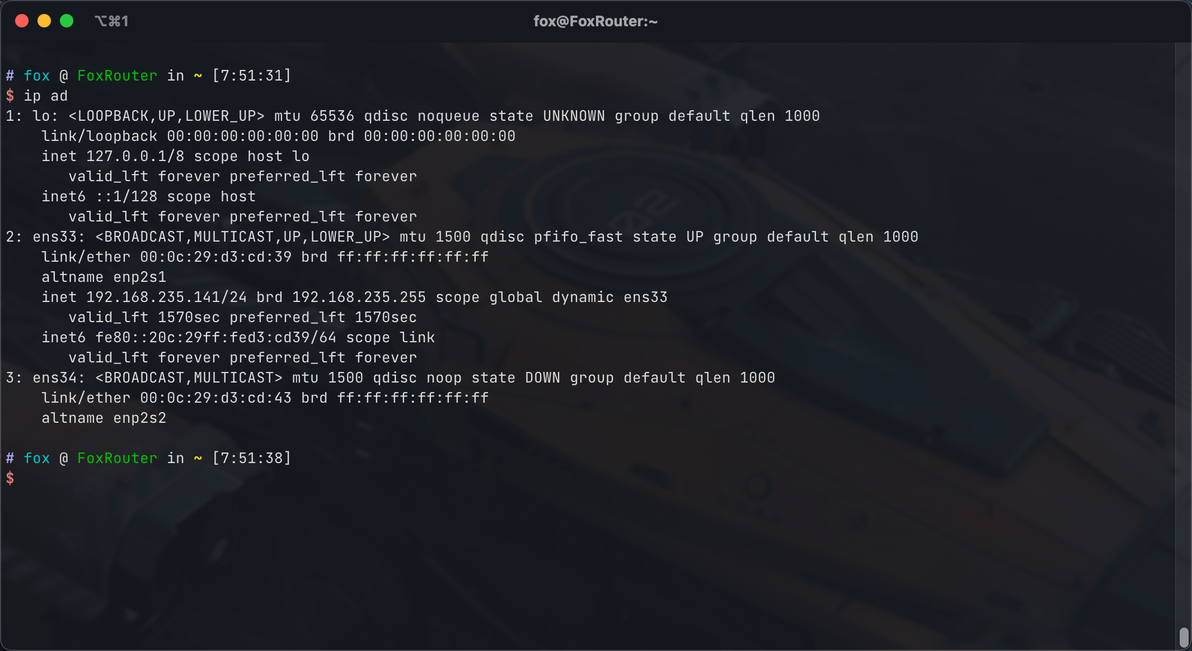
网络状态信息
发现系统时区不正确,顺手将系统的时区设置为正确的内容:
$ sudo timedatectl set-timezone Asia/Shanghai

# 检查时区
$ date -R

Tue, 19 Apr 2022 19:54:51 +0800
1. 查看网卡设置
查看当前网卡的配置文件:
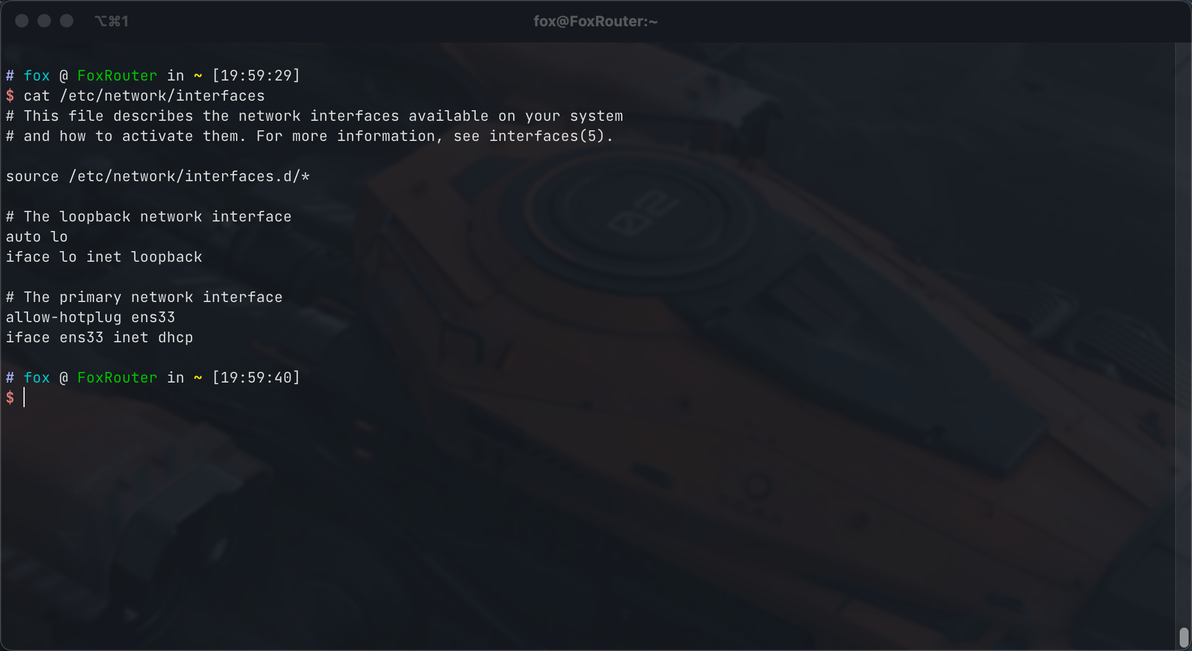
网卡配置文件
备份当前的网卡配置文件:
$ cd /etc/network

$ sudo cp interfaces interfaces.bak将第一个网口,我这里是ens33,的自动DHCP获取地址配置注释掉:
$ sudo nano interfaces

修改后参考如下:

# This file describes the network interfaces available on your system
# and how to activate them. For more information, see interfaces(5).

source /etc/network/interfaces.d/*

# The loopback network interface
auto lo
iface lo inet loopback

# The primary network interface
# allow-hotplug ens33
# iface ens33 inet dhcp
2. PPPoE拨号
$ sudo pppoeconf基本上只需要你的宽带用户名和密码,其他一路“回车”确认即可。
唯一需要注意的是关于是否使用PPPoE拨号带来的DNS服务器选项。
由于后续会使用Adguard Home来提供内网的DNS服务,因此在DNS设置部分中选择“否”。
拨号成功后,再次查看一下网卡配置文件会得到类似如下内容:
# This file describes the network interfaces available on your system
# and how to activate them. For more information, see interfaces(5).

source /etc/network/interfaces.d/*

# The loopback network interface
auto lo
iface lo inet loopback

# The primary network interface
# allow-hotplug ens33
# iface ens33 inet dhcp

auto dsl-provider
iface dsl-provider inet ppp
pre-up /bin/ip link set ens33 up # line maintained by pppoeconf
provider dsl-provider

auto ens33
iface ens33 inet manual
3. 创建网桥
假设你看到的网卡分别为 ens33、ens34、ens35;
预计使用 ens33 作为 WAN 口拨号,ens34 和 ens35 作为本地桥 br0 的成员端口;
光猫网络地址:192.168.1.1
内网网络地址:172.16.1.1/24
开始编辑网卡配置:
$ sudo nano interfaces编辑完成后,参考如下内容:
# This file describes the network interfaces available on your system
# and how to activate them. For more information, see interfaces(5).

source /etc/network/interfaces.d/*

# The loopback network interface
auto lo
iface lo inet loopback

# The primary network interface
# allow-hotplug ens33
# iface ens33 inet dhcp

# Access to modem
auto ens33
iface ens33 inet static
  address 192.168.1.233
  netmask 255.255.255.0

# PPPoE connection
auto dsl-provider
iface dsl-provider inet ppp
  pre-up /bin/ip link set ens33 up # line maintained by pppoeconf
  provider dsl-provider

# Bridged interfaces
iface ens34 inet manual
iface ens35 inet manual

# Setup an IP address for our bridge
auto br0
iface br0 inet static
  bridge_ports ens34 ens35
  bridge_waitport 1
  bridge_fd 5
  bridge_bridgeprio 32767
  address 172.16.1.1
  network 172.16.1.0
  netmask 255.255.255.0
  broadcast 172.16.1.255
4. 关闭硬件卸载(可选)
一定程度上网络数据包的 Bufferbloat 和网卡的驱动、硬件卸载相关,因此可以关闭网卡的硬件卸载,和 PPPoE 的硬件卸载。
加入网卡关闭硬件卸载的网卡配置如下:
# This file describes the network interfaces available on your system
# and how to activate them. For more information, see interfaces(5).

source /etc/network/interfaces.d/*

# The loopback network interface
auto lo
iface lo inet loopback

# The primary network interface
# allow-hotplug ens33
# iface ens33 inet dhcp

# Access to modem
auto ens33
iface ens33 inet static
  address 192.168.1.233
  netmask 255.255.255.0
  post-up /sbin/ethtool -K ens33 gro off gso off tso off

# PPPoE connection
auto dsl-provider
iface dsl-provider inet ppp
  pre-up /bin/ip link set ens33 up # line maintained by pppoeconf
  provider dsl-provider

# Bridged interfaces
iface ens34 inet manual
iface ens35 inet manual

# Setup an IP address for our bridge
auto br0
iface br0 inet static
  bridge_ports ens34 ens35
  bridge_waitport 1
  bridge_fd 5
  bridge_bridgeprio 32767
  address 172.16.1.1
  network 172.16.1.0
  netmask 255.255.255.0
  broadcast 172.16.1.255
  post-up /sbin/ethtool -K br0 gro off gso off tso off
  post-up /sbin/ethtool -K ens34 gro off gso off tso off
post-up /sbin/ethtool -K ens35 gro off gso off tso off关闭 PPPoE 的硬件卸载:
$ sudo nano /etc/ppp/ip-up.d/00offload填入以下内容:
#!/bin/sh
# Disable ppp0 hardware offload

/sbin/ethtool -K ppp0 gro off gso off
增加该脚本的可执行权限:
$ sudo chmod +x /etc/ppp/ip-up.d/00offload
5. 开启网桥相关内核模块
$ sudo nano /etc/modules-load.d/auto-load.conf填入以下内容:
# Load bridge netfilter at boot
br_netfilter
6. 内核参数调整
$ sudo nano /etc/sysctl.conf在文件末尾增加以下内容(内核版本 > 4.13 fq_codel 可以和 bbr 配合使用):
net.core.default_qdisc = fq_codel
net.ipv4.tcp_congestion_control = bbr

net.ipv4.ip_forward = 1
net.ipv6.conf.all.disable_ipv6 = 1
#net.ipv6.conf.all.forwarding = 1

net.ipv4.tcp_fastopen = 1
net.ipv4.tcp_syncookies = 1
net.ipv4.tcp_notsent_lowat = 131072

net.ipv4.tcp_ecn = 1
net.ipv4.tcp_sack = 1
net.ipv4.tcp_dsack = 1

net.ipv4.icmp_ratelimit = 50
重启生效,或者使用以下命令加载:
$ sudo sysctl -f
7. 添加防火墙
说明:本防火墙从 OpenWrt 21.02 版本中导出,主要修改有
1、禁止了外网的 icmp ping (echo request)
2、“劫持”内网的DNS请求必须走本机的DNS服务器
3、网络入口为“ppp0”、内网网桥为“br0”
首先创建一个包含防火墙条目的文件 firewall.rule :
$ cd
$ nano firewall.rule填入以下内容:
# Generated by iptables-save
*nat
:PREROUTING ACCEPT [0:0]
:INPUT ACCEPT [0:0]
:OUTPUT ACCEPT [0:0]
:POSTROUTING ACCEPT [0:0]
:postrouting_lan_rule - [0:0]
:postrouting_rule - [0:0]
:postrouting_wan_rule - [0:0]
:prerouting_lan_rule - [0:0]
:prerouting_rule - [0:0]
:prerouting_wan_rule - [0:0]
:zone_lan_postrouting - [0:0]
:zone_lan_prerouting - [0:0]
:zone_wan_postrouting - [0:0]
:zone_wan_prerouting - [0:0]
-A PREROUTING -i br0 -p udp -m udp --dport 53 -m comment --comment "Fox-fw3: Redirect DNS Query" -j REDIRECT --to-ports 53
-A PREROUTING -i br0 -p tcp -m tcp --dport 53 -m comment --comment "Fox-fw3: Redirect DNS Query" -j REDIRECT --to-ports 53
-A PREROUTING -m comment --comment "Fox-fw3: Custom prerouting rule chain" -j prerouting_rule
-A PREROUTING -i br0 -m comment --comment "Fox-fw3" -j zone_lan_prerouting
-A PREROUTING -i ppp0 -m comment --comment "Fox-fw3" -j zone_wan_prerouting
-A POSTROUTING -m comment --comment "Fox-fw3: Custom postrouting rule chain" -j postrouting_rule
-A POSTROUTING -o br0 -m comment --comment "Fox-fw3" -j zone_lan_postrouting
-A POSTROUTING -o ppp0 -m comment --comment "Fox-fw3" -j zone_wan_postrouting
-A postrouting_rule -d 192.168.1.1/32 -m comment --comment "Fox-fw3: Access to Modem" -j MASQUERADE
-A zone_lan_postrouting -m comment --comment "Fox-fw3: Custom lan postrouting rule chain" -j postrouting_lan_rule
-A zone_lan_prerouting -m comment --comment "Fox-fw3: Custom lan prerouting rule chain" -j prerouting_lan_rule
-A zone_wan_postrouting -m comment --comment "Fox-fw3: Custom wan postrouting rule chain" -j postrouting_wan_rule
-A zone_wan_postrouting -m comment --comment "Fox-fw3" -j MASQUERADE
-A zone_wan_prerouting -m comment --comment "Fox-fw3: Custom wan prerouting rule chain" -j prerouting_wan_rule
COMMIT
# Completed


# Generated by iptables-save
*raw
:PREROUTING ACCEPT [0:0]
:OUTPUT ACCEPT [0:0]
:zone_lan_helper - [0:0]
-A PREROUTING -i br0 -m comment --comment "Fox-fw3: lan CT helper assignment" -j zone_lan_helper
COMMIT
# Completed


# Generated by iptables-save
*mangle
:PREROUTING ACCEPT [0:0]
:INPUT ACCEPT [0:0]
:FORWARD ACCEPT [0:0]
:OUTPUT ACCEPT [0:0]
:POSTROUTING ACCEPT [0:0]
-A FORWARD -o ppp0 -p tcp -m tcp --tcp-flags SYN,RST SYN -m comment --comment "Fox-fw3: Zone wan MTU fixing" -j TCPMSS --clamp-mss-to-pmtu
-A FORWARD -i ppp0 -p tcp -m tcp --tcp-flags SYN,RST SYN -m comment --comment "Fox-fw3: Zone wan MTU fixing" -j TCPMSS --clamp-mss-to-pmtu
COMMIT
# Completed


# Generated by iptables-save
*filter
:INPUT ACCEPT [0:0]
:FORWARD DROP [0:0]
:OUTPUT ACCEPT [0:0]
:forwarding_lan_rule - [0:0]
:forwarding_rule - [0:0]
:forwarding_wan_rule - [0:0]
:input_lan_rule - [0:0]
:input_rule - [0:0]
:input_wan_rule - [0:0]
:output_lan_rule - [0:0]
:output_rule - [0:0]
:output_wan_rule - [0:0]
:reject - [0:0]
:syn_flood - [0:0]
:zone_lan_dest_ACCEPT - [0:0]
:zone_lan_forward - [0:0]
:zone_lan_input - [0:0]
:zone_lan_output - [0:0]
:zone_lan_src_ACCEPT - [0:0]
:zone_wan_dest_ACCEPT - [0:0]
:zone_wan_dest_REJECT - [0:0]
:zone_wan_forward - [0:0]
:zone_wan_input - [0:0]
:zone_wan_output - [0:0]
:zone_wan_src_REJECT - [0:0]
-A INPUT -i lo -m comment --comment "Fox-fw3" -j ACCEPT
-A INPUT -m comment --comment "Fox-fw3: Custom input rule chain" -j input_rule
-A INPUT -m conntrack --ctstate RELATED,ESTABLISHED -m comment --comment "Fox-fw3" -j ACCEPT
-A INPUT -m conntrack --ctstate INVALID -m comment --comment "Fox-fw3" -j DROP
-A INPUT -p tcp -m tcp --tcp-flags FIN,SYN,RST,ACK SYN -m comment --comment "Fox-fw3" -j syn_flood
-A INPUT -i br0 -m comment --comment "Fox-fw3" -j zone_lan_input
-A INPUT -i ppp0 -m comment --comment "Fox-fw3" -j zone_wan_input
-A FORWARD -m comment --comment "Fox-fw3: Custom forwarding rule chain" -j forwarding_rule
-A FORWARD -m conntrack --ctstate RELATED,ESTABLISHED -m comment --comment "Fox-fw3" -j ACCEPT
-A FORWARD -m conntrack --ctstate INVALID -m comment --comment "Fox-fw3" -j DROP
-A FORWARD -i br0 -m comment --comment "Fox-fw3" -j zone_lan_forward
-A FORWARD -i ppp0 -m comment --comment "Fox-fw3" -j zone_wan_forward
-A FORWARD -m comment --comment "Fox-fw3" -j reject
-A OUTPUT -o lo -m comment --comment "Fox-fw3" -j ACCEPT
-A OUTPUT -m comment --comment "Fox-fw3: Custom output rule chain" -j output_rule
-A OUTPUT -m conntrack --ctstate RELATED,ESTABLISHED -m comment --comment "Fox-fw3" -j ACCEPT
-A OUTPUT -m conntrack --ctstate INVALID -m comment --comment "Fox-fw3" -j DROP
-A OUTPUT -o br0 -m comment --comment "Fox-fw3" -j zone_lan_output
-A OUTPUT -o ppp0 -m comment --comment "Fox-fw3" -j zone_wan_output
-A forwarding_rule -d 192.168.1.1/32 -m comment --comment "Fox-fw3: Access to Modem" -j ACCEPT
-A reject -p tcp -m comment --comment "Fox-fw3" -j REJECT --reject-with tcp-reset
-A reject -m comment --comment "Fox-fw3" -j REJECT --reject-with icmp-port-unreachable
-A syn_flood -p tcp -m tcp --tcp-flags FIN,SYN,RST,ACK SYN -m limit --limit 64/sec --limit-burst 128 -m comment --comment "Fox-fw3" -j RETURN
-A syn_flood -m comment --comment "Fox-fw3" -j DROP
-A zone_lan_dest_ACCEPT -o br0 -m comment --comment "Fox-fw3" -j ACCEPT
-A zone_lan_forward -m comment --comment "Fox-fw3: Custom lan forwarding rule chain" -j forwarding_lan_rule
-A zone_lan_forward -m comment --comment "Fox-fw3: Zone lan to wan forwarding policy" -j zone_wan_dest_ACCEPT
-A zone_lan_forward -m conntrack --ctstate DNAT -m comment --comment "Fox-fw3: Accept port forwards" -j ACCEPT
-A zone_lan_forward -m comment --comment "Fox-fw3" -j zone_lan_dest_ACCEPT
-A zone_lan_input -m comment --comment "Fox-fw3: Custom lan input rule chain" -j input_lan_rule
-A zone_lan_input -m conntrack --ctstate DNAT -m comment --comment "Fox-fw3: Accept port redirections" -j ACCEPT
-A zone_lan_input -m comment --comment "Fox-fw3" -j zone_lan_src_ACCEPT
-A zone_lan_output -m comment --comment "Fox-fw3: Custom lan output rule chain" -j output_lan_rule
-A zone_lan_output -m comment --comment "Fox-fw3" -j zone_lan_dest_ACCEPT
-A zone_lan_src_ACCEPT -i br0 -m comment --comment "Fox-fw3" -j ACCEPT
-A zone_wan_dest_ACCEPT -o ppp0 -m conntrack --ctstate INVALID -m comment --comment "Fox-fw3: Prevent NAT leakage" -j DROP
-A zone_wan_dest_ACCEPT -o ppp0 -m comment --comment "Fox-fw3" -j ACCEPT
-A zone_wan_dest_REJECT -o ppp0 -m comment --comment "Fox-fw3" -j reject
-A zone_wan_forward -m comment --comment "Fox-fw3: Custom wan forwarding rule chain" -j forwarding_wan_rule
-A zone_wan_forward -p esp -m comment --comment "Fox-fw3: Allow-IPSec-ESP" -j zone_lan_dest_ACCEPT
-A zone_wan_forward -p udp -m udp --dport 500 -m comment --comment "Fox-fw3: Allow-ISAKMP" -j zone_lan_dest_ACCEPT
-A zone_wan_forward -m conntrack --ctstate DNAT -m comment --comment "Fox-fw3: Accept port forwards" -j ACCEPT
-A zone_wan_forward -m comment --comment "Fox-fw3" -j zone_wan_dest_REJECT
-A zone_wan_input -m comment --comment "Fox-fw3: Custom wan input rule chain" -j input_wan_rule
-A zone_wan_input -p udp -m udp --dport 68 -m comment --comment "Fox-fw3: Allow-DHCP-Renew" -j DROP
-A zone_wan_input -p icmp -m icmp --icmp-type 8 -m comment --comment "Fox-fw3: Allow-Ping" -j DROP
-A zone_wan_input -p igmp -m comment --comment "Fox-fw3: Allow-IGMP" -j ACCEPT
-A zone_wan_input -m conntrack --ctstate DNAT -m comment --comment "Fox-fw3: Accept port redirections" -j ACCEPT
-A zone_wan_input -m comment --comment "Fox-fw3" -j zone_wan_src_REJECT
-A zone_wan_output -m comment --comment "Fox-fw3: Custom wan output rule chain" -j output_wan_rule
-A zone_wan_output -m comment --comment "Fox-fw3" -j zone_wan_dest_ACCEPT
-A zone_wan_src_REJECT -i ppp0 -m comment --comment "Fox-fw3" -j reject
COMMIT
# Completed
将防火墙条目导入 iptables:
### 导入防火墙
$ sudo iptables-restore < firewall.rule为了持久化防火墙配置,即开机就有如上的防火墙配置,需要使用另外的一个软件包;如果设置正确,目前Debian系统应该已经通过 PPPoE 拨号成功,并且可以与外网通信,因此如下操作:
$ sudo apt install iptables-persistent根据提示,会保存 IPv4、IPv6的防火墙到其指定的地方。
如果后续修改了防火墙,需要持久化保存,可以参考如下命令:
### 导出防火墙
$ sudo iptables-save > firewall.rule其他有用的防火墙命令:
# 查看防火墙状态
$ sudo iptables -nvL

# nft 显示所有规则
$ nft list ruleset
