
目录
效果
目的
学习深度的原理以及计算过程。
了解观察空间的概念,ComputeScreenPos函数和Linear01Depth函数的使用。
粒子切边问题。
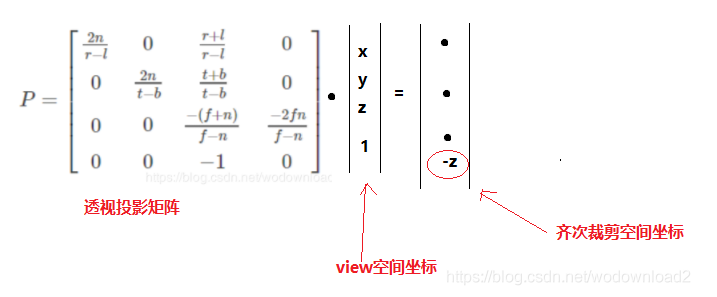
Eye Depth | 观察空间
观察空间看到的物体是什么样子的?
第一种方法
观察空间是物体相对于摄像机所在平面的距离,(摄像机的深度是 0 ,物体是w)因为是相对,所以Z是相反的。我们前计算顶点距离摄像机数值。
//顶点着色器阶段
o.positionVS = TransformWorldToView(o.positionWS);        //世界空间转换成观察空间

//片元着色器阶段输出数值
float fragmentEyeDepth = -i.positionVS.z;                //观察空间下顶点的深度是(-z)

第二种方法
在顶点着色器阶段,使用函数ComputeScreenPos裁剪空间转换成屏幕空间,
o.scrPos = ComputeScreenPos(o.positionCS); //使用unity函数 [-w,w] 转换到[0,w]0代表观察空间位置,w代表顶点位置,
float fragmentEyeDepth = i.scrPos.w; //观察空间下顶点的深度是(-z)扩展 为什么输出是屏幕空间.w分量,不应该是z吗?
从观察空间到裁剪空间的矩阵是投影矩阵,但要注意的是,投影矩阵并没有实现真正的投影,而是将顶点变换到齐次裁剪坐标,为裁剪做准备,
经过投影矩阵变换后, (透视相机)透视投影下的顶点齐次坐标屏幕空间.w值为**-position.z** 。深度值就储存到w里了。
计算过程参考大佬方法
3D数学-透视投影 - 知乎 (zhihu.com)
图形学基础 - 变换 - 投影 - 知乎 (zhihu.com)
输出顶点
float fragmentEyeDepth = i.scrPos.w; //观察空间下顶点的深度是(-z)效果和上面的一样 ,因为目前数值很大所以曝光了。越距离摄像机越远数值越大。

这一步可以理解是获取顶点在屏幕位置的数值,那我们下一步获取深度值。
获取深度值
URP管线设置开启深度图
打开渲染管线确认是否开启深度(Depth)

ShaderGraphs 里获取深度节点

Shader中获取深度图
声明深度变量
TEXTURE2D(_CameraDepthTexture);
SAMPLER(sampler_CameraDepthTexture);顶点着色器阶段---输入 裁剪空间齐次坐标转换到屏幕空间的齐次坐标
o.scrPos = ComputeScreenPos(o.positionCS); //获取屏幕坐标注意:这里是输入的是裁剪空间位置坐标
片元着色器阶段—输出结果
float2 screenPos = i.scrPos.xy / i.scrPos.w;                     //透视除法

float depth = SAMPLE_TEXTURE2D(_CameraDepthTexture,sampler_CameraDepthTexture,screenPos);
float linearDepth = Linear01Depth(depth,_ZBufferParams);     //转换成[0,1]内的线性变化深度值
float4 col = float4(LinearDepth.xxx,1);效果

代码
Shader "URP/URP_Depth"
{
    Properties
    {
        _DepthOffset("_DepthOffset",float) = 1
        _DepthDdgeSize("_DepthDdgeSize",Range(0,1)) = 0.005
    }
    SubShader
    {
        Tags
        {
            "RenderPipeline"="UniversalPipeline"
            "RenderType"="Transparent"
            "Queue"="Transparent"
        }

        HLSLINCLUDE


        #include "Packages/com.unity.render-pipelines.universal/ShaderLibrary/Core.hlsl"


        CBUFFER_START(UnityPerMaterial)
        float _DepthOffset,_DepthDdgeSize;
        CBUFFER_END


        TEXTURE2D(_CameraDepthTexture);
        SAMPLER(sampler_CameraDepthTexture);


        // 顶点着色器的输入
        struct a2v
        {
            float3 positionOS : POSITION;
            float4 normalOS : NORMAL;
            float2 texcoord :TEXCOORD0;
        };

        // 顶点着色器的输出
        struct v2f
        {
            float4 positionCS : SV_POSITION;
            float3 normalWS : NORMAL;
            float3 positionWS:TEXCOORD1;
            float4 scrPos : TEXCOORD0;
        };
        ENDHLSL

        Pass
        {
            Name "Pass"
            Tags
            {
                "LightMode" = "UniversalForward"
                "RenderType"="Transparent"
            }

            Blend SrcAlpha OneMinusSrcAlpha


            HLSLPROGRAM
            #pragma vertex vert
            #pragma fragment frag


            // 顶点着色器
            v2f vert(a2v v)
            {
                v2f o;

                VertexPositionInputs  PositionInputs = GetVertexPositionInputs(v.positionOS.xyz);
                o.positionCS = PositionInputs.positionCS;                                        //获取裁剪空间位置
                o.positionWS = PositionInputs.positionWS;                                        //获取世界空间位置信息

                VertexNormalInputs NormalInputs = GetVertexNormalInputs(v.normalOS.xyz);
                o.normalWS.xyz = NormalInputs.normalWS;                                //  获取世界空间下法线信息

                o.scrPos = ComputeScreenPos(o.positionCS);
                return o;
            }

            // 片段着色器
            half4 frag (v2f i) : SV_Target
            {


                float2 screenPos = i.scrPos.xy / i.scrPos.w;
                float depth = SAMPLE_TEXTURE2D(_CameraDepthTexture,sampler_CameraDepthTexture,screenPos);
                float LinearDepth = Linear01Depth(depth,_ZBufferParams);

                float4 col = float4(LinearDepth.xxx,1);
                return col;
            }
            ENDHLSL
        }
    }
}

问题
问题1 为什么裁剪空间转换成屏幕空间需要在除 scrPos.w 分量?
在顶点着色器阶段,我们已经使用函数ComputeScreenPos 把裁剪空间转换成屏幕空间了。
为什么到片元着色器阶段还要使用 屏幕空间.xy / 屏幕空间.w 分量。
从摄像机空间到裁剪空间的矩阵是投影矩阵,但要注意的是,投影矩阵并没有实现真正的投影,而是将顶点变换到齐次裁剪坐标,为裁剪做准备,
经过投影矩阵变换后,
(透视相机)透视投影下的顶点齐次坐标屏幕空间.w值为**-position.z** 。深度值就储存到w里了。
(正交相机) 正交投影的w值为1
我们上一节护盾篇介绍到 position.z就是物体的深度值。
裁剪空间下齐次坐标,x和y的取值范围是(-w,w) 然后 W 分量**(-z)**
屏幕空间下的齐次坐标,取值范围是(0-1),W分量 (-z)
最后通过透视除法之后xy的取值范围就是(0-1)了。
所以 :这个过程通过齐次除法(透视除法)转换成普通坐标
float2 screenPos = i.scrPos.xy / i.scrPos.w; //像素 除 深度问题2 为什么还需要使用Linear01Depth函数对深度图处理。
采样得到的深度值,在透视投影的情况下不是线性的,因为经过透视投影和齐次除法后,Zndc和Zview的倒数是线性关系,我们采样得到了非线性的深度值.
判断物体是否和其它物体相交
实现这个效果我们就需要判断当前物体的深度值与深度图中对应的深度值是否在一定范围内,
如果是则判定为相交。
第1步我们在裁剪空间计算出物体的位置信息,
第2步获取场景深度数据,物体的像素深度。
第3步 在判断物体是否和场景中的其他物体相交。
特效中粒子和模型交叉时会出现切边。就可以使用这样的方法解决。
默认效果,带有切边

1. 第一种方法 使用裁剪空间计算深度
第一种方法,护盾使用的方法。开始计算出物体在屏幕空间的位置信息。
float2 SS_texcoord = i.positionCS.xy / _ScreenParams.xy; // 物体在屏幕的位置计算空间深度转换成线性
//计算深度缓存
float depth = SAMPLE_TEXTURE2D(_CameraDepthTexture,sampler_CameraDepthTexture,screenPos);
float linear01Depth = Linear01Depth(depth,_ZBufferParams); //转换成[0,1]内的线性变化深度值这里使用函数Linear01Depth 转换到(0-1)
注意 :函数定义在Common.hlsl里,注意它和build in的同名函数的参数不同

在计算模型线性深度
float depth = i.positionCS.z;                           //齐次裁剪空间物体像素深度
depth = Linear01Depth(depth,_ZBufferParams); //转换模型线性深度 //获取模型线性深度最后计算出物体之间的深度效果
float one = saturate((D - linear01Depth + _SoftSize) * 100 * _SoftFade);
col.a *= 1 - one;                                      //取反向 输出到Alpha
return col; 效果
参数

代码
Shader "URP/URP_Depth_Effect_01"
{
    Properties
    {
        _MainTex ("Texture", 2D) = "white" {}
        _SoftFade("_SoftFade",Float) = 1.0
        _SoftSize("_SoftSize",Range(0,0.005)) = 0.00076
    }
    SubShader
    {
        Tags
        {
            "RenderPipeline"="UniversalPipeline"
            "RenderType"="Transparent"
            "Queue"="Transparent"
        }

        HLSLINCLUDE


        #include "Packages/com.unity.render-pipelines.universal/ShaderLibrary/Core.hlsl"


        CBUFFER_START(UnityPerMaterial)
        float _SoftFade,_SoftSize;
        float4 _MainTex_ST;
        CBUFFER_END


        TEXTURE2D(_CameraDepthTexture);
        SAMPLER(sampler_CameraDepthTexture);

        TEXTURE2D(_MainTex);
        SAMPLER(sampler_MainTex);

        // 顶点着色器的输入
        struct a2v
        {
            float3 positionOS : POSITION;
            float4 normalOS : NORMAL;
            float2 texcoord :TEXCOORD0;
        };

        // 顶点着色器的输出
        struct v2f
        {
            float4 positionCS : SV_POSITION;
            float3 normalWS : NORMAL;
            float3 positionWS:TEXCOORD1;
            float4 scrPos : TEXCOORD0;
            float2 uv :TEXCOORD2;
        };
        ENDHLSL


        Pass
        {
            Name "Pass"
            Tags
            {
                "LightMode" = "UniversalForward"
                "RenderType"="Transparent"
            }

            Blend SrcAlpha OneMinusSrcAlpha


            HLSLPROGRAM
            #pragma vertex vert
            #pragma fragment frag


            // 顶点着色器
            v2f vert(a2v v)
            {
                v2f o;

                VertexPositionInputs  PositionInputs = GetVertexPositionInputs(v.positionOS.xyz);
                o.positionCS = PositionInputs.positionCS;                                        //获取裁剪空间位置
                o.positionWS = PositionInputs.positionWS;                                        //获取世界空间位置信息

                VertexNormalInputs NormalInputs = GetVertexNormalInputs(v.normalOS.xyz);
                o.normalWS.xyz = NormalInputs.normalWS;                                //  获取世界空间下法线信息
                o.uv.xy = TRANSFORM_TEX(v.texcoord, _MainTex);
                return o;
            }

            // 片段着色器
            half4 frag (v2f i) : SV_Target
            {
                half4 DiffuseTex = SAMPLE_TEXTURE2D(_MainTex,sampler_MainTex,i.uv.xy);

                float2 screenPos = i.positionCS.xy / _ScreenParams.xy;                                          // 物体在屏幕的位置
                float depth = SAMPLE_TEXTURE2D(_CameraDepthTexture,sampler_CameraDepthTexture,screenPos);       //深度值
                float linear01Depth = Linear01Depth(depth,_ZBufferParams);                                      //转换成[0,1]内的线性变化深度值

                float Ddepth = i.positionCS.z;                                //齐次裁剪空间物体像素深度
                float D = Linear01Depth(Ddepth,_ZBufferParams);               //转换线性深度

                float one = saturate((D - linear01Depth + _SoftSize) * 100 * _SoftFade);
                float4 col = DiffuseTex;
                col.a *= 1 - one;                                              //取反向 输出到Alpha
                return col;
            }
            ENDHLSL
        }
    }
}
2. 第二种 使用屏幕空间获取深度
使用函数ComputeScreenPos 裁剪空间信息转换到齐次空间下屏幕空间位置 。顶点着色器阶段
o.scrPos = ComputeScreenPos(o.positionCS);在片元着色器阶段
float2 ndcPos  = i.scrPos.xy/ i.scrPos.w;                        // [0-1] 透视除法
float depth = SAMPLE_TEXTURE2D(_CameraDepthTexture,sampler_CameraDepthTexture,ndcPos).r;         // [-w,w] 计算深度
float LinearDepth = LinearEyeDepth(depth,_ZBufferParams);

float fade = saturate((LinearDepth - i.scrPos.w) / _SoftFade);        //使用全部深度 --减去物体的深度

float4 col = DiffuseTex;
col.a *= fade;输出结果

代码
Shader "URP/URP_Depth_Effect_02"
{
    Properties
    {
        _SoftFade("_SoftFade",Float) = 1.0
        _MainTex ("Texture", 2D) = "white" {}
    }
    SubShader
    {
        Tags
        {
            "RenderPipeline"="UniversalPipeline"
            "RenderType"="Transparent"
            "Queue"="Transparent"
        }

        HLSLINCLUDE


        #include "Packages/com.unity.render-pipelines.universal/ShaderLibrary/Core.hlsl"


        CBUFFER_START(UnityPerMaterial)
        float _SoftFade;
        float4 _MainTex_ST;
        CBUFFER_END


        TEXTURE2D(_CameraDepthTexture);
        SAMPLER(sampler_CameraDepthTexture);

        TEXTURE2D(_MainTex);
        SAMPLER(sampler_MainTex);

        // ������ɫ��������
        struct a2v
        {
            float3 positionOS : POSITION;
            float4 normalOS : NORMAL;
            float2 texcoord :TEXCOORD0;
        };

        // ������ɫ�������
        struct v2f
        {
            float4 positionCS : SV_POSITION;
            float3 normalWS : NORMAL;
            float3 positionWS:TEXCOORD1;
            float4 scrPos : TEXCOORD0;
            float4 uv : TEXCOORD2;
        };
        ENDHLSL

        Pass
        {
            Name "Pass"
            Tags
            {
                "LightMode" = "UniversalForward"
                "RenderType"="Transparent"
            }

            Blend SrcAlpha OneMinusSrcAlpha


            HLSLPROGRAM

            #pragma vertex vert
            #pragma fragment frag


            // ������ɫ��
            v2f vert(a2v v)
            {
                v2f o;

                VertexPositionInputs  PositionInputs = GetVertexPositionInputs(v.positionOS.xyz);
                o.positionCS = PositionInputs.positionCS;
                o.positionWS = PositionInputs.positionWS;

                VertexNormalInputs NormalInputs = GetVertexNormalInputs(v.normalOS.xyz);
                o.normalWS.xyz = NormalInputs.normalWS;

                o.uv.xy = TRANSFORM_TEX(v.texcoord, _MainTex);

                o.scrPos = ComputeScreenPos(o.positionCS);
                return o;
            }


            half4 frag (v2f i) : SV_Target
            {
                half4 DiffuseTex = SAMPLE_TEXTURE2D(_MainTex,sampler_MainTex,i.uv);

                float2 ndcPos  = i.scrPos.xy/ i.scrPos.w;                                                        // [0-1] 透视除法
                float depth = SAMPLE_TEXTURE2D(_CameraDepthTexture,sampler_CameraDepthTexture,ndcPos).r;         // [-w,w] 计算深度
                float LinearDepth = LinearEyeDepth(depth,_ZBufferParams);

                //float fragmentEyeDepth = i.scrPos.w;                                                            //这里获取的是顶点是深度数值

                float fade = saturate((LinearDepth - i.scrPos.w) / _SoftFade);                                    //使用全部深度 --减去物体的深度

                float4 col = DiffuseTex;
                col.a *= fade;
                return col;
            }
            ENDHLSL
        }
    }
}
ComputeScreenPos | 计算齐次空间下屏幕坐标位置
URP内置获取
/*
             那么屏幕坐标的计算方法
             screenPosX = ((x / w) * 0.5 + 0.5) * width
             screenPosY = ((y / w) * 0.5 + 0.5) * height

             变换后的结果 unity代码类似
             o.x = (pos.x * 0.5 + pos.w * 0.5)
             o.y = (pos.y * 0.5 * _ProjectionParams.x + pos.w * 0.5)
            */
            float4 ComputeScreenPos(float4 pos, float projectionSign)                          //齐次坐标变换到屏幕坐标
            {
                float4 o = pos * 0.5f;
                o.xy = float2(o.x,o.y * projectionSign) + o.w;
                o.zw = pos.zw;
                return o;
}扩展 ComputeScreenPos 屏幕齐次坐标 透视投影之后透视除法之前的坐标空间被称为裁剪空间,也叫齐次(裁剪)空间
看这个函数输入的是一个位置信息,该函数传入的是齐次空间下的坐标,
//传入齐次坐标
positionCS = TransformWorldToHClip(WorldPos);            //输入的是世界空间下的顶点位置
screenPos = ComputeScreenPos(positionCS );下面我们进行齐次坐标推导到屏幕坐标
顶点在变换到齐次坐标后,其x和y分量的范围在[-w, w]。假设目前屏幕的宽度为width,高度为height,那么屏幕坐标的计算方法为:
// ComputeScreenPos 函数计算方法

o.x = (pos.x * 0.5 + pos.w * 0.5)
o.y = (pos.y * 0.5 * _ProjectionParams.x + pos.w * 0.5)

// _ProjectionParams.x用于在使用翻转投影矩阵时(此时其值为-1.0)翻转y的坐标值。


//屏幕坐标的计算方法为
screenPosX = ((x / w) * 0.5 + 0.5) * width
screenPosY = ((y / w) * 0.5 + 0.5) * height


//我们自己的计算过程变换
screenPosX/width = ((x / w) * 0.5 + 0.5)
screenPosY/height = ((y / w) * 0.5 + 0.5)


//两边同时乘w:
screenPosX / width * w = ((x * 0.5 + w * 0.5)
screenPosY / height * w = ((y * 0.5 + w * 0.5)
Unity Shader
// Unity Shader代码
float4 o = pos * 0.5f;                   //这里 pos.xyzw
o.xy = float2(o.x,o.y * projectionSign) + o.w;
o.zw = pos.zw;


//变换
o.x = pos.x * 0.5  + pos.w * 0.5
o.y = pos.y * 0.5  + pos.w * 0.5
这样变换完的结果和我们上面计算的结果一样。
总结
ComputeScreenPos 函数是计算裁剪空间转换到屏幕空间
LinearEyeDepth和Linear01Depth
这是这俩个函数的对比。
// Z buffer to linear 0..1 depth
float Linear01Depth(float depth, float4 zBufferParam)
{
    return 1.0 / (zBufferParam.x * depth + zBufferParam.y);
}
// Z buffer to linear depth
float LinearEyeDepth(float depth, float4 zBufferParam)
{
    return 1.0 / (zBufferParam.z * depth + zBufferParam.w);
}Linear01Depth会返回相机空间中范围在(0,1]的深度,近平面为Near/Far,远平面为1。
LinearEyeDepth会返回相机空间中的深度,近平面为Near,远平面为Far。
总结
这俩个计算深度的方法不同,都是计算物体深度,第二种方法更简单。
扩展:实现水深度
使用上面2种制作一下水面深度的效果。
第一种,裁剪空间和像素深度
在片元计算器阶段 使用裁剪空间和屏幕位置计算顶点位置。
float2 SS_texcoord = i.positionCS.xy / _ScreenParams.xy; //顶点在屏幕的位置获取渲染深度
//计算深度缓存
float4 depthcolor = tex2D(_CameraDepthTexture,SS_texcoord);
float depthbuffer = Linear01Depth(depthcolor,_ZBufferParams); //线性深度深度输入裁剪空间的像素深度
float depth = i.positionCS.z;
depth = Linear01Depth(depth,_ZBufferParams); //获取线性深度计算俩个物体的深度
float edge =  1 - saturate((depth - depthbuffer + _DepthDdgeSize) * 100  * _DepthOffset);             //计算物体深度
float3 Watercolor = lerp(_DeepWater,_ShallowWater,edge);
float4 col = float4(Watercolor,1);

第二种 自定义函数求深度
定义ComputeScreenPos函数 ,上面介绍过。
这个函数是把裁剪空间齐次坐标转换到屏幕空间的齐次坐标,映射到 (0,1)范围
/*
             那么屏幕坐标的计算方法
             screenPosX = ((x / w) * 0.5 + 0.5) * width
             screenPosY = ((y / w) * 0.5 + 0.5) * height

             变换后的结果 unity代码类似
             o.x = (pos.x * 0.5 + pos.w * 0.5)
             o.y = (pos.y * 0.5 * _ProjectionParams.x + pos.w * 0.5)
            */
            float4 ComputeScreenPos(float4 pos, float projectionSign)                          //齐次坐标变换到屏幕坐标
            {
                float4 o = pos * 0.5f;
                o.xy = float2(o.x,o.y * projectionSign) + o.w;
                o.zw = pos.zw;
                return o;
}定义一个函数获取全部深度,输出是float类型,所以输出单通道。
float CustomSampleSceneDepth(float2 uv)
{
		return SAMPLE_TEXTURE2D(_CameraDepthTexture,sampler_CameraDepthTexture,uv).r;
}在定义一个计算俩个物体深度
//输入世界空间   WorldPos
float GetDepthFade(float3 WorldPos, float Distance)
{
	float4 posCS= TransformWorldToHClip(WorldPos);                                            //转换成齐次坐标
	float4 ScreenPosition = ComputeScreenPos(posCS, _ProjectionParams.x);                      //齐次坐标系下的屏幕坐标值
	//从齐次坐标变换到屏幕坐标, x,y的分量 范围在[-w,w]的范围   _ProjectionParams 用于在使用翻转投影矩阵时(此时其值为-1.0)翻转y的坐标值。
	//这里
	float screenDepth = CustomSampleSceneDepth(ScreenPosition.xy / ScreenPosition.w);        //计算屏幕深度 是非线性

	float EyeDepth = LinearEyeDepth(screenDepth,_ZBufferParams);                            //深度纹理的采样结果转换到视角空间下的深度值
	return saturate((EyeDepth - ScreenPosition.w)/ Distance);                               //使用视角空间下所有深度 减去模型顶点的深度值
}注意 : ScreenPosition.xy / ScreenPosition.w 是在做透视除法,像素除深度
在片元着色器阶段输出
//计算深度缓存
float depthfade = GetDepthFade(i.positionWS, _DepthDdgeSize);
float4 col = float4(depthfade.xxx,1);

代码
Shader "URP/URP_Depth_02"
{
    Properties
    {
        _ShallowWater ("shallowColor", Color) = (1.0, 1.0, 1.0, 1.0)
        _DeepWater ("DeepColor", Color) = (1.0, 1.0, 1.0, 1.0)
        _DepthDdgeSize("_DepthDdgeSize",Range(0,100)) = 0.005
    }
    SubShader
    {
        Tags
        {
            "RenderPipeline"="UniversalPipeline"
            "RenderType"="Transparent"
            "Queue"="Transparent"
        }

        HLSLINCLUDE


        #include "Packages/com.unity.render-pipelines.universal/ShaderLibrary/Core.hlsl"


        CBUFFER_START(UnityPerMaterial)
        float _DepthDdgeSize;
        float4 _ShallowWater,_DeepWater;
        CBUFFER_END


        TEXTURE2D(_CameraDepthTexture);
        SAMPLER(sampler_CameraDepthTexture);                       //获取深度贴图

        // 顶点着色器的输入
        struct a2v
        {
            float3 positionOS : POSITION;
            float4 normalOS : NORMAL;
            float2 texcoord :TEXCOORD0;
        };

        // 顶点着色器的输出
        struct v2f
        {
            float4 positionCS : SV_POSITION;
            float3 normalWS : NORMAL;
            float3 positionWS:TEXCOORD1;
        };
        ENDHLSL

        Pass
        {
            Name "Pass"
            Tags
            {
                "LightMode" = "UniversalForward"
                "RenderType"="Transparent"
            }

            Blend SrcAlpha OneMinusSrcAlpha


            HLSLPROGRAM
            #pragma vertex vert
            #pragma fragment frag

            /*
             那么屏幕坐标的计算方法
             screenPosX = ((x / w) * 0.5 + 0.5) * width
             screenPosY = ((y / w) * 0.5 + 0.5) * height

             变换后的结果 unity代码类似
             o.x = (pos.x * 0.5 + pos.w * 0.5)
             o.y = (pos.y * 0.5 * _ProjectionParams.x + pos.w * 0.5)
            */
            float4 ComputeScreenPos(float4 pos, float projectionSign)                          //齐次坐标变换到屏幕坐标
            {
                float4 o = pos * 0.5f;
                o.xy = float2(o.x,o.y * projectionSign) + o.w;
                o.zw = pos.zw;
                return o;
			}

            float CustomSampleSceneDepth(float2 uv)
            {
                return SAMPLE_TEXTURE2D(_CameraDepthTexture,sampler_CameraDepthTexture,uv).r;
			}

            //输入世界空间   WorldPos
            float GetDepthFade(float3 WorldPos, float Distance)
            {
                float4 posCS = TransformWorldToHClip(WorldPos);                                            //转换成齐次坐标
                float4 ScreenPosition = ComputeScreenPos(posCS, _ProjectionParams.x);                      //齐次坐标系下的屏幕坐标值
                //从齐次坐标变换到屏幕坐标, x,y的分量 范围在[-w,w]的范围   _ProjectionParams 用于在使用翻转投影矩阵时(此时其值为-1.0)翻转y的坐标值。
                //这里
                float screenDepth = CustomSampleSceneDepth(ScreenPosition.xy / ScreenPosition.w);        //计算屏幕深度 是非线性

                float EyeDepth = LinearEyeDepth(screenDepth,_ZBufferParams);                            //深度纹理的采样结果转换到视角空间下的深度值
                return saturate((EyeDepth - ScreenPosition.w)/ Distance);                               //使用视角空间下所有深度 减去模型顶点的深度值
			}


            // 顶点着色器
            v2f vert(a2v v)
            {
                v2f o;

                VertexPositionInputs  PositionInputs = GetVertexPositionInputs(v.positionOS.xyz);
                o.positionCS = PositionInputs.positionCS;                          //获取裁剪空间位置
                o.positionWS = PositionInputs.positionWS;                          //获取世界空间位置信息

                VertexNormalInputs NormalInputs = GetVertexNormalInputs(v.normalOS.xyz);
                o.normalWS.xyz = NormalInputs.normalWS;                                //  获取世界空间下法线信息
                return o;
            }

            // 片段着色器
            half4 frag (v2f i) : SV_Target
            {

                float depthfade = GetDepthFade(i.positionWS, _DepthDdgeSize);
                float3 watercolor = lerp(_DeepWater,_ShallowWater,depthfade);
                float4 col = float4(watercolor,1);

                return col;
            }
            ENDHLSL
        }
    }
}
