

在最近的项目中有很深刻的体会,Kotlin coroutine给开发者提供了一个非常好用、简单、调试方便的协程api,但是作为一个想不断精进自己code质量的人,就必须弄懂coroutine的底层原理。所以在前两篇内容 ->
DEVLOG Coroutine 学习(一)挂起,CoroutineScope,异常
Coroutine 学习(二)ViewModelScope LifeCycleScope Dispatcher
的基础上,我想先看看在使用常见的那些api,如launch runblocking..... 绕不过去的基础知识:
参考内容:
(1)Kotlin协程-协程的内部概念Continuation:
https://blog.csdn.net/weixin_42063726/article/details/106198212
(2)Kotlin协程实现原理系列:
https://zhuanlan.zhihu.com/p/301494587
本文主要讨论几个要点
对于协程中的重要概念: Continuation起一个头
仔细探讨一下Coroutine中的CoroutineInterceptor和Dispatchers
PART1: Continuation
Continuation在Kotlin协程中有着明确的定义:
// Continuation表示在挂起之后继续执行并且返回一个类型为T的结果的行为
@SinceKotlin("1.3")
public interface Continuation<in T> {
    public val context: CoroutineContext
    public fun resumeWith(result: Result<T>)
}
其主要作用是表示协程挂起,并且继续执行的一种行为。Continuation对象好像和我们隔得很远,但是在Kotlin coroutine代码编译的过程中,编译器会对suspend 函数以及suspend lambda进行操作,使它们包含Continuation。这个内容将会在下一篇文章中讨论。
PART2: CoroutineContext源码分析
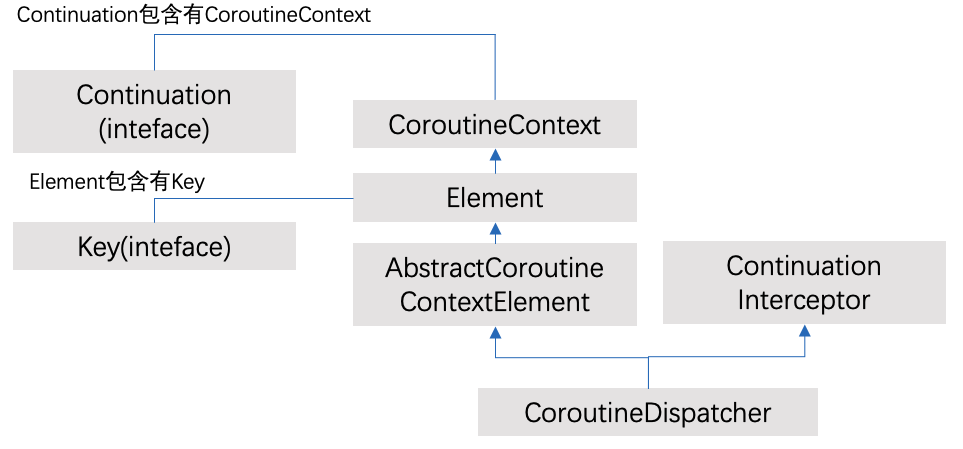
需要注意的是Continuation中包含了一个CoroutineContext对象。 之前的DEVLOG Coroutine 学习(一)挂起,CoroutineScope,异常中说过,CoroutineScope中也包含了CoroutineContext,并且指出了CoroutineContext中包含了多种Element。

下面我们结合具体的代码分析.
我们可以通过 + 的方式构建一个CoroutineContext,并且可以通过类似于Kotlin map中的索引标识符获取放在coroutineContext中的对象:
val coroutineContext = SupervisorJob() + CoroutineName("name") + Dispatchers.IO
val coroutineName = coroutineContext[CoroutineName]
下面我们主要分析一下 CoroutineContext中 +,也就是plus方法和索引方法的实现。
CoroutineContext.Element
首先要看看CoroutineContext中的Element:
// 内部实现其实是一个单例
public interface Element : CoroutineContext {

    public val key: Key<*>
    public override operator fun <E : Element> get(key: Key<E>): E? =
        @Suppress("UNCHECKED_CAST")
        if (this.key == key) this as E else null
}

public interface Key<E : Element>可以看出Element其实也是一个CoroutineContext,通过重载的get方法,传入一个类型参数,我们就可以使用[]取出想要的数据。
CoroutineContext#plus
这个plus方法,比较容易理解,首先会判断当前的context是否是EmptyCoroutineContext,
// CoroutineContext#plus
public operator fun plus(context: CoroutineContext): CoroutineContext =
    // 如果当前的CoroutineContext是EmptyCoroutineContext
    if (context === EmptyCoroutineContext)
        this
    else // fast path -- avoid lambda creation
            context.fold(this) { acc, element ->
                val removed = acc.minusKey(element.key)
                if (removed === EmptyCoroutineContext) element else {
                    // 保证interceptor在CoroutineContext的最后一个
                    val interceptor = removed[ContinuationInterceptor]
                    if (interceptor == null)
                        // 如果不存在interceptor
                        CombinedContext(removed, element)
                    else {
                        // 如果存在,先移除,将interceptor放到CombinedContext的最后一个
                        val left = removed.minusKey(ContinuationInterceptor)
                        if (left === EmptyCoroutineContext)
                            CombinedContext(element, interceptor)
                        else
                            CombinedContext(CombinedContext(left, element), interceptor)
                    }
                }
            }
如果不是这样,就会使用CoroutineContext#fold方法,将传入的elment添加到Context中:
public fun <R> fold(initial: R, operation: (R, Element) -> R): R如果存在ContinuationInterceptor,这个方法会确保ContinuationInterceptor在Context的最后一个。所以CoroutineContext这个interface的底层是通过自身的一个实现类,即CombinedContext。
CombinedContext是一个这样的结构:
// CombinedContext
internal class CombinedContext(
    private val left: CoroutineContext,
    private val element: Element
) : CoroutineContext, Serializable {

    override fun <E : Element> get(key: Key<E>): E? {
        var cur = this
        // CombinedContext类似于一个链表的结构,从左向右寻找
        while (true) {
            // 调用了Element重载的get方法
            cur.element[key]?.let { return it }
            val next = cur.left
            if (next is CombinedContext) {
                cur = next
            } else {
                return next[key]
            }
        }
    }
}
它自身只有left和element两个元素,left表示之前添加过的所有的CoroutineContext想加起来的结果,element表示待添加CoroutineContext实例。 整体结构类似于:
((Job), CoroutineName) + Element -> (((Job), CoroutineName), Element)
同时需要注意,CoroutineContext(CombinedContext)在通过key寻找元素的时候,是从从最右边向最左边寻找。之所以存在这个特性,这是因为CoroutineContext对于CoroutineInterceptor的寻找和使用非常频繁。下面通过一个例子了解一下CoroutineInterceptor。

PART3: CoroutineInteceptor & Dispatchers
在下面的例子中,我手写了一个interceptor。之前稍微有提及,在suspend 函数和suspend lambda编译过程中,都会插入Continuation,用于干预协程的挂起和恢复过程:
 val interceptor = object: ContinuationInterceptor {
        override val key: CoroutineContext.Key<*>
                get() = ContinuationInterceptor

        override fun <T> interceptContinuation(
            continuation: Continuation<T>
        ):  Continuation<T> {
                Log.d("ContinuationInterceptor", "before resumeWith")
                Log.d("ContinuationInterceptor", "------------------------------------")
                return object: Continuation<T> by continuation{
                    override fun resumeWith(result: Result<T>) {
                        Log.d("ContinuationInterceptor", "in resumeWith")
                        Log.d("ContinuationInterceptor", "------------------------------------")
                        thread {
                            // 可以在这里进行线程切换的操作
                            continuation.resumeWith(result)
                        }
                         Log.d("ContinuationInterceptor", "after resumeWith")
                        Log.d("ContinuationInterceptor", "------------------------------------")
                    }
                }
            }
}对于这个Interceptor,我们放到具体的例子中进行分析:
// Case#1
lifecycleScope.launch(interceptor) {
    Log.d("ContinuationInterceptor", "start in parent scope")

    launch {
        Log.d("ContinuationInterceptor", "start in child scope")
    }
}

D: before resumeWith main    // parent before
D: ------------------------------------
D: in resumeWith main        // parent in
D: ------------------------------------
D: start in parent scope
D: before resumeWith main    // child before
D: ------------------------------------
D: in resumeWith main        // child in
D: ------------------------------------
D: start in child scope
D: after resumeWith main     // child after
D: ------------------------------------
D: after resumeWith main     // parent after
D: ------------------------------------因为ContinuationInterceptor可以对于协程的挂起和恢复进行监听,我们可以看到,对于父协程的Continuation(后续称为父Continuation),执行到通过launch构造子协程时,会同样拦截到子Continuation的行为,直到子Continuation完成操作,父Continuation才会结束。
我们再来看看这个例子:
// Case #2
lifecycleScope.launch(interceptor) {
    Log.d("ContinuationInterceptor", "start in parent scope")

    launch (Dispatchers.Main) {
        Log.d("ContinuationInterceptor", "start in child scope # Dispatchers.Main")
    }
}

D: before resumeWith main
D: ------------------------------------
D: in resumeWith main
D: ------------------------------------
D: start in parent scope
D: after resumeWith main
D: ------------------------------------
D: start in child scope # Dispatchers.Main在这个例子中,我只是将子协程的dispatchers替换成了Kotlin提供的Dispatchers.Main,但是,并没有发现拦截的代码出现。
如果仔细看一下Dispatchers的相关的类的继承关系,可以发现Dispatchers也是CoroutineInterceptor,所以Dispatchers相应的实现中肯定有对应的interceptContinuation实现。这不难理解,Dispatchers的作用就是进行线程切换。
所以接下来,我们需要分析两个问题
CoroutineInterceptor#interceptContinuation是在哪里被调用的?
既然Dispatchers也是CoroutineInterceptor,那我们就需要看看它的interceptContinuation的实现。
CoroutineInterceptor#interceptContinuation的调用链
我们从launch方法开始往下看,这个是相关的方法的调用链,接下来我们一步一步在源码中解析:
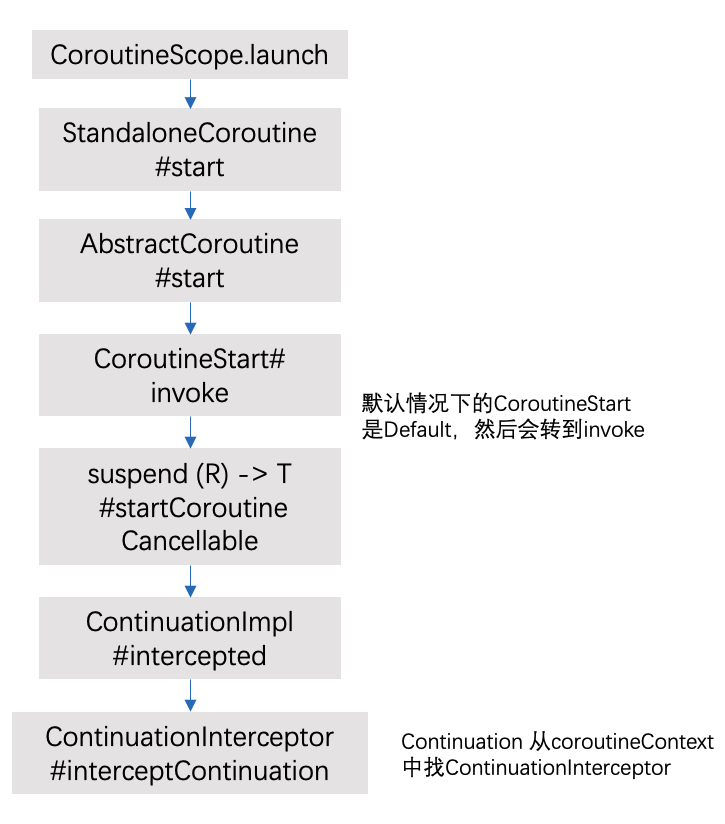
CoroutineScope.launch:
public fun CoroutineScope.launch(
    context: CoroutineContext = EmptyCoroutineContext,
    start: CoroutineStart = CoroutineStart.DEFAULT,
    block: suspend CoroutineScope.() -> Unit
): Job {
    val newContext = newCoroutineContext(context)
    val coroutine = if (start.isLazy)
        LazyStandaloneCoroutine(newContext, block) else
        StandaloneCoroutine(newContext, active = true)
    // 这个地方默认情况下传入的CoroutineStart是Default
    coroutine.start(start, coroutine, block)
    return coroutine
}我们默认的协程都说不是Lazy的,使用launch方法都会立刻开始执行协程,所以接下来会将StandaloneCoroutine创建的协程实例返回给coroutine,然后得到的coroutine对象会执行start。
// AbstractCoroutine#start
public fun <R> start(start: CoroutineStart, receiver: R, block: suspend R.() -> T) {
        initParentJob()
        start(block, receiver, this)
}这里需要仔细看看,start中会使用传入的CoroutineStart类型的start lambda(姑且这么解释)来继续执行(也就是会执行invoke方法),这个start对象是构造launch的时候的参数:
public fun CoroutineScope.launch(
    context: CoroutineContext = EmptyCoroutineContext,
    start: CoroutineStart = CoroutineStart.DEFAULT,
    block: suspend CoroutineScope.() -> Unit
)默认情况下是CoroutineStart.DEFAULT,继续跟踪CoroutineStart中的invoke方法:
public operator fun <R, T> invoke(block: suspend R.() -> T, receiver: R, completion: Continuation<T>): Unit =
        when (this) {
            DEFAULT -> block.startCoroutineCancellable(receiver, completion)
            ATOMIC -> block.startCoroutine(receiver, completion)
            UNDISPATCHED -> block.startCoroutineUndispatched(receiver, completion)
            LAZY -> Unit // will start lazily
}block 是一个 suspend R.() -> T 类型的高阶函数,所以startCoroutineCancellable一定是block的扩展方法,:
@InternalCoroutinesApi
public fun <T> (suspend () -> T).startCoroutineCancellable(completion: Continuation<T>): Unit = runSafely(completion) {
    createCoroutineUnintercepted(completion).intercepted().resumeCancellableWith(Result.success(Unit))
}

@SinceKotlin("1.3")
public actual fun <T> Continuation<T>.intercepted(): Continuation<T> =
    (this as? ContinuationImpl)?.intercepted() ?: this

// ContinuationImpl#intercepted
public fun intercepted(): Continuation<Any?> =
    intercepted
        ?: (context[ContinuationInterceptor]?.interceptContinuation(this) ?: this)
            .also { intercepted = it }
startCoroutineCancellable 最终会转到CoroutineImpl中的intercepted。
在这个方法中,当前的CoroutineContext中定义的ContinuationInterceptor会被取出,具体的取出的逻辑在上面已经说过。 针对这个Interceptor,就会执行它的interceptContinuation实现。
这里小结一下,在上面的例子中,我们自定义的interceptor,通过CoroutineContext的+重载方法被放倒了CoroutineContext的最后一个。自定义的interceptor然后会被CoroutineContext的get(key)重载取出,并且执行它的interceptContinuation方法。
既然是这样,如果我们在launch的时候指定Dispatchers,也相当于指定了CoroutineInterceptor,那我们看下常见的Dispatchers.Main 和 Dispatchers.DEFAULT中interceptContinuation的实现。
DispatchedContinuation
Dispatchers的共有的父类是CoroutineDispatcher,它实现了interceptContinuation方法:
// CoroutineDispatchers#interceptContinuation
public final override fun <T> interceptContinuation(continuation: Continuation<T>): Continuation<T> =
        DispatchedContinuation(this, continuation)

// CoroutineDispatchers#resumeWith
 override fun resumeWith(result: Result<T>) {
        val context = continuation.context
        val state = result.toState()
        if (dispatcher.isDispatchNeeded(context)) {
            _state = state
            resumeMode = MODE_ATOMIC
            dispatcher.dispatch(context, this)
        } else {
            executeUnconfined(state, MODE_ATOMIC) {
                withCoroutineContext(this.context, countOrElement) {
                    continuation.resumeWith(result)
                }
            }
        }
}(上面写错了,resumeWith方法应该是DispatchedContinuation中的)
显而易见的是,interceptContinuation中需要返回的Continuation对象被DispatchedContinuation实现,所以我们需要看看它的resumeWith方法中干了什么。
resumeWith方法会通过是否需要分发,来分别调用dispatcher对象的dispatch方法和continuation的resumeWith方法。值得注意的是,这两个对象都来自于构造DispatchedContinuation对象时的参数。
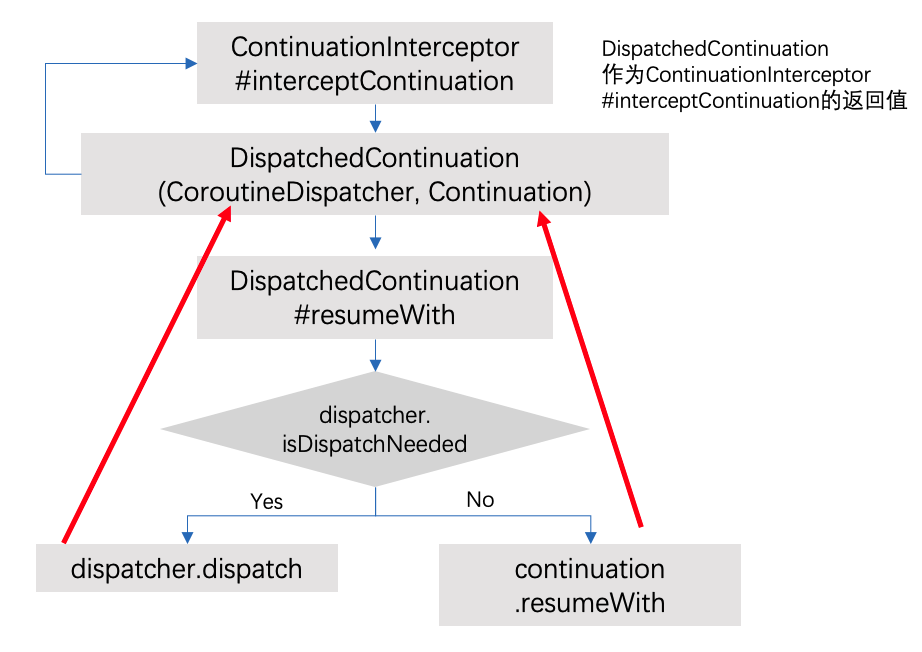
换言之,如果需要分发,就会调用参数中的continuation,这个参数从哪里来?个人认为应该是在构建suspend 函数和suspend lambda的时候通过kotlin编译器创建的;如果不需要分发,就需要看dispatcher对象的dispatcher逻辑。
因此,现在的分析的着力点就转向了具体的dispatcher对象,也就是我们传入的Disaptchers.Main Dispatchers.IO 这些中的dispatch方法,我们看看它们到底是怎么进行分发的。
Dispatchers.Main
// Dispatchers.Main中的dispatcher
public actual val Main: MainCoroutineDispatcher get() = MainDispatcherLoader.dispatcher
val dispatcher: MainCoroutineDispatcher = loadMainDispatcher()
Dispatchers. Main通过loadMainDispatcher创建dispatcher,实际上loadMainDispatcher通过调用创建Dispatchers的工厂方法构建Dipatchers对象:
private fun loadMainDispatcher(): MainCoroutineDispatcher {
    return try {
        val factories = if (FAST_SERVICE_LOADER_ENABLED) {
            FastServiceLoader.loadMainDispatcherFactory()
        } else {
            // 默认情况下会执行else中逻辑,里面创建了MainDispatcherFactory
            ServiceLoader.load(
                MainDispatcherFactory::class.java,
                MainDispatcherFactory::class.java.classLoader
                .iterator().asSequence().toList()
        }
        @Suppress("ConstantConditionIf")
        // tryCreateDispatcher 在AndroidDispatcherFactory中会调用createDispatcher
        factories.maxBy { it.loadPriority }?.tryCreateDispatcher(factories)
            ?: createMissingDispatcher()
        } catch (e: Throwable) {
            // Service loader can throw an exception as well
            createMissingDispatcher(e)
        }
    }
}上述方法中创建的出来的DispatcherFactory其实是AndroidDispatcherFactory。AndroidDispatcherFactory构造了HandlerContext。之前说过HandlerContext也是一个Dispatcher,它通过Handler向主线程发送Runnable。
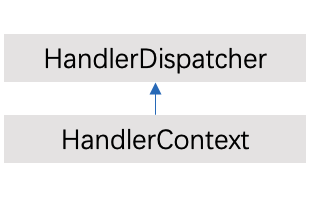
总而言之,Dispatchers.Main中的任务最后通过其内部的HandlerContext dispatch方法使用一个Handler(使用Looper.main)发送到消息队列,非常纯粹、意料之中的实现。
// HandlerContext#dispatch
override fun dispatch(context: CoroutineContext, block: Runnable) {
    handler.post(block)
}
最后来看一下Dispatchers.Main 在什么情况下会进行dispatch:
// HandlerContext#contructor
public constructor(
        handler: Handler,
        name: String? = null
    ) : this(handler, name, false)

// HandlerContext#isDispatchNeeded
// 默认情况下invokeImmediately 为 false
override fun isDispatchNeeded(context: CoroutineContext): Boolean {
        return !invokeImmediately || Looper.myLooper() != handler.looper
}默认情况下invokeImmediately为false,并且handler.looper 返回的是Looper.main,所以结合起来看,isDispatcherNeeded 通常会返回true;如果当当前线程不是主线程时,也会返回true。
我粗略的看了一下Dispatchers.Default的实现,它是使用Java中提供的线程池实现的,具体的逻辑就不在这里展开分析了。
总结:
本文介绍了Continuation,这个在kotlin协程中非常重要,但是常常委身于幕后的类
通过两个例子探讨了Interceptor和Continuation的关系,同时也揭示了Dispatcher也是Interceptor,并且通过Interceptor的角度 重新看了一下Dispatchers.Main的源码。
