

大家好我是窗窗,听说在7.1版本中绝望可以瞬发了,又恰巧在NGA看到了一个收益计算的帖子,突然对黑魔法师重新燃起了一丝兴趣,所以就想着回来看看,如果绝望的瞬发是不需要任何前置条件的,这样的改动会不会引入新的变数(如果7.1实际上没有这么改,当成思考黑魔的可能性的一种智性游戏也是很有趣的!因为在现在受限的耀星和跳蓝体系下,黑魔能挖掘的可能性并不多,权当图一乐吧:)
参考阅读(Reference)
NGA帖子:[个人心得] [黑魔法师] 为什么说绝望瞬发可能是技改组一次难得按懂了计算器的优质改动——7.1版本下黑魔法师进阶循环收益分析 NGA玩家社区
循环优劣的判断标准 (Lines Comparing Method)
黑魔循环实际上是利用有限的瞬发资源(雷云/异言/火苗)来创造相对更高的威力收益。因此,在考虑一条循环的优劣时,必须结合火苗(F3P)的消耗或获取,相对威力收益,以及消耗资源数3者(Filler Requirement)来考虑。
The blackmage fight strategy should be commonly understood as utilizing restricted resources(T3P/F3P/Xenoglossy) to enter more lines with high PGE. Therefore, when we weigh up the pros and cons of each line, we should combine 3 factors: generating and spending of F3P, PGE, and filler requirement.
在循环路线的比较中,有的路线是既消耗火苗又生产火苗,或是不消耗火苗也不生产火苗,这样的路线是火苗平衡的。而单独的消耗火苗路线和单独的生成火苗路线,两者必须放到一起,才能够公平地和火苗平衡路线比较。
Some lines spend and generate F3P, or neither, which can be called "F3P neutral." Additionally, lines that only spend or generate F3P should be combined to compare with F3P neutral lines.
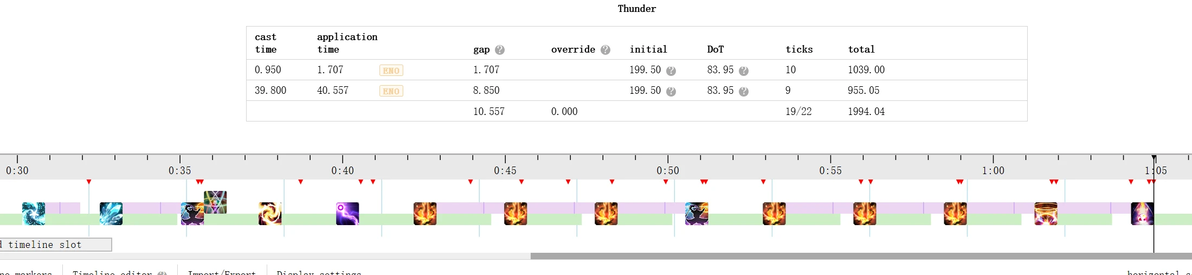
收益计算时所使用的参考PPS:标准循环改(N6),这个循环既消耗了火苗也生产了火苗,是7.0版本的“填充循环”——即在没有足够资源时优先考虑使用的循环,但请注意因为它的时间很长,所以需要支出一个雷云。(AF1 F3P standard is used as baseline rotation)
循环路线简述(Commonly Used Lines Introduction)
路线1(Line 1)
路线1
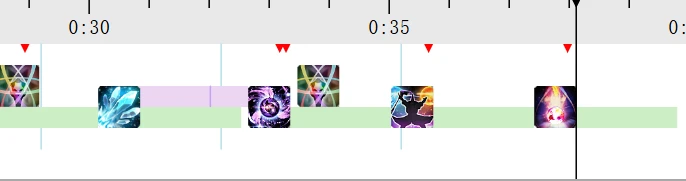
路线1(Line 1),简称1,可以产出火苗(F3P),消耗1个瞬发资源,收益威力是-41.9p。一般情况下,路线1将和后续会提到的路线3(Line3)绑定使用,记为3+1/31(后续不同路线间的组合同理)。我们使用路线1来生产火苗而不使用标准循环。
Line 1 (1), which can generate F3P and consume 1 filler, has -41.9 PGE. Generally, line 1 will be used with line 3 which will be mentioned later, i.e. 3+1/31. We used line 1 to generate F3P instead of standard.
路线2(Line 2)
路线2
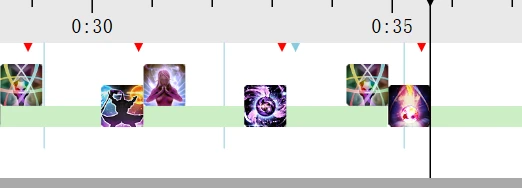
路线2(Line2),简称2,通过醒梦(Lucid/LucidDreaming)和1个瞬发资源填充,直接在一档火里打出绝望的路线,收益威力是61.4p。
Line 2 (2), needs 1 filler and Lucid Dreaming, which can value at 61.4 PGE.
路线3(Line 3)
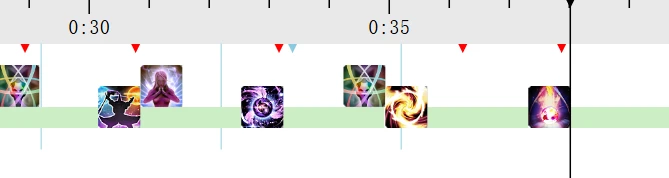
路线3(Line3),简称3,需要醒梦,路线2消耗火苗的版本,消耗一个瞬发资源,收益威力是119.1p,在没有魔泉的情况下,一般和路线1绑定使用(3+1)。一般来说,使用路线3来消耗火苗。
Line 3 (3), which needs Lucid, spends F3P and 1 filler to create 119.1 PGE, normally combined with line 1 if it is not at the pre-manafront stage. This line is basically the default choice to use F3P.
路线4(Line 4)

路线4
路线4,需要醒梦。消耗一个瞬发资源换取53.4p的收益,和路线2同样火苗平衡且消耗资源数相同,但收益上不如路线2。但是该路线火阶段的持续时间比路线2更长。
Line 4 (4), needs Lucid and take 1 filler for 53.4 PGE. As another F3P neutral line but weaker than line 2, this line has a longer fire phase.
路线5(Line 5)
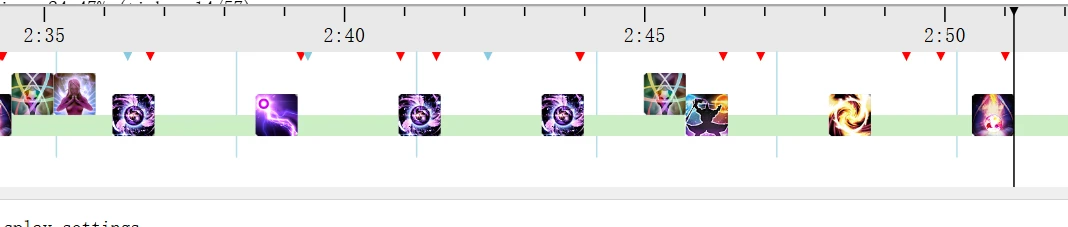
路线5
路线5,火苗平衡路线,需要醒梦和4个资源,平均每个资源换取43.78p收益(175.1/4)。可以考虑在需要集中大量瞬发资源时使用。
Line 5 (5), which is also F3P neutral, needs Lucid and 4 fillers, each of which can get 43.78 PGE. This line is worthy of consideration when we need a lot of fillers in a short time.
路线6(Line6)

路线6
路线6,火苗平衡路线,需要消耗一个即刻,收益为103.95p,去掉即刻后的收益为19.95p。因为这条路线需要消耗即刻,如果考虑到这个即刻给其它技能的收益,这条循环可以赚出的收益分别为28.05(原定计划为即刻给F4),19.95(给B3)和-9.85(给耀星)。由此可见,这条循环是比瞬发耀星的标改循环亏的。但是当标改的数量因为全局中多使用了非标准路线而减少时,因为没用那么多耀星可供瞬发,理论上可以用这条路线赚出收益。但是它的前置条件是3根冰针并且不携带火苗,这让这条路线的使用场景限制在了路线1+3之后。(这像是一种续剑)
Line 6 (6) also with F3P neutral, needs a Swiftcast and gets 103.95 (with Swiftcast) or 19.95 PGE (without Swiftcast). Considering that Swiftcast can be used in other places, the PGE at which this line value is 28.05 (Swiftcast used in F4), 19.95 (in UI1 B3), and -9.85 PGE (in Flare Star). This means this line is weaker than AF1 F3P standard with an instant flare star. Still, during a whole battle, when the number of AF1 F3P standards decreases because of nonstandard lines, we do not have such many flare star that can be used with swiftcast, in this case, we can benefit from this line theoretically.
This line also needs 3 Umbral Hearts and the precondition that is without F3P, this restricts line 6 only can be used in a few conditions, such as after line 1+3.
60s路线组合 (Combination Lines)
由于高收益的路线都需要醒梦,因此我们必须尽可能在一次醒梦中进入更多次的高收益路线。所以比起路线本身的收益,更应当积极思考路线组合的收益。
It is not hard to conceive that we should maximize the utilization of Lucid Dreaming because all high PGE lines rely on it, so instead of single lines, we should pay more attention to combination lines.
3+1/31

3+1
3+1,两条子路线加到一起可以到达火苗平衡状态,消耗2个资源,收益威力为77.2p,平均每资源收益38.6p。
3+1 with F3P neutral, takes 2 fillers and gets 38.6 (77.2/2) PGE for each one.
3+4+1

3+4+1
3+4+1,火苗平衡,收益威力130.6p,消耗资源数为3,平均资源收益43.53p。
3+4+1 with F3P neutral, takes 3 fillers and gets 43.53 PGE for each one.
2+2/22(前置条件无火苗)

2+2
2+2,火苗平衡,收益威力为122.8p,但是连在一起使用的两个2会消耗3个资源(因为星灵移位的cd问题),此时单个资源收益为40.9p。此外请注意,如果2+2的中间填充标改循环,因为标改循环长度的原因依旧需要消耗1个多余的雷云资源,同时还错过了这次醒梦的时长。因此2后面继续跟循环,总会造成资源的浪费。
2+2 with F3P neutral, takes 3 fillers and gets 40.9 PGE for each one because of the cooldown time of transpose. Moreover, if you put the AF1 F3P standard between 2 sub-lines, you will waste a T3P and Lucid. So this form 2+2 always causes a waste of resources.
4+2/42(前置条件无火苗)

4+2
4+2,火苗平衡,收益威力为114.8p,消耗资源数2,平均资源收益为57.4p,可见4+2基本是2+2的上位替代,但使用4+2需要提前开启醒梦或者未来观测路线可行(这里不多赘述这个技巧)。
同时,在使用4+2时应当注意是否有“冗余的资源”,因为黑魔的醒梦60s才有一次,而无论是2+2还是4+2,所消耗的资源小于60s能获取的资源。因为消耗同样资源的情况下,4+2的质量就不如2+2了,因此在资源冗余时可以考虑把任意位置的4升级成2。(虽然一般来讲,由于标改循环里要补雷,星灵循环往往是连续消耗异言的状态)
4+2 with F3P neutral, takes 2 fillers to create 57.4 TGE/filler. This is better than 2+2 but an opportune moment of Lucid should be considered.
In practical fights, if we get redundant Xenoglossy, we should enter 2+2 instead of 4+2.
2+F3P+4+1/2F3P41
在实际情况中,由于2+2/4+2的路线长度,再加上火苗的产出和下一次使用的总时长大于30s,因此,如果有火苗,这里的火苗要以3档火的形式消耗掉而没法带进下一次标改,从而导致在最后打1。
In actual fights, because of the length of 2+2/4+2, the F3P cannot be brought into the next AF1 F3P standard but used as AF3 F3P, this causes an extra line 1 in the end.

2+F3P+4+1
2+F3P+4+1,火苗平衡,收益威力102.6p,消耗资源数为3,平均资源收益34.2p。
2+F3P+4+1 with F3P neutral, takes 3 fillers and gets 34.2 PGE/filler.
魔泉前路线组合 (Pre-Manafont Lines)
由于魔泉会给出火悖论,相当于赠送一枚火苗,因此在魔泉之前可以使用消耗火苗的循环而不用再额外使用路线1来生产火苗,这让3+1+3组合变得具备强度。
Due to AF Paradox in Manafont, we can get a free F3P, this means that an extra line 1 can be avoided before Manafont, which strengthens the 3+1+3 line.
3+1+3/313

3+1+3
3+1+3,消耗火苗,收益威力196.3p,消耗瞬发数量为3,平均每个资源获取了65.43p的收益,需要注意醒梦开启的时机。是魔泉前的推荐手法之一。关于342,442F3P,222F3P之类的路线都不行,这里就不多分析了,可以思考一下为什么不行qwq。
A strong 3+1+3 line which consumes F3P, has 65.43 PGE/filler (3 in total). The opportune moment of Lucid should be noticed.
3+1+3+6/3136

3+1+3+6
3+1+3+6,3+1+3增加续剑的版本,增加了魔泉前的长度。
3+1+3 line with 6 added, has a longer length before Manafont.
3+2/32

3+2
3+2,消耗火苗,收益威力180.5p,消耗瞬发数量为2,平均每个资源获取90.25p的收益。资源相对没那么充足时的魔泉前最优选,如果资源要溢出,则应当考虑其它路线。
3+2 which spends F3P, has 90.25 PGE/filler (2 in total). This line is pretty suitable in case you do not have enough fillers before Manafont.
3+2+2/322

3+2+2
3+2+2,消耗火苗,收益威力241.9p,因为出现了22连续结构,实际消耗资源数为4,平均每个资源的收益是60.475。消耗4资源但又需要一定循环长度时的选择。
3+2+2 which spends F3P and gets 60.475 PGE/filler (4 in total).
F3P+5/F3P5

5+F3P
F3P+5,需要提前消耗火苗,收益威力为204.8p,消耗资源数为4,平均收益51.2。在长度上比3+2+2短一些。
F3P+5, shorter than 3+2+2 (both take 4 fillers), has 51.2 PGE/filler.
3+5

3+5
3+5,消耗火苗,收益威力294.22p,消耗资源数为5,平均收益58.84p。奢侈而又强力的资源倾斜路线。
3+5, a high cost powerful line, which spends F3P and gets 58.84 PGE/filler.
亏损/不常用路线 (Other Lines)
路线4无F4(Line 4 w/o F4)
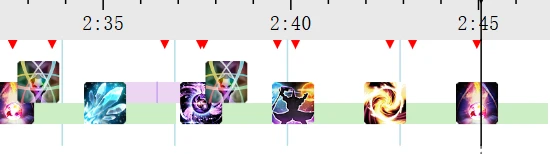
4 w/o F4
4 w/o F4,收益1.84p与标改接近,但需要消耗资源,因此除非有特殊情况,不推荐将资源消耗在这条路线上,也不推荐用它来衔接路线6。这条路线以及它衔接路线6时会创造一定的类似标改收益的长度,有时可以利用它来避免打出额外的路线1。
4 w/o F4, only gets 1.84 PGE and is similar to AF1 F3P standard but has 1 filler cost. Normally, it is not recommended to enter this line or chain line 6, but sometimes the length of these can be utilized.
路线5无F3P(Line 5 w/o F3P)

5 w/o F3P
5 w/o F3P,收益131.4p,每资源收益32.85p,但可以生产火苗,如果可以利用一个雷云然后接3的话,可以构成5+3。
5 w/o F3P which can generate F3P, has 32.85 PGE/filler. Sometimes, with an aligned T3P, the 5 w/o F3P +3 can be built.
排轴思路 (Applications)
通过对于以上各种路线以及路线组合的分析可知,因为魔泉前的路线组合不需要再使用路线1来生产火苗,因此魔泉前的路线组合比60s组合拥有更高的平均资源收益。在理想情况下,每120s,我们应该将更多的资源挪用到魔泉前,而在魔泉前以外的部分,用相对少但不至于浪费的资源进行非标准循环,和标改循环组合起来进行输出。
Above all, pre-Manafont lines are overall stronger than other nonstandard lines (in the case of PGE/filler). Ideally, we should invest more fillers to enter pre-Manafont lines and take advantage of left fillers to build nonstandard lines excluded from the pre-Manafont stage, combined with AF1 F3P standard to efficiently go through this period.
团辅收益 (Party Buffs)
由于非标准路线的平均收益不高,因此我们如果以贡献团伤的角度考虑的话,应该积极地利用团辅。这包括将异言打到团辅里和团辅内10G。
From the consideration of party contribution, because all of these nonstandard lines get few PGE, we should consider aligning lines for raid buffs, which include putting more Xenoglossy in buffs and ensuring 10 GCD.
团辅内异言 (Xenoglossy in Party Buffs)
在1.2倍率的情况下,如果用异言替换了团辅内的F4,这会带来60.8p的收益,基本上高于非标准路线里每资源能取得的收益,当然,理想情况下我们希望能够既进行非标准路线,又将异言打到团辅里。
Assuming the party buff is 1.2x, if we replace F4 with Xeno in buffs, this will bring 60.8 extra potency, basically higher than PGE which can get from nonstandard lines. But ideally, we should better not only put Xeno into buffs but also enter nonstandard lines.
10G团辅 (10 GCD in Party Buffs)
在多瞬发+黑魔纹的加持下,有机会在团辅里打出10个GCD,这会带来相当可观的收益,在1.2倍率下,即使是多打1个1档火F3P,都可以创造出额外的78.4p收益,如果多打1个F4则可以创造出115.2p收益。因此,如果有条件,应当积极考虑10G甚至11G团辅。
With the Ley Lines buff and serval instant casts, we always get a chance to put 10GCD into party buffs, which will bring considerable profits. In the case of 1.2x buffs, this could create an extra 78.4 (an extra AF1 F3P) to 115.2 (an extra F4) potency, which makes 10GCD (even 11GCD) worthy to be considered.
雷云利用 (T3P Utilization)
这版本的断雷损失非常高,断1跳雷就会损失60p,而非标准路线带来的收益基本无法弥补断雷的损失,理想情况下应当以尽量避免断雷为最高优先级。但如果适当断雷进团辅却是合适的,因为1.2倍率下的雷云有150p的收益。
对于适当覆盖雷的收益,则要考虑到全局的雷数量,在不覆盖太多导致雷云数量+1(最后的雷跳不满)的情况下,可以通过少量的覆盖雷,将雷云挪作瞬发资源使用来创造收益。
应当尽可能地利用雷云带来的瞬发资源打非标准路线获取收益,哪怕有时这样的机会是可遇而不可求的。
For Dawntraill blackmage, it is super costly (60 potencies per 3 seconds) to drop dots and nonstandard lines can not recover the cost of it basically, so ideally we should avoid any dropping. But if you can drop a little bit to align party buffs, sometimes it is worthy because of 150 extra potency with T3P in 1.2x buffs.
Turning to clipping dots, we should consider if clipping causes an extra T3P before phase/fight, if not, a little clipping is worthy to enable more nonstandard lines.
Taking advantage of T3P as far as possible to get benefits.
团辅轴构建 (Overall Strategy for Party Buffs)
综上所述,考虑到以上几点,我们应当将大量的资源挪到魔泉前,配合黑魔纹,使用非标准循环+4异言+团辅10G来取得最大收益。如果战斗没有上天,我们最多可以带着3个异言+1个详述给的异言进入团辅中,如果上天的时间合适则有机会携带5异言,下面主要针对4异言进行讨论,5异言在原理上是相通的。
如果雷云不能够得到利用,则考虑用4异言进入F3P+5路线,这样的用法会让每资源至少获得大约131.6p的收益(1.2倍率)。但因为在黑魔纹里,F3P+5路线需要条件苛刻的良性跳蓝才能用4资源打出,而如果能利用上雷云的话可以缓解这种情况。
To sum up, we should organize more fillers before Manafont as far as we can, with Ley Lines buff, nonstandard lines, 4 Xeno, and 10G principle to maximize the benefits. If the fight does not have untargetable periods, 3 Xeno, and another 1 Xeno which is given by Amplifier could be taken into buffs, if not, sometimes we get the chance to bring 5 Xeno into it. We will discuss 4 Xeno in the following content, but the 5 Xeno case shares the same sense.
If the T3P can not be utilized efficiently, we should consider entering the F3P+5 line by 4 Xeno, which makes 131.6 potency/filler (1.2x buff), but because of the Ley Line buff, the mptick requirement will be very harsh albeit viable.
由于F3P+5路线并不总是经常能够进入,作为替代的有用4资源进行3+2路线,这样每资源会取得大约125.52p的收益。
魔泉前循环外的资源,一般使用3+1或者2来转化为收益。
在实际战斗中,往往会在特别的时间点产生跑位的需求而消耗更多资源,因此可以将消耗更多的资源组合成3+4+1或者3+1+3+1/3+1+3+6+1等形式来止损,然后根据魔泉前所剩余的资源数,选择消耗资源数更少的魔泉前路线,来降级收益。
An alternative solution of F3P+5 is 3+2 which costs 4 fillers and each one gets 125.52 extra potency.
The fillers excluded from pre-Manafont stage will be built into 3+2/2.
In the actual fight, because of the moving requirement, sometimes we can use more fillers to enable 3+4+1, 3+1+3+1, or 3+1+3+6+1 to move, and relegate the pre-Manafont lines.
120s魔泉的rd轴 (Overall Strategy for rDPS with 120s Interval Manafont)
rd轴在原理上和团辅轴是相通的,只是不需要再考虑团辅内异言和团辅10G的要求,因此在魔泉前路线的安排上会更自由,比如可以使用3+2+2。
Basically same as the strategy for party buffs, but do not need to consider Xeno and 10GCD in buffs, so the arrangement for the pre-Manafont stage is more flexible, e.g. 3+2+2 can be considered.
100s魔泉的rd轴 (Overall Strategy for rDPS with 100s Interval Manafont)
如果魔泉好了就开能全场多开一次的话,应当考虑100s魔泉的rd轴。这会导致我们并不能总是带着4异言来到魔泉前,因此魔泉前路线的安排会比120s魔泉rd轴更加自由,我们应当积极地考虑3+1+3,3+1+3+6,3+2等路线。
If we can get an extra Manafont in the whole fight by using it every 100s, we should consider it. The 100s interval means that we can not always bring 4 Xeno into the pre-Manafont stage, so more flexibility will be accessible, e.g. 3+1+3, 3+1+3+6, and 3+2 can be considered frequently.
rd轴构建A (rDPS Strategy A)
思路由不知名食物黑魔排轴后提供
在rd轴的构建中,应当尽量减少用于止损标准循环(将标准变为标改)的路线1的使用次数,即压路线1+标改。但由于魔泉之间需要一定的填充长度,推荐在魔泉之后接续一个标改循环,而之后不再使用路线1回归标改。这期间在有醒梦的情况下可以使用3+1+3+6这种整体上长度较长的结构,然后再使用剩余的可用资源,配合其它的非醒梦星灵路线(路线4无F4,或者单独的冰悖论)来撑到下一次魔泉开启。
Minimizing the use of line 1 and AF1 F3P standard, and only use 1 AF1 F3P standard after each Manafont, then take advantage of long length combination lines such as 3+1+3+6 and other accessible fillers to sustain nonstandard lines until the next Manafont is available.
rd轴构建B (rDPS Strategy B)
思路由鱼卡提供
奇数分钟打路线2,偶数分数打3+5,待实际排轴视情况,有可能最后变成长短轴240s的结构。
Using single line 2 in the non-pre-Manafont stage and line 3+5 in pre-Manafont stage.
This strategy needs to be practiced actually to see if it has to be changed into other combination forms.
后续更新计划(但我很懒大概率没什么问题就不会更新了):
增加一些木桩轴或者副本轴示例
勘误
