YOLO-v8 目标检测示例

收录于文集
共104篇
使用 keras 可以很方便地使用内置的 yolo-v8 模型进行目标检测,下面是使用 yolo-v8 模型进行目标检测的示例代码:
代码块
Python
自动换行
复制代码
import keras, keras_cv
from keras_cv import visualization
import numpy as np
import matplotlib.pyplot as plt

# 构造推理图片数据集, image url: "https://i.imgur.com/gCNcJJI.jpg"
image = keras.utils.load_img("./gCNcJJI.jpeg")
image = np.array(image)

# 为了提高推理性能,图片大小需要resize到64的倍数
inference_resizing = keras_cv.layers.Resizing(
    640, 640, pad_to_aspect_ratio=True, bounding_box_format="xywh"
)
image_batch = inference_resizing([image])

# 载入 yolo v8 目标检测模型
pretrained_model = keras_cv.models.YOLOV8Detector.from_preset(
    "yolo_v8_m_pascalvoc", bounding_box_format="xywh"
)
y_pred = pretrained_model.predict(image_batch)

# 显示目标检测结果
class_ids = [
    "Aeroplane",
    "Bicycle",
    "Bird",
    "Boat",
    "Bottle",
    "Bus",
    "Car",
    "Cat",
    "Chair",
    "Cow",
    "Dining Table",
    "Dog",
    "Horse",
    "Motorbike",
    "Person",
    "Potted Plant",
    "Sheep",
    "Sofa",
    "Train",
    "Tvmonitor",
    "Total",
]
class_mapping = dict(zip(range(len(class_ids)), class_ids))

visualization.plot_bounding_box_gallery(
    image_batch,
    value_range=(0, 255),
    rows=1,
    cols=1,
    y_pred=y_pred,
    scale=5,
    font_scale=0.7,
    bounding_box_format="xywh",
    class_mapping=class_mapping,
)
plt.show()
复制成功
运行上述代码之后会显示一个图片,结果如下:
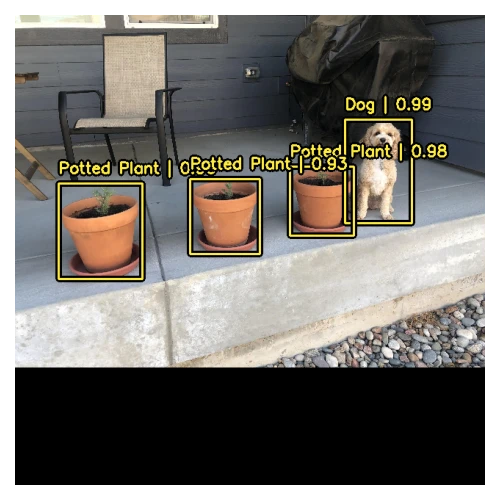
目标检测结果
检测到的目标在图片中会用黄色矩形标识出来,并且矩形上方还会显示目标的标签以及置信度。
(完)
本文为我原创,未经授权禁止转载
cv38610221
分享至
投诉或建议
