

感谢Laughing@Shanghai编译 感谢miskcoo开发的 工具 感谢meyergru、Kerryliu、我不是矿神编写的脚本
编辑更新时间:2024-07-06
示范设备及版本: RR版本 v24.7.0 型号: SA6400(epyc7002) 版本: 7.2(69057u4) 内核: official LKM: prod DMI: UGREEN DX4600 Pro/To be filled by O.E.M, BIOS 5.19 05/10/2023 CPU: Intel(R) Pentium(R) Silver N6005 @ 2.00GHz MEM: 15844 MB
本图文已过期,请移步新教程:
This tutorial has expired, please move to the new URL: 网页链接
请返回B站旧版图文界面浏览,新版代码块全压成一条了,格式打乱,无法使用。
请更新RR版本到24.6.9及以上,更新 i2c-i801.ko 对 Ice Lake-N, Alder Lake-P/M, Raptor Lake-S, Meteor Lake-P/SoC-S/PCH-S, Birch Stream 的兼容(only epyc7002)。led控制工具只能在root权限下运行。
同时支持以下设备:
- UGREEN DX4600 Pro
- UGREEN DXP2800
- UGREEN DXP4800 Plus
- UGREEN DXP6800 Pro
- UGREEN DXP8800 Plus
一、前置条件:
1.RR引导中
如果没设置过模块,默认是全选,跳过这一步。
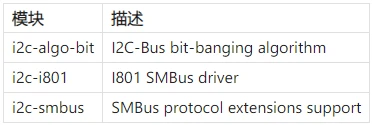
确保在模块列表中,选择了如下模块:
2.检查验证
SSH登陆NAS,并切换到root帐号:
sudo -i # 输入你帐户密码
检查加载的i2c模块:
lsmod | grep i2c

i2c_algo_bit           16384  1 i915
i2c_i801               28672  0
请下载Laughing大佬编译的i2c-tools和ugreen_leds_cli:
https://ufile.io/i88h6zja #30天过期
https://pixeldrain.com/u/iSiKny3K #120天过期
https://wormhole.app/xxzk3#vCdcaQAMXg8KEYMwL_fbBA #24小时过期
将解压后的 ugreen_leds 文件夹,通过网页上传到home目录,然后在SSH终端上:
cd /volume1/homes/你的用户名/ugreen_leds
列出系统中的所有 I2C 总线适配器,i2c-0是我们所需要的 SMBus I801 adapter
./i2cdetect -l
i2c-0 smbus SMBus I801 adapter at efa0 SMBus adapter
i2c-1 i2c i915 gmbus dpa I2C adapter
i2c-2 i2c i915 gmbus dpb I2C adapter
... 扫描 `i2c-0` 总线,确认有设备
./i2cdetect -y 0
0 1 2 3 4 5 6 7 8 9 a b c d e f
00: 08 -- -- -- -- -- -- --
10: -- -- -- -- -- -- -- -- -- -- -- -- -- -- -- --
20: -- -- -- -- -- -- -- -- -- -- -- -- -- -- -- --
30: 30 31 -- -- 34 35 -- -- -- -- 3a -- -- -- -- --
40: -- -- -- -- 44 -- -- -- -- -- -- -- -- -- -- --
50: 50 -- 52 -- -- -- -- -- -- -- -- -- -- -- -- --
60: -- -- -- -- -- -- -- -- -- -- -- -- -- -- -- --
70: -- -- -- -- -- -- -- --
3.安装LED控制器
cp /volume1/homes/你的用户名/ugreen_leds/ugreen_leds_cli /usr/local/bin/
chmod +x /usr/local/bin/ugreen_leds_cli
测试:
ugreen_leds_cli all -on -color 255 255 255 -brightness 65 # 全白灯亮度65
ugreen_leds_cli all -off # 全关
./pao_ma_deng.sh # 跑马灯LED控制器命令说明:
用法: ugreen_leds_cli  [LED-NAME...] [-on] [-off] [-(blink|breath) T_ON T_OFF]
                    [-color R G B] [-brightness BRIGHTNESS] [-status]

       LED-NAME:    用空格分隔,可能的值为
                    { power, netdev, disk[1-8], all }。
       -on / -off:  打开/关闭对应的LED。
       -blink / -breath:  将LED设置为闪烁/呼吸模式。此模式下,LED会亮T_ON毫秒,然后
                    熄灭T_OFF毫秒。
                    T_ON 和 T_OFF 的取值范围是 [0, 65535]。
       -color:      设置对应LED的颜色。
                    R, G 和 B 的取值范围是 [0, 255]。
       -brightness: 设置对应LED的亮度。
                    BRIGHTNESS 的取值范围是 [0, 255]。
       -status:     显示对应LED的状态。
至此,home文件夹下面的ugreen_leds完成了它的使命,可以删除了。
二、功能实现
电源:常亮白灯;
LAN灯:5分种ping一下网关,连通白灯,失败红色闪烁;
DISK灯:检查有几个硬盘,对应的灯位亮绿灯,如果温度超过50度,红色闪烁;
(可以自定义按自己心情改色)
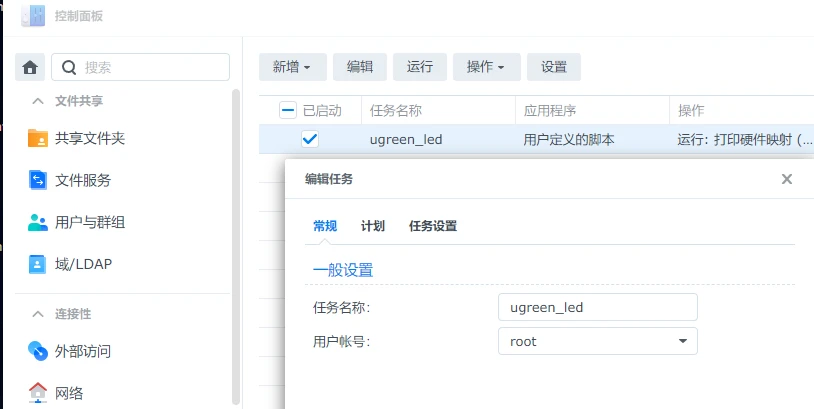
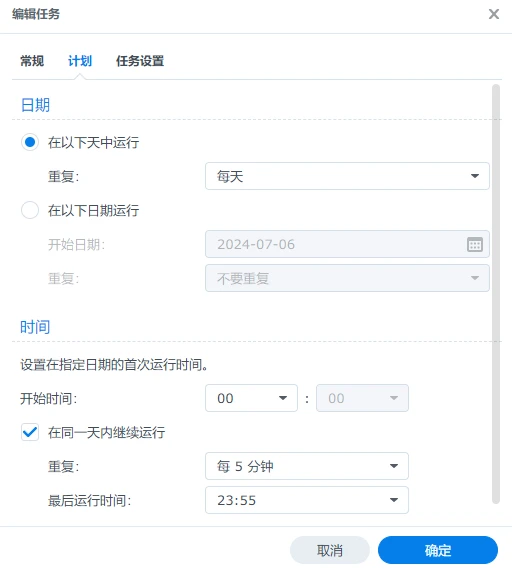
计划任务-新增-计划中的任务-用户自定义的脚本 任务名称 ugreen_led 用户账号为 root 计划中勾选 在同一天内继续运行,第5分钟重复一次。
任务设置-运行命令 中粘贴以下脚本: (B站新版本图文会格式异常,显示为一条,所以另附下面的脚本:https://pixeldrain.com/u/htWfNdz2)
如果不要输出,请注释掉所有echo行
#!/bin/bash

#set -x

# 初始化设备状态数组
devices=(w x x x x x x x x x)
# 初始化设备映射
map=(power netdev disk1 disk2 disk3 disk4 disk5 disk6 disk7 disk8)

# 检查网络状态
gw=$(ip route | awk '/default/ { print $3 }')
if ping -q -c 1 -W 1 $gw >/dev/null; then
    devices[1]=w
else
    devices[1]=r
fi


# 将 sataX 映射到硬件设备
declare -A hwmap

echo "映射设备中..."
for devpath in /sys/block/sata*; do
    dev=$(basename $devpath)
    hctl=$(basename $(readlink $devpath/device))
    hwmap[$dev]=${hctl:0:1}
    echo "将 $dev 映射到 ${hctl:0:1}"
done

# 打印硬件映射 (hwmap) 以供验证
echo "硬件映射 (hwmap):"
for key in "${!hwmap[@]}"; do
    echo "$key: ${hwmap[$key]}"
done

# 检查硬盘状态并更新设备状态数组,方法一(如果硬盘全部支持SMART功能)
#echo "检查磁盘状态中..."
#for dev in "${!hwmap[@]}"; do
    # 使用 smartctl 检查硬盘状态
#    if smartctl -H /dev/$dev &> /dev/null; then
#        status="ONLINE"
#    else
#        status="OFFLINE"
#    fi
#    index=$((${hwmap[$dev]} + 2))
#    echo "设备 $dev 状态 $status 映射到索引 $index"
#
#    if [ $status = "ONLINE" ]; then
#        devices[$index]=g
#    else
#        devices[$index]=x
#    fi
#done

# 检查硬盘状态并更新设备状态数组,方法二
echo "检查磁盘状态中..."
for dev in "${!hwmap[@]}"; do
    # 使用 udevadm 检查硬盘状态
    if udevadm info --query=all --name=/dev/$dev &> /dev/null; then
        status="ONLINE"
    else
        status="OFFLINE"
    fi
    index=$((${hwmap[$dev]} + 2))
    echo "设备 $dev 状态 $status 映射到索引 $index"

    if [ $status = "ONLINE" ]; then
        devices[$index]=g
    else
        devices[$index]=x
    fi
done

# 根据硬盘温度设置disk灯状态,50度高温红色闪烁提醒
for i in "${!hwmap[@]}"; do
    index=$((${hwmap[$i]} + 2))
    hdd_temp=$(cat /run/synostorage/disks/sata$((${hwmap[$i]} + 1))/temperature)
    if [ "$hdd_temp" -ge 50 ]; then
        devices[$index]=r
    else
        devices[$index]=g
    fi
done

# 打印设备状态数组(可选,用于调试)
#echo "设备状态数组:${devices[@]}"

# 输出最终设备状态并控制 LED 灯
echo "最终设备状态:"
for i in "${!devices[@]}"; do
    echo "$i: ${devices[$i]}"
    case "${devices[$i]}" in
        w)
            echo "设置 ${map[$i]} 为白色常亮"
            ugreen_leds_cli ${map[$i]} -color 255 255 255 -on -brightness 64
            ;;
        g)
            echo "设置 ${map[$i]} 为绿色常亮"
            ugreen_leds_cli ${map[$i]} -color 0 255 0 -on -brightness 64
            ;;
        r)
            echo "设置 ${map[$i]} 为红色闪烁"
            ugreen_leds_cli ${map[$i]} -color 255 0 0 -blink 400 600 -brightness 64
            ;;
        x)
            echo "关闭 ${map[$i]}"
            ugreen_leds_cli ${map[$i]} -off
            ;;
    esac
done
三、扩展
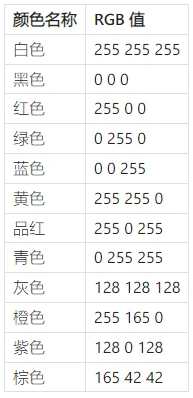
常用颜色
参考
https://github.com/meyergru/ugreen_dxp8800_leds_controller
https://github.com/miskcoo/ugreen_dx4600_leds_controller
https://blog.miskcoo.com/2024/05/ugreen-dx4600-pro-led-controller
https://gist.github.com/Kerryliu/c380bb6b3b69be5671105fc23e19b7e8
https://imnks.com/10101.html
结尾
感谢您花时间阅读这篇教程,由于本人学识有限,对linux也是一知半解,文中难免有疏漏之处,还请各位大佬海涵。希望这篇教程能对您有所帮助,我尽我所能地提供了详细的步骤和解释,但如果你发现任何错误或不清楚的地方,请务必告诉我,让我有机会改进,欢迎随时交流,我们可以一起进步。
