
本节通过FTC SDK内置的例子,来进行教学。
项目文件结构
示例代码
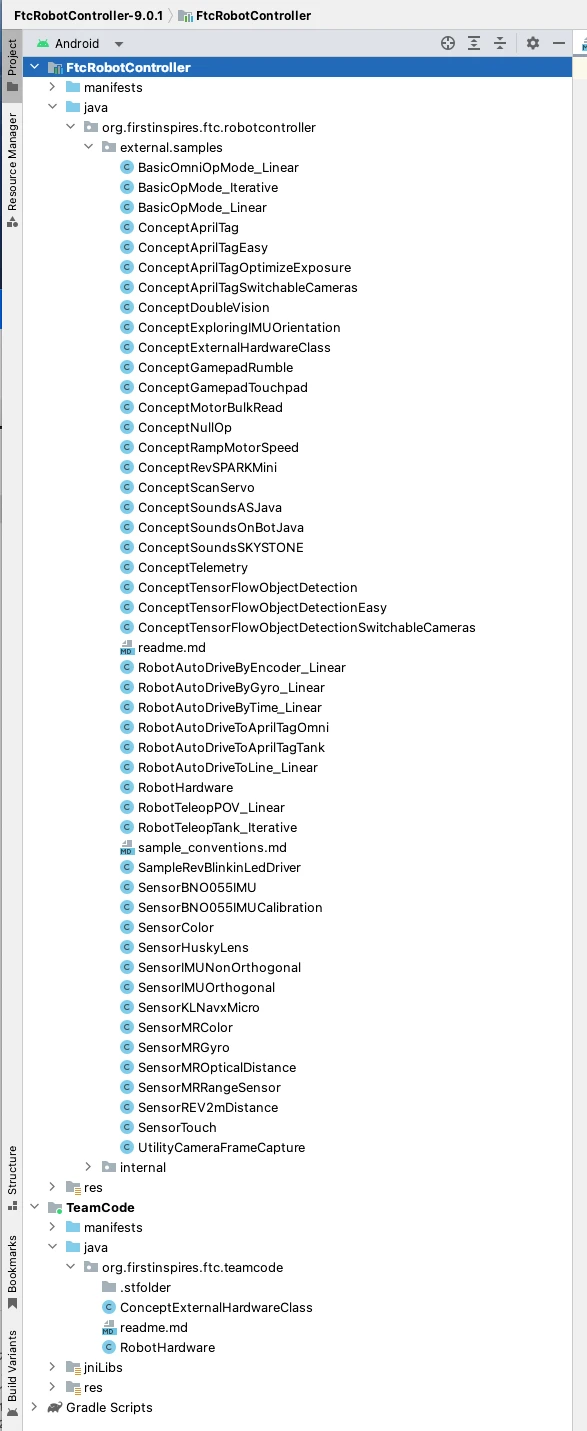
点开左侧面板 Project
<FtcRobotController\java\org.firsinspires.ftc.robotcontroller\external.samples> 里包含了大量示例代码。
Basic 开头的文件包含一个最小功能的运行模式,用于说明特定风格的运行模式的骨架/结构。 这些都是最基本的示例。
Sensor 开头的文件展示了如何使用一个特定的传感器。它的目的不是驱动一个正常运行的机器人,而只是展示了读取和显示传感器值所需的最基本代码。读取和显示传感器值所需的最少代码。
Robot 开头的文件假定有一个简单的双电机(差分)驱动基础。它可用于提供常用的基线驱动运行模式,或 演示如何使用特定传感器或概念进行导航。
Concept 开头的文件用于说明执行某一特定功能或概念。这些操作可能比较复杂,但应在注释中解释清楚、 或在注释中引用外部文档、指南或教程。每个操作模式应尽量只演示一个概念,以便根据其名称根据它们的名称找到它们。 这些操作模式可能不会产生可驾驶的机器人。
队伍代码
<TeamCode\java\org.firsinspires.ftc.teamcode> 就是队伍代码了。
开始代码编写
首先先找到合适的示例代码,右键复制

随后到 <TeamCode\java\org.firsinspires.ftc.teamcode> 里,右键粘贴

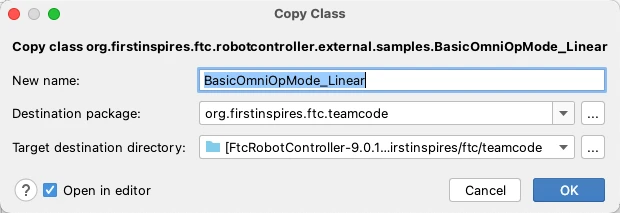
在弹出的对话框里,填写新的名字,Android Studio会帮我们自动修改必要的内容。
手动操控麦克纳姆轮底盘代码解析
以下是 BasicOmniOpMode_Linear.java 文件内容,并附带注释的翻译和简单解析。
/* Copyright (c) 2021 FIRST. All rights reserved.
*
* 每个代码文件开头会有一些版权申明
*/
package org.firstinspires.ftc.teamcode;
import com.qualcomm.robotcore.eventloop.opmode.Disabled;
import com.qualcomm.robotcore.eventloop.opmode.LinearOpMode;
import com.qualcomm.robotcore.eventloop.opmode.TeleOp;
import com.qualcomm.robotcore.hardware.DcMotor;
import com.qualcomm.robotcore.util.ElapsedTime;
/*
* 本文件是一个 线性的(Linear) &quot;OpMode&quot; ,FTC SDK支持两种模式:
* 一种是 Linear 模式,参考 BasicOpMode_Linear.java。这种模式代码比较直白。
* 另一种是 Iterative 模式,参考 BasicOpMode_Iterative.java,这种模式有点像 Arduino 的模式
* OpMode 指的是一段可以自动或者手动操控的程序,在 Driver Station 的程序列表里会显示名字,可以选择并执行对应代码。
*
* 这份文件里包含的是一个操控4个麦克纳姆轮底盘的程序。可以参考:
* https://gm0.org/en/latest/docs/robot-design/drivetrains/holonomic.html
* 注意,麦克纳姆轮正确安装时,从上往下看起来应该像 X
*/
// 下方的 TeleOp 表示时手动操控阶段,可以改成 Autonomous ,即为自动阶段代码。
// name 部份为DS上显示的名字,group用于分组
@TeleOp(name=&quot;Basic: Omni Linear OpMode&quot;, group=&quot;Linear OpMode&quot;)
// 下面这行 @Disabled 注释掉之后才会在DS里显示,否则不会显示。
@Disabled
public class BasicOmniOpMode_Linear extends LinearOpMode {
// 声明四个电机变量
private ElapsedTime runtime = new ElapsedTime();
private DcMotor leftFrontDrive = null;
private DcMotor leftBackDrive = null;
private DcMotor rightFrontDrive = null;
private DcMotor rightBackDrive = null;
@Override
public void runOpMode() {
// 初始化硬件,注意下面的字符串必须跟在DS或者RC上 configure 里配置的名字完全一致。
leftFrontDrive = hardwareMap.get(DcMotor.class, &quot;left_front_drive&quot;);
leftBackDrive = hardwareMap.get(DcMotor.class, &quot;left_back_drive&quot;);
rightFrontDrive = hardwareMap.get(DcMotor.class, &quot;right_front_drive&quot;);
rightBackDrive = hardwareMap.get(DcMotor.class, &quot;right_back_drive&quot;);
// 设置电机旋转的正方向。
leftFrontDrive.setDirection(DcMotor.Direction.REVERSE);
leftBackDrive.setDirection(DcMotor.Direction.REVERSE);
rightFrontDrive.setDirection(DcMotor.Direction.FORWARD);
rightBackDrive.setDirection(DcMotor.Direction.FORWARD);
// telemetry 可以把程序运行的信息发送到DS上方便调试。
telemetry.addData(&quot;Status&quot;, &quot;Initialized&quot;);
telemetry.update();
// 初始化结束,这里是等待DS上按下开始按钮。
waitForStart();
// 如果想要在初始化阶段显示一些信息,比如颜色传感器的读数,陀螺仪的角度等,
// 可以用下面的代码代替上面那句 waitForStart();
/*
while (opModeInInit()) {
telemetry.addData(&quot;&gt;&quot;, &quot;Waiting Time: &quot; + runtime.toString());
telemetry.update();
}
*/
runtime.reset();
// 下面的代码会不停循环直到DS上按下 STOP 按钮。
while (opModeIsActive()) {
double max;
// POV 模式,左摇杆前后左右平移,右摇杆转向。
// axial 代表电机前进后退
// lateral 代表电机左右平移
// yaw 代表电机自转,顺时针或者逆时针
double axial = -gamepad1.left_stick_y; // 注意左摇杆往前推是负值
double lateral = gamepad1.left_stick_x;
double yaw = gamepad1.right_stick_x;
// 把摇杆的读数进行线性组合,得到每个电机应当获得的功率值。
double leftFrontPower = axial + lateral + yaw;
double rightFrontPower = axial - lateral - yaw;
double leftBackPower = axial - lateral + yaw;
double rightBackPower = axial + lateral - yaw;
// 按照比例缩放每个电机功率,确保最大的那个电机功率不超过 100%
max = Math.max(Math.abs(leftFrontPower), Math.abs(rightFrontPower));
max = Math.max(max, Math.abs(leftBackPower));
max = Math.max(max, Math.abs(rightBackPower));
if (max &gt; 1.0) {
leftFrontPower /= max;
rightFrontPower /= max;
leftBackPower /= max;
rightBackPower /= max;
}
// 以下是测试电机的代码
//
// 把下方代码取消注释后,按ABXY几个按键,首先确认电机在Configuration里配置是否正确
// 其次判断是否正确的旋转方向是否是向前的,用 setDirection() 来设置方向。
// 一旦测试完毕需要把下方代码重新注释掉。
/*
leftFrontPower = gamepad1.x ? 1.0 : 0.0; // X gamepad
leftBackPower = gamepad1.a ? 1.0 : 0.0; // A gamepad
rightFrontPower = gamepad1.y ? 1.0 : 0.0; // Y gamepad
rightBackPower = gamepad1.b ? 1.0 : 0.0; // B gamepad
*/
// 把各个电机计算出来的功率,应用到各个电机
leftFrontDrive.setPower(leftFrontPower);
rightFrontDrive.setPower(rightFrontPower);
leftBackDrive.setPower(leftBackPower);
rightBackDrive.setPower(rightBackPower);
// 通过遥测功能,把当前运行状态发送给 Driver Station
telemetry.addData(&quot;Status&quot;, &quot;Run Time: &quot; + runtime.toString());
telemetry.addData(&quot;Front left/Right&quot;, &quot;%4.2f, %4.2f&quot;, leftFrontPower, rightFrontPower);
telemetry.addData(&quot;Back left/Right&quot;, &quot;%4.2f, %4.2f&quot;, leftBackPower, rightBackPower);
telemetry.update();
}
}} 舵机使用
舵机是常用的一种小型电机,通常用于抓取物品。更多细节可以参考 RobotAutoDriveByGyro_Linear.java
package org.firstinspires.ftc.teamcode;
import com.qualcomm.robotcore.eventloop.opmode.LinearOpMode;
import com.qualcomm.robotcore.eventloop.opmode.TeleOp;
import com.qualcomm.robotcore.hardware.Servo;
@TeleOp(name = &quot;Concept: ServoTest&quot;, group = &quot;Concept&quot;)
@Disabled
public class ServoTest extends LinearOpMode {
// 定义舵机变量
Servo servo;
public void runOpMode() {
// 获得舵机访问权
servo = hardwareMap.get(Servo.class, &quot;left_hand&quot;);
waitForStart();
while(opModeIsActive()){
// 舵机可以设置的值是0-1之间,对应的是最大和最小的旋转角度。
// 下面代码的意思是,如果手柄按下a键,舵机转到最大角度,否则就转到最小角度。
if(gamepad1.a){
servo.setPosition(1);
}else{
servo.setPosition(0);
}
}
}
}陀螺仪使用
package org.firstinspires.ftc.teamcode;
import com.qualcomm.robotcore.eventloop.opmode.LinearOpMode;
import com.qualcomm.robotcore.eventloop.opmode.TeleOp;
import com.qualcomm.robotcore.hardware.IMU;
@TeleOp(name = &quot;Concept: ServoTest&quot;, group = &quot;Concept&quot;)
@Disabled
public class ServoTest extends LinearOpMode {
// 定义imu变量
private IMU imu;
public void runOpMode() {
// 获得imu访问权
imu = hardwareMap.get(IMU.class, &quot;imu&quot;);
// 下面这段代码可以用来设置rev朝向,以正确使用imu
imu.initialize(new IMU.Parameters(
new RevHubOrientationOnRobot(
RevHubOrientationOnRobot.LogoFacingDirection.UP,
RevHubOrientationOnRobot.UsbFacingDirection.FORWARD
)
));
// 下面这段代码取代 waitForStart(); 从而可以在等待开始阶段就可以获得读数
while (opModeInInit()) {
telemetry.addData(&quot;&gt;&quot;, &quot;Robot Heading = %4.0f&quot;,
imu.getRobotYawPitchRollAngles().getYaw(AngleUnit.DEGREES)
);
telemetry.update();
}
while(opModeIsActive()){
// 根据需要,可以重置imu的值
if(gamepad1.a){
imu.resetYaw();
}
telemetry.addData(&quot;&gt;&quot;, &quot;Robot Heading = %4.0f&quot;,
imu.getRobotYawPitchRollAngles().getYaw(AngleUnit.DEGREES)
);
telemetry.update();
}
}
}其他代码
想要深入了解各种传感器和电机的使用,还是应当查阅示例代码和文档,上面那些只能是抛砖引玉。
比如想要了解如何使用AprilTag,就应该看看 ConceptAprilTag.java
想要知道怎么使用TFOD,就应该看看ConceptTensorFlowObjectDetection.java
想要知道怎么使用HuskyLens,就应该看看 SensorHuskyLens.java
FTC还可以使用触碰传感器,颜色传感器,距离传感器等很多传感器,都可以参考对应文档和示例来学习如何使用。
机器人社自己封装的代码
我社对FTC官方SDK进一步进行了封装,把一些常用功能封装起来,大幅减少代码量,主线代码变得非常简洁,逻辑清晰简单易用。下面是一个手动阶段的例子和一个自动阶段的例子。
手动阶段
package org.firstinspires.ftc.teamcode;
import com.qualcomm.robotcore.eventloop.opmode.LinearOpMode;
import com.qualcomm.robotcore.eventloop.opmode.TeleOp;
import com.qualcomm.robotcore.util.ElapsedTime;
import org.firstinspires.ftc.robotcore.external.tfod.Recognition;
import org.firstinspires.ftc.vision.apriltag.AprilTagDetection;
@TeleOp(name=&quot;手动阶段&quot;, group=&quot;Robot&quot;)
//@Disabled
public class TeleOp19565 extends LinearOpMode {
private ElapsedTime runtime = new ElapsedTime();
// 存放查找的 AprilTag 的变量
private AprilTagDetection desiredTag = null;
// 存放查找的 Tfod 的变量
private Recognition desiredTfod = null;
// 我校封装的代码都放在 RobotHardware 类中。
// 通过下面的代码,之后所有的硬件方法都可以通过 &quot;robot.&quot; 开头来访问。
RobotHardware robot = new RobotHardware(this);
@Override
public void runOpMode() {
// 前后移动/平移/自转
double drive = 0;
double strafe = 0;
double turn = 0;
// 初始化所有硬件,对比前面的代码,是不是简洁了很多
robot.init();
robot.initDoubleVision();
telemetry.addData(&quot;Status&quot;, &quot;Initialized&quot;);
telemetry.update();
// 等待开始
waitForStart();
runtime.reset();
// 主循环的代码,直到按下 Stop 键
while (opModeIsActive()) {
telemetry.addData(&quot;Status&quot;, &quot;Run Time: &quot; + runtime.toString());
// 获得手柄的参数
drive = -gamepad1.left_stick_y;
strafe = gamepad1.left_stick_x;
turn = gamepad1.right_stick_x;
if (gamepad1.options) {
robot.resetYaw();
}
desiredTag = robot.getAprilTag(1);
desiredTfod = robot.getTfod(&quot;Pixel&quot;);
// 如果按下 Bumper 并且找到了目标,则自动驶向目标。
// LB 为 AprilTag,RB 为 Tfod
if (gamepad1.left_bumper &amp;&amp; desiredTag!=null) {
robot.moveToAprilTag(desiredTag,12);
telemetry.addData(&quot;Control Mode&quot;,&quot;Auto AprilTag&quot;);
} else if (gamepad1.right_bumper &amp;&amp; desiredTfod!=null) {
robot.moveToTfod(desiredTfod,300);
telemetry.addData(&quot;Control Mode&quot;,&quot;Auto Tfod&quot;);
} else {
// 基于场地中心坐标系的第三人称操控模式
robot.driveRobotFieldCentric(drive, strafe, turn);
// 基于机器人中心视角的第一人称操控模式
// robot.driveRobot(drive, strafe, turn);
telemetry.addData(&quot;Control Mode&quot;,&quot;Manual&quot;);
}
telemetry.update();
}
关闭图像识别部份以节约机器资源
robot.closeVision();
}
}自动阶段
手动阶段能用的功能自动阶段都能用,并且下面4个方法比较适合自动阶段使用。
// 前后平移
robot.driveStraight( speed, distance, heading);
// 左右平移
robot.driveStrafe(   speed, distance, heading);
// 自转
robot.turnToHeading( speed, heading);
// 停在某个角度一段时间
robot.holdHeading(   speed, heading, holdTime);
