
Running Javascript in Android app or game with JavaScriptCore and Native code
Javascript is a powerful scripting language that is also easy to learn and very popular. There is a great range of potentials to use it in app or game, from scripting design to creating a full engine.
One great things about this is that you can hot-update your app or game without the need to resubmit to the Stores. However, this might lead to a ban, so don’t blame me for not telling you beforehand.
I always have this desire to create my own cross-platform App SDK similar to React-native or Flutter with Javascript as the programing language. The difference would be in the UI design and architecture, but that would be another story. Thus, my first brick of the wall would be to run Javascript source code with native code.
You might ask why I want to re-invent the wheel, but the hell I don’t. Shit stuck on the wheels. React-native UI design is way too tedious, and I hate flux. To further piss us programmers off, Flutter uses Dart. With all due respect to people who created these good SDKs, I can’t understand why they did not make things similar to Microsoft WPF.
Anyway, back to the main topic.
Curiously, I could not find any document out there to tell me how to do this job in step-by-step manner. After some struggle and effort to do this by myself, I decide to share my experience here.
If you have read this far, I bet you know what you want to get from this story I am writing. You must have also suffered from the lack of documents for this task.
The objective of this story is to run a simple Javascript line and show the result on screen.
Let’s begin!
Why JavaScriptCore?
React-native uses it. Most of the hard job was done by React-native community.
It is native to iOS, half of the job is already done this way.
Overview
First thing to do is compile JavaScriptCore into Android shared library.
Link the shared library into an Android project.
Run a simple script using that library.
Step 1 — Compile JavaScriptCore
This is the most difficult and lengthy task to do, however, it was made very simple because react-native community already did everything here: https://github.com/react-community/jsc-android-buildscripts.
So to begin with, clone that repo somewhere and do exactly as their instructions in the README file until you get a folder named compiled in /build. This process can take more than 2 hours.
You can learn a lot by trying to compile the shared library by yourself without using what react-native community already did. But trust me, the knowledge would be very hard-earned, and you will swear a lot during the process.
In that folder, you can see shared library files (.so files) of JavaScriptCore:
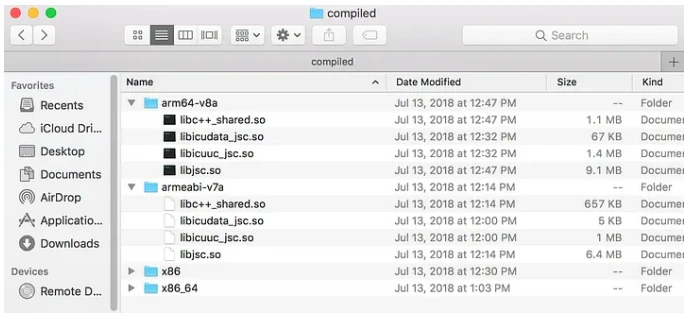
We will need all the so files generated above. You can try to delete some of them later and see if the app still runs.
Step 2 — Create new Android project
In this story, I use Android Studio for the sake of simplicity.
When creating new project, make sure C++ support is checked:

Try running the empty App project.
The native-code part of our App begins in app/src/main/cpp/native-lib.cpp, we will modify it to run this simple Javascript line.

The line calculates a simple math operation using a defined function and then returns a simple message to the context.
But before that, we need to link the shared library to our project.
Step 3 — Link shared library to Android project
You need to create a directory named jniLibs in app/src/main, and copy all so files generated in step 1 here. Thus you get this:

Everything in app/src/main/jniLibs will be copied to the build automatically. We don’t need to tell Android Studio to do anything else.
Now, if we call JavaScriptCore functions in native-lib.cpp file, we will surely gets compile errors. However, just go ahead, change that cpp file like the following. I want you to get error to learn.
#include <jni.h>
#include <string>

#include "JavaScriptCore/JavaScriptCore.h"

std::string JSStringToStdString(JSStringRef jsString) {
    size_t maxBufferSize = JSStringGetMaximumUTF8CStringSize(jsString);
    char* utf8Buffer = new char[maxBufferSize];
    size_t bytesWritten = JSStringGetUTF8CString(jsString, utf8Buffer, maxBufferSize);
    std::string utf_string = std::string(utf8Buffer, bytesWritten -1);
    delete [] utf8Buffer;
    return utf_string;
}

extern "C" JNIEXPORT jstring

JNICALL
Java_com_example_chungnguyen_testjsc_MainActivity_stringFromJNI(
        JNIEnv *env,
        jobject /* this */) {

    JSContextGroupRef contextGroup = JSContextGroupCreate();
    JSGlobalContextRef globalContext = JSGlobalContextCreateInGroup(contextGroup, nullptr);

    JSStringRef statement = JSStringCreateWithUTF8CString("function degToRad(value) { return (value * Math.PI) / 180; } ('90deg = ' + degToRad(90))");

    JSValueRef retValue = JSEvaluateScript(globalContext, statement, nullptr, nullptr, 1,nullptr);

    JSStringRef retString = JSValueToStringCopy(globalContext, retValue, nullptr);

    std::string hello = JSStringToStdString(retString);

    JSGlobalContextRelease(globalContext);
    JSContextGroupRelease(contextGroup);
    JSStringRelease(statement);
    JSStringRelease(retString);

    return env->NewStringUTF(hello.c_str());
}The very first error would be missing header file JavaScriptCore/JavaScriptCore.h. My reaction when I got this compile error was: “Where the f@#k can I find that header file?”.
Go back to the jsc-android-buildscripts repo folder you had cloned before, you can find source code of JavaScriptCore at build/target/webkit/Source. What needs to be done would be adding header files search path to our Android Project.
To do so, in the file CMakeLists.txt at app/src, add these lines:
include_directories(../../jsc-android-buildscripts/build/target/webkit/Source/JavaScriptCore)
include_directories(../../jsc-android-buildscripts/build/target/webkit/Source/JavaScriptCore/ForwardingHeaders)
In my case, jsc-android-buildscripts repo folder is located at the same place at the Android project folder, and so I put the header search paths like above.

These two folders are at the same location.
Now header file paths are resolved, but after compiling again, we have link errors about undefined references.
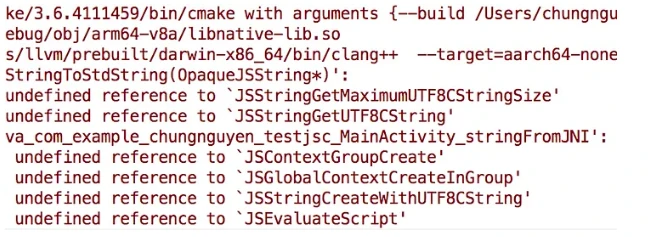
No need to panic, we just need to link the shared library to our native code. To do so, first we need to define the library property by adding these lines to the CMakeLists.txt file.
add_library(jsc SHARED IMPORTED)
set_target_properties( # Specifies the target library.
                       jsc

                       # Specifies the parameter you want to define.
                       PROPERTIES IMPORTED_LOCATION

                       # Provides the path to the library you want to import.
src/main/jniLibs/${ANDROID_ABI}/libjsc.so )Those lines define the shared library named jsc. The real file name is libjsc.so, but the file location is based on ABI architecture when compiling the native code.
Then, we need to actually link the library by adding jsc this line:
target_link_libraries( # Specifies the target library.
                       native-lib

                       jsc

                       # Links the target library to the log library
                       # included in the NDK.
                       ${log-lib} )
That’s it! Run the app to see the result.
