
先复习下网络启动的过程:
总结启动流程下:
1、PC加电自检,进入网卡PXE启动。
2、PXE向DHCP服务器请求IP地址,发送option60,标识自己的架构。
3、DHCP服务器,发送启动TFTP服务器ip和对应的iPXE启动文件名给PC的PXE程序。
4、PC的PXE程序到TFTP服务器下载iPXE启动文件,并启动iPXE。
5、iPXE再次向DHCP服务器发送请求,获取自己的配置文件名。
6、iPXE到TFTP服务器下载配置文件,进入iPXE启动菜单。
前面的完成了openwrt的配置,走到了第3步,网卡的PXE启动程序,获取了tftp服务器的ip和启动文件名,接下来就要用到TFTP服务器、HTTP服务器。
下面我们要配置群晖nas,配置http、tftp服务。
一、配置HTTP服务
1、规划web目录:指定网站要使用的磁盘空间。
2、安装web station:根据自己的规划,完成web station的安装、配置。
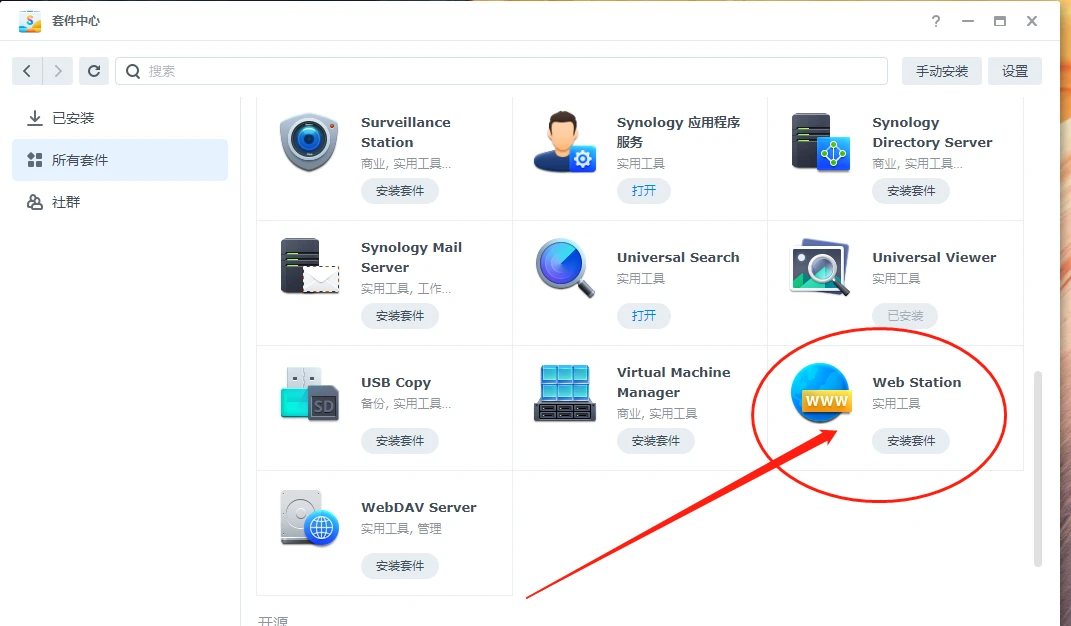
3、完成后,系统自动创建了两个共享,web和web_packages,其中web就是我们的网站定目录,也就是http://192.168.1.3/的主目录。这里192.168.1.3是本人群晖NAS的IP,请用你的替换。
4、web下建立tftp目录,这个作为我们网路启动服务目录
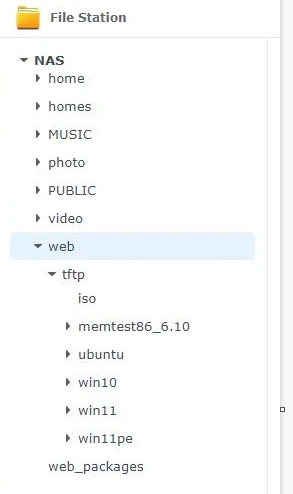
HTTP/TFTP目录结构
二、配置TFTP服务:
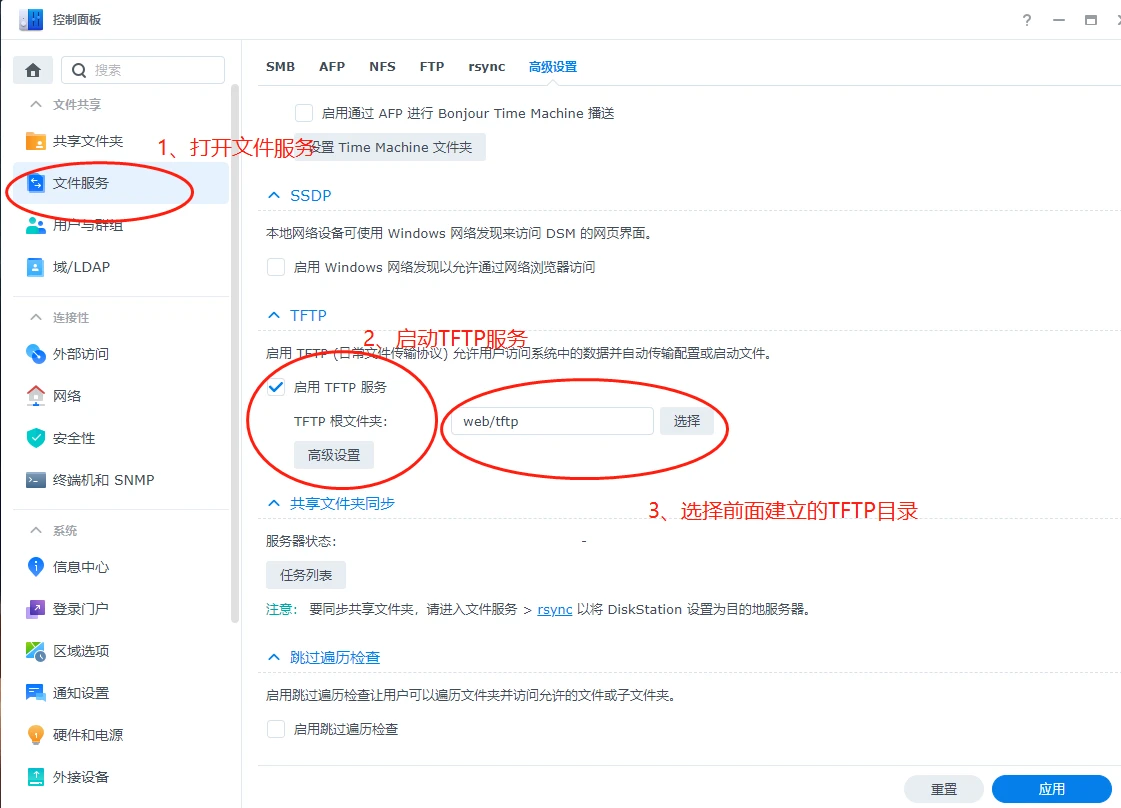
这个简单,打开控制面板,进入文件服务,启用TFTP,指定TFTP的根文件夹,指向我们前面设置的web/tftp即可。
三、下载ipxe启动文件,设置启动环境:
1、下载iPXE启动程序:
第一篇介绍过,网络启动分为PXE启动和iPXE启动,DHCP设置启动文件就是ipxe的启动程序,分别是BIOS模式下的undionly.kpxe,和UEFI模式下的 ipxe.efi ,这两个文件请到ipxe官网下载:
https://boot.ipxe.org/undionly.kpxe
https://boot.ipxe.org/ipxe.efi
下载后纺织到web/tftp目录下。
到这里,网络启动流程就到了
第4步,PC机从TFTP获取了iPXE启动文件,然后开始执行。
第5步,iPXE启动程序被执行,再次向DHCP服务器请求配置配置文件。DHCP返回tftp服务器ip和boot.ipxe。
2、boot.ipxe是iPXE的配置文件:boot.ipxe
这个是ipxe比较复杂的部分,我提供个样板,请保存为boot.ipxe。
#!ipxe
# Global variables used by all other iPXE scripts
chain --autofree boot.ipxe.cfg ||
# Boot <boot-url>/<boot-dir>/hostname-<hostname>.ipxe
# if hostname DHCP variable is set and script is present
# isset ${hostname} && chain --replace --autofree ${boot-dir}hostname-${hostname}.ipxe ||

# Boot <boot-url>/<boot-dir>/uuid-<UUID>.ipxe
# if SMBIOS UUID variable is set and script is present
# isset ${uuid} && chain --replace --autofree ${boot-dir}uuid-${uuid}.ipxe ||

# Boot <boot-url>/<boot-dir>/mac-010203040506.ipxe if script is present
# chain --replace --autofree ${boot-dir}mac-${mac:hexraw}.ipxe ||

# Boot <boot-url>/<boot-dir>/pci-8086100e.ipxe if one type of
# PCI Intel adapter is present and script is present
# chain --replace --autofree ${boot-dir}pci-${pci/${busloc}.0.2}${pci/${busloc}.2.2}.ipxe ||

# Boot <boot-url>/<boot-dir>/chip-82541pi.ipxe if one type of
# PCI Intel adapter is present and script is present
# chain --replace --autofree ${boot-dir}chip-${chip}.ipxe ||

# Boot <boot-url>/menu.ipxe script if all other options have been exhausted
chain --replace --autofree ${menu-url} ||3、配置boot.ipxe.cfg,这个是变量文件,内容如下,请保存为boot.ipxe.cfg。请注意需要替换自己NAS服务器ip。
#!ipxe

# OPTIONAL: Base URL used to resolve most other resources
# Should always end with a slash
set next-server 192.168.1.3
set boot-url http://${next-server}/tftp/
set nas_ip 192.168.1.3

# REQUIRED: Absolute URL to the menu script, used by boot.ipxe
# and commonly used at the end of simple override scripts
# in ${boot-dir}.
set menu-url ${boot-url}menu.ipxe

# OPTIONAL: iSCSI server location and iSCSI IQNs
# Must be specified as an IP, some clients have issues with name resolution
# Initiator IQN is also calculated to use hostname, if present
#set iscsi-server ${nas_ip}
#set base-iqn iqn.2023-02.laomaonas.synology.me
#set base-iscsi iscsi:${iscsi-server}:::0:iqn.1991-05.com.microsoft:server1-test-target
#isset ${hostname} && set initiator-iqn ${base-iqn}:${hostname} || set initiator-iqn ${base-iqn}:${mac}

# OPTIONAL: URL to report memtest results to
set memtest-report-url http://boot.smidsrod.lan/memtest-report.cgi这里指定了http服务器的地址,以及menu.ipxe所在目录。
4、配置启动菜单,menu.ipxe
先附上我的menu.ipxe,请保存为menu.ipxe。
#!ipxe
# Some menu defaults
# set menu-timeout 0 if no client-specific settings found
isset ${menu-timeout} || set menu-timeout 10000
set submenu-timeout ${menu-timeout}
isset ${menu-default} || set menu-default exit

# Figure out if client is 64-bit capable
cpuid --ext 29 && set arch x64 || set arch x86
cpuid --ext 29 && set archl amd64 || set arch i386

# bios or uefi
iseq ${platform} efi && goto start_efi || goto start_bios

###################### MAIN MENU  ####################################
###############
###UEFI mode
:start_efi
menu iPXE boot menu for ${arch}  ${platform}
item --gap --             ------------------------- Windows Operating systems ------------------------------
item UEFI64    	       	WinPe Tools 64	(iso,netless)
item win11				WinPE 11 (iso,net)
item dabaicai				Dabaicai PE(iso)
item --gap --             ------------------------- Linux  Operating systems ------------------------------
item archlinux        	ArchLinux Live CD
item deepin				Deepin live CD
item ubuntu_uefi			Ubuntu 22.04 live CD
item --gap --             ------------------------- Advanced options -------------------------------
item memtest_uefi       	Memtest86+
item shell				iPXE Shell
item reboot             	Reboot computer
item --key 0x08 back      Back to top menu...
item --key x exit         	Exit iPXE and continue BIOS boot
choose --timeout ${menu-timeout} --default ${menu-default} selected || goto cancel
set menu-timeout 0
goto ${selected}

###############
##BIOS MODE
:start_bios
menu iPXE boot menu for ${arch}  ${platform}
item --gap --             ------------------------- Windows Operating systems -------------------------
item BIOS32DOS            	WinPe Tools 32bit with DOS tools (iso,netless)
item BIOS64DOS			WinPe Tools 64bit with DOS tools (iso,netless)
item win11				WinPE 11  (iso,network)
item dabaicai				Dabaicai PE(iso)
item --gap --             ------------------------- Linux  Operating systems ------------------------------
item archlinux        	ArchLinux Live CD
item deepin				Deepin live CD
item ubuntu_bios			Ubuntu 22.04 live CD
item --gap --             ------------------------- Advanced options -------------------------------------
item memtest_bios       	Memtest86+
item shell				iPXE Shell
item reboot             	Reboot computer
item --key x exit         	Exit iPXE and continue BIOS boot
choose --timeout ${menu-timeout} --default ${menu-default} selected || goto cancel
set menu-timeout 0
goto ${selected}

############ MAIN MENU ITEMS ############
:win11
echo Boot iPXE ${arch}  |  ${platform}
sanboot  --no-describe http://192.168.1.3/tftp/iso/my11pe1.iso || goto failed
goto start


:UEFI64
echo Boot iPXE ${arch}  |  ${platform}
sanboot --no-describe http://192.168.1.3/tftp/iso/petools64.iso || goto failed
goto start

:BIOS32DOS
echo Boot iPXE ${arch}  |  ${platform}
initrd http://192.168.1.3/tftp/iso/petools32-dos.iso
chain memdisk iso raw || goto failed
goto start

:BIOS64DOS
echo Boot iPXE ${arch}  |  ${platform}
initrd http://192.168.1.3/tftp/iso/petools64-dos.iso
chain memdisk iso raw || goto failed
goto start

#dabaicai can boot  bios & efi.  tested!
:dabaicai
echo Boot iPXE ${arch}  |  ${platform}
sanboot --no-describe  http://192.168.1.3/tftp/iso/dabaicai.iso || goto failed
goto start


:memtest_uefi
chain http://192.168.1.3/tftp/memtest86_6.10/memtest64.efi
goto start

:memtest_bios
chain  http://192.168.1.3/tftp/memtest86_6.10/memtest64.bin
goto start


:archlinux
echo Boot iPXE ${arch}  |  ${platform}
sanboot --no-describe  http://192.168.1.3/tftp/iso/archlinux-2023.02.01-x86_64.iso.iso || goto failed
goto start

:deepin
echo Boot iPXE ${arch}  |  ${platform}
sanboot --no-describe  http://192.168.1.3/tftp/iso/deepin-live-system-2.0-amd64.iso || goto failed
goto start

:ubuntu_uefi
echo Boot iPXE ${arch}  |  ${platform}
kernel http://192.168.1.3/tftp/ubuntu/casper/vmlinuz
initrd http://192.168.1.3/tftp/ubuntu/casper/initrd
imgargs vmlinuz initrd=initrd boot=casper ip=dhcp url=http://192.168.1.3/tftp/ubuntu/ubuntu-22.04.1-desktop-amd64.iso
boot
goto start

:ubuntu_bios
echo Boot iPXE ${arch}  |  ${platform}
kernel http://192.168.1.3/tftp/ubuntu/casper/vmlinuz
initrd http://192.168.1.3/tftp/ubuntu/casper/initrd
imgargs vmlinuz initrd=initrd boot=casper ip=dhcp url=http://192.168.1.3/tftp/ubuntu/ubuntu-22.04.1-desktop-amd64.iso
boot || goto failed
goto start

################

:cancel
echo You cancelled the menu, dropping you to a shell

:shell
echo Type 'exit' to get the back to the menu
shell
set menu-timeout 0
set submenu-timeout 0
goto start

:failed
echo Booting failed, dropping to shell
goto shell

:reboot
reboot

:exit
exit

:config
config
goto start

:back
set submenu-timeout 0
clear submenu-default
goto start
menu基本分为两部分,UEFI菜单和BIOS菜单。下面的语句判单启动模式,分别启用对应的菜单:
# bios or uefi
iseq ${platform} efi && goto start_efi || goto start_bios
菜单下面就是各个启动项的配置。
上面的三个文件,即boot.ipxe,boot.ipxe.cfg,menu.ipxe,请保存到web/tftp目录下。
四、下载WIN PE镜像,设置网络启动PE镜像iso:
IPXE可以启动ISO文件,WIM文件,等等系统镜像,这里以ISO打包的pe为例说明,其它请大家参考上面的menu进行设置即可。
请下载微PE工具箱的iso文件,修改名字微petools64.iso,放置到web/tftp/iso目录中。
1、下载微pe工具箱:
https://www.wepe.com.cn/download.html
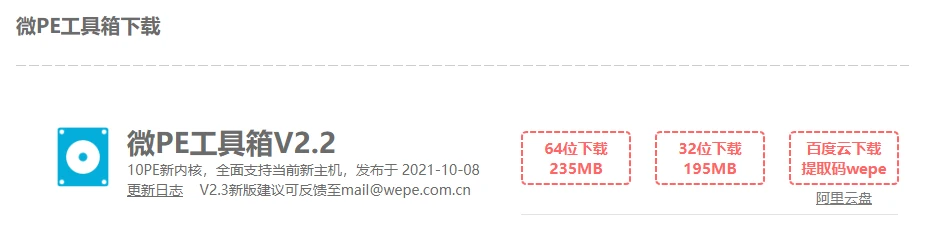
请下载微PE工具箱的64位版,修改名字微petools64.iso,放置到web/tftp/iso目录中。
2、设置menu.ipxe:
这里用到了sanboot命令,是ipxe的一个启动镜像命令,支持http、iscsi等多种网络协议。相比tftp的10M速度,http可以跑满千兆网速,启动微pe工具箱iso,只有235兆,基本上可以秒启动。
:UEFI64
echo Boot iPXE ${arch} | ${platform}
sanboot --no-describe http://192.168.1.3/tftp/iso/petools64.iso || goto failed
goto start
:BIOS64DOS
echo Boot iPXE ${arch} | ${platform}
initrd http://192.168.1.3/tftp/iso/petools64.iso
chain memdisk iso raw || goto failed
goto start
3、测试。
根据启动流程,开始启动测试,并根据流程,判断问题,解决问题,祝你们成功。
