
安装livecd-tools工具
该工具可以生成livecd的pxeboot相关信息,也可以用来创建livecd。
命令行:livecd-iso-to-pxeboot 指定livecd镜像
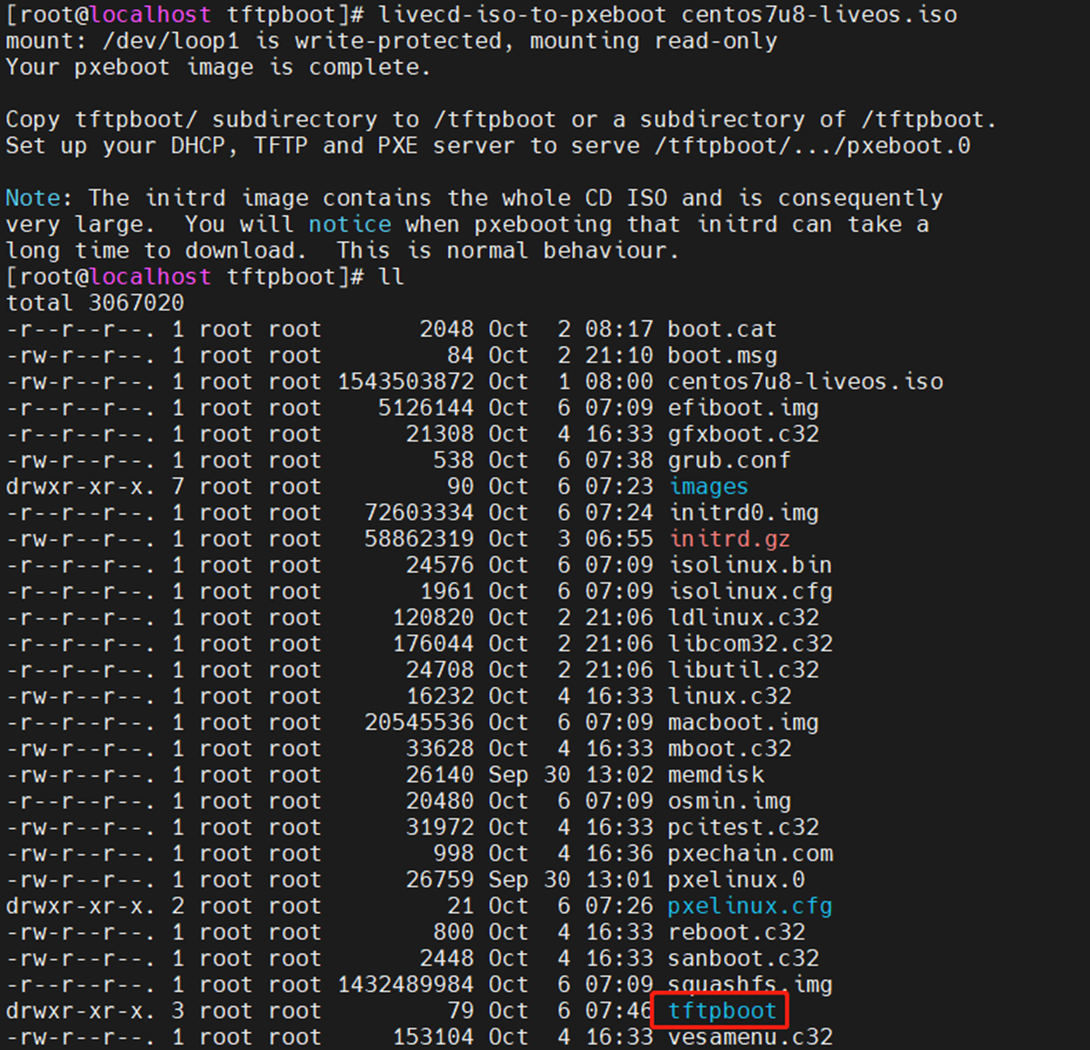
就会在当前文件夹下生成tftpboot文件夹,该文件夹中有启动所需相关文件及default内核所需的label书写方式

制作livecd步骤
1:创建KS文件,其中描述关闭防火墙、安装分区、安装软件、yum源及用户密码等主要信息。
======================
ks文件参考
************************
lang en_GB.UTF-8
keyboard us
timezone Asia/Shanghai --isUtc
#selinux --enforcing
selinux --disabled
#firewall --enabled --service=cockpit
firewall --disabled
#xconfig --startxonboot
services --enabled=sshd
# Clear the Master Boot Record
zerombr
# Partition clearing information
clearpart --all --initlabel
# Disk partitioning information
part / --size 8192 --fstype ext4
part /boot/efi --fstype="ext4" --size=200
part /boot --fstype="ext4" --size=1024
part swap --fstype="swap" --size=2048
part /run/initramfs/live --fstype="ext4" --grow --size=1
# Root password
auth --useshadow --enablemd5
rootpw --plaintext 21Vianet.com
repo --name=base --baseurl=http://mirrors.ustc.edu.cn/centos/7.9.2009/os/x86_64/
repo --name=updates --baseurl=http://mirrors.ustc.edu.cn/centos/7/updates/x86_64/
repo --name=extras --baseurl=http://mirrors.ustc.edu.cn/centos/7/extras/x86_64/
repo --name=epel --baseurl=http://mirrors.aliyun.com/epel/7/x86_64
%packages
@^minimal
@core
kernel
bash
openssh-server
shim #支持uefi启动,必须的包
grub2 #支持uefi启动,必须的包
grub2-efi #支持uefi启动,必须的包
grub2-tools #支持uefi启动,必须的包
grub2-efi-x64-cdboot #支持uefi启动,必须的包
efibootmgr #支持uefi启动,必须的包
unzip
vim
net-tools
openssl
wget
perl
net-snmp
OpenIPMI
%end
%post
%end
*****************************************
2:在ks文件目录下执行:livecd-creator --verbose -c livecd.ks --cache=cache -f HitOS 会在当前文件夹下创建hitos.iso的livecd镜像。
3:将生成的iso挂载到/mnt文件夹下mount HitOS.iso /mnt/,并将其中所有文件拷贝到/newiso文件夹下,以便有写入的权限:cp -rp /mnt/* /newiso/
4:将liveos文件夹下的squashfs.img拷贝到另一个临时目录:cp /newiso/LiveOS/squashfs.img /workpath/,原/newiso/LiveOS/squashfs.img可以删除
5:切换到/workpath/目录下,解压squashfs.img:unsquashfs squashfs.img。会在当前文件加下生成:squashfs-root文件夹,且文件里有:/workpath/squashfs-root/LiveOS/ext3fs.img
6:将/workpath/squashfs-root/LiveOS/ext3fs.img挂载到/media下,并chroot到/media下进行其他软件安装或删减:比如安装ipmitool/racadm/storcli等常用工具软件,也可以拷贝文件或者安装包到根目录指定文件中做备份使用。
8:其中安装racadm的时候执行命令报错,需要添加libssl.so的连接:
>centos路径:ln -svf /usr/lib64/libssl.so.1.0.2k /opt/dell/srvadmin/lib64/libssl.so
>ubuntu路径:ln -svf /usr/lib/x86_64-linux-gnu/libssl.so.1.0.2k /opt/dell/srvadmin/lib64/libssl.so
合并参考:https://cloud.tencent.com/developer/article/1529142
https://blog.nanpuyue.com/2018/039.html
>封装时添加racadm链接:ln -s /opt/dell/srvadmin/sbin/racadm /usr/sbin/racadm
9:exit退出chroot模式,删除原squashfs.img。重新打包squashfs.img:mksquashfs squashfs-root/ squashfs.img -comp xz
10:将新生成的squashfs.img拷贝到LiveCD目录下:cp /workpath/squashfs.img /newiso/LiveOS/squashfs.img
11:切回LiveCD上层目录/newiso文件夹下执行命令重新生成iso文件:mkisofs -R -b isolinux/isolinux.bin -c isolinux/boot.cat -o /tmp/HitOS-LiveCD.iso -V "HitOS-LiveCD" -no-emul-boot -boot-load-size 4 -boot-info-table -eltorito-alt-boot -bisolinux/efiboot.img -no-emul-boot -allow-limited-size .
12:到/tmp文件夹下查看iso镜像
