
一、 准备
1. 硬件工具:TTL转接板、金属探针(有电烙铁的、想焊接的朋友可以不用再购买探针)以及网线
2. 软件工具:putty中文版(英文版也行)、Tftpd64、TTL转接板配套驱动
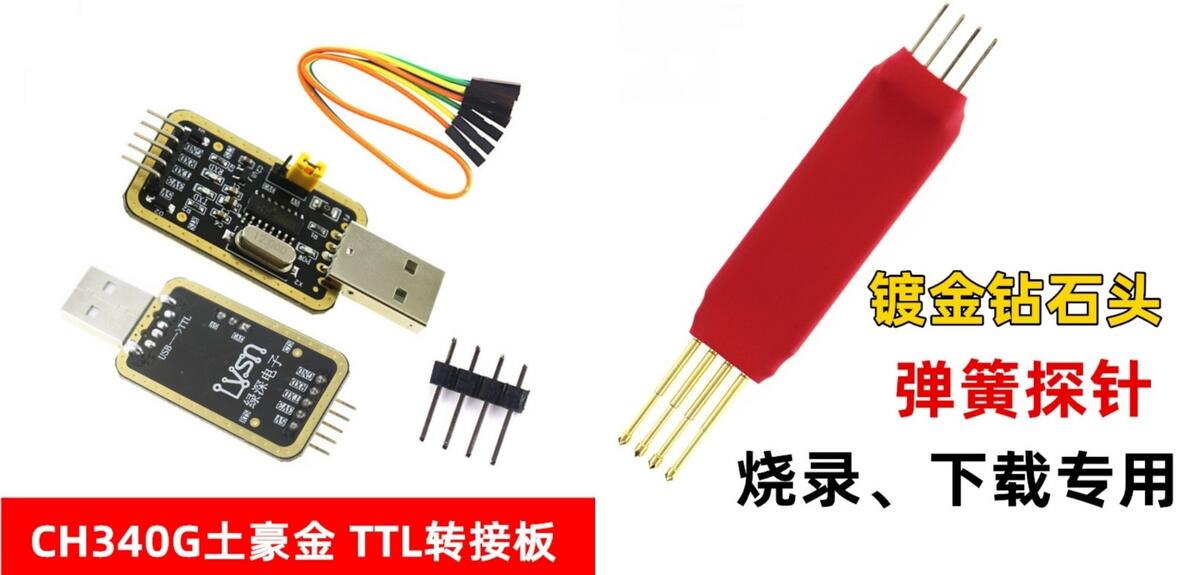
3. 安装驱动与软件:
① 安装软件工具,软件工具界面如下
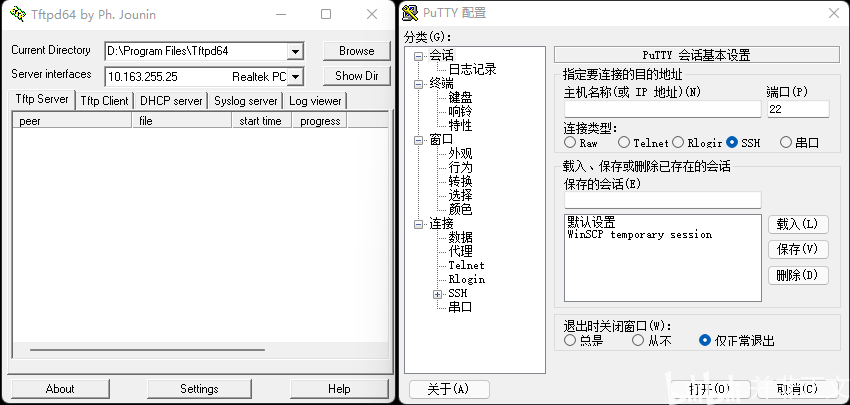
Putty和Tftpd64软件界面
② 拿到TTL转接板后,安装店家提供的驱动;驱动安装后将转接板插到电脑USB口上。
③打开电脑的设备管理器,点击端口(COM和LPT),查看驱动板在当前USB口的COM号(若更换了USB口需重新查看COM号码)。
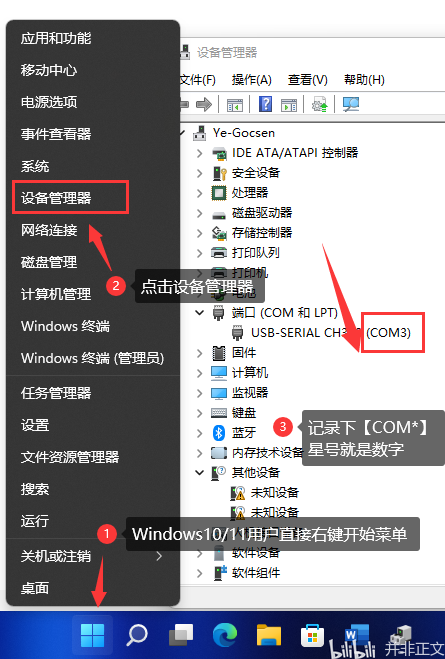
查看转接板的COM号码
二、 拆机
1. 用吹风机加热路由器背面的信息贴纸后撕开,可以看见两个螺丝孔,取下螺丝。
2. 分别向四周撬开卡口以分离路由器顶盖,不可大力出奇迹。
打开顶盖后便可以看到路由器主板,以及预留的TTL孔。
3. 将排针焊接至该孔位后(用探针则不用焊接)按照以下标识将路由器与转接板用排线连接:
RX -> TXD
TX -> RXD
GND -> GND
3V、5V不用连接
三、 准备救砖环境
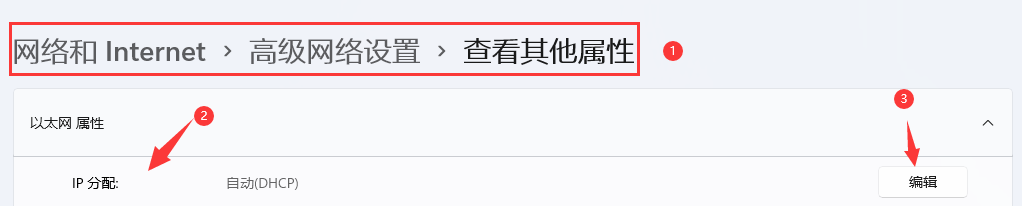
1. 设置IPv4
① 将电脑和路由器的LAN口用网线连接
② 打开电脑网络设置,将以太网网卡的IPV4设置成以下内容:
IP地址:192.168.31.100
子网掩码:255.255.255.0
网关:192.168.31.1
首选DNS(DNS1):192.168.31.1
③ 保存退出。
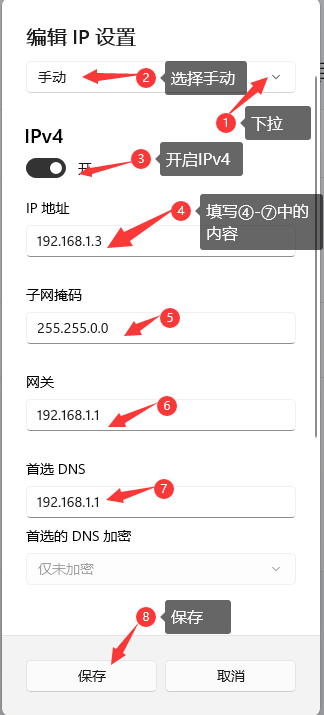
2. 配置Tftp64文件夹
① 打开Tftp64(程序安装路径要全英文,中文路径易报错)
② 修改Server Ininterfaces的网卡为刚刚设置了IP的网卡
③ 将下载的官方固件包更名为miwifi.bin后和备份的分区固件一起放置到Tftp64的Current Directory(Current Directory为根目录或者自选的目录)后面显示的目录下。
点击Show Dir-再点Explorer就会弹出该目录,将要用到的固件放置到这里面即可。
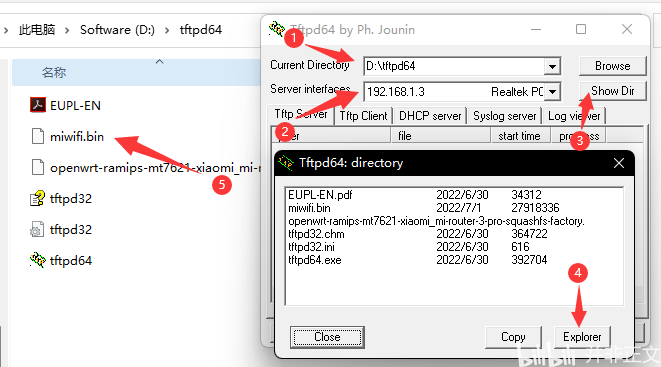
配置Tftp64文件夹
四、 准备进入U-BOOT
!!!务必按照顺序进行!!!
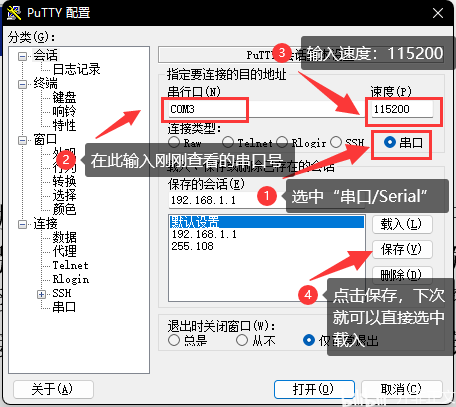
1. 按照图中的步骤设定Putty参数,设定好后点击打开/Open进入命令窗口界面。
2. 在路由器未通电的情况下,通过TTL转接板将电脑与路由器连接(图中灯为蓝色是因为已经救成功)。连好之后勿断开电脑与路由器之间的连接,否则可能造成更大的损失。
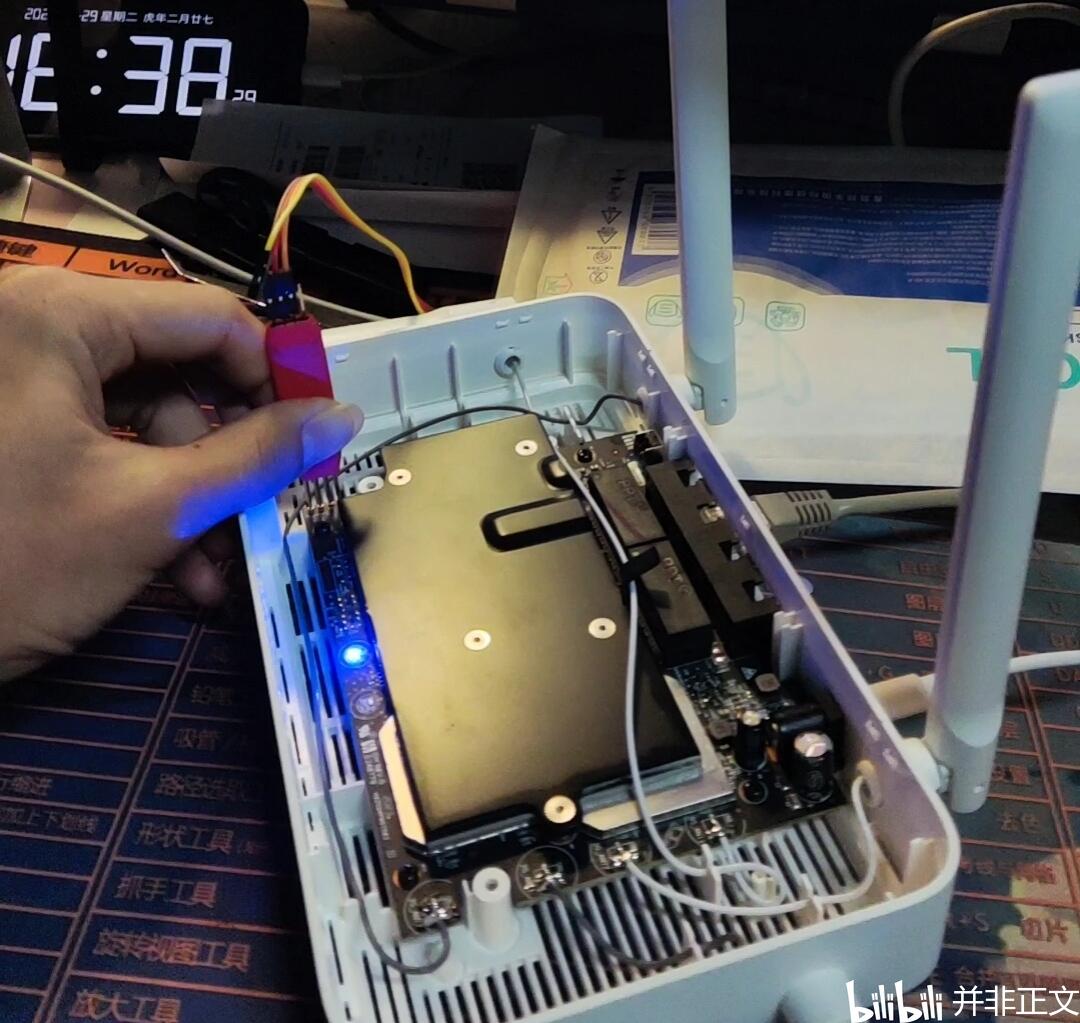
通过TTL转接板将路由器与电脑连接
3. 给路由器通电,并不停按键盘的任意按键来中断AutoBoot,直到窗口出现:IPQ6018#,则表示成功进入U-Boot。
4. 如果无法中断Autoboot,且代码为如下内容:
看倒数第六行:
U-Boot 2016.01 (Jul 13 2020 - 12:00:51 +0000), Build: jenkins-common_router_openwrt_ota_publish-75

 DRAM:  smem ram ptable found: ver: 2 len: 4
256 MiB
NAND:  ONFI device found
ID = 9500a1ef
Vendor = ef
Device = a1
SF: Unsupported flash IDs: manuf 00, jedec 0000, ext_jedec 0000
ipq_spi: SPI Flash not found (bus/cs/speed/mode) = (0/0/48000000/0)
128 MiB
MMC:   sdhci: Node Not found, skipping initialization

PCI0 is not defined in the device tree
In:    serial@78B1000
Out:   serial@78B1000
Err:   serial@78B1000
machid: 8030200
eth0 MAC Address from ART is not valid,use random ethaddr
bootwait is off, bootdelay=5
### main_loop: bootcmd="bootmiwifi"
Hit any key to stop autoboot:  0
 trigger button release!
boot from rootfs 0
可按以下步骤操作:
① 断开电源;
② 按住reset(复位)键;
③ 通电;
④ 直到黄灯开始闪烁再松开reset;
⑤ 等待片刻,路由器开始重启,迅速多次按任意键,直到出现:IPQ6018#。若未出现则手动断电重启并不断按键盘任意键直到出现:IPQ6018#。
以下为过程代码,截取了比较显眼的部分,省略的部分用“…………”替代
U-Boot 2016.01 (Jul 13 2020 - 12:00:51 +0000), Build: jenkins-common_router_openwrt_ota_publish-75

…………

machid: 8030200
eth0 MAC Address from ART is not valid,use random ethaddr
bootwait is off, bootdelay=5
### main_loop: bootcmd="bootmiwifi"
Hit any key to stop autoboot:  0
 detect button press, continue check 5 secs    //此代码表示我需要按住reset(复位)键
 detect button pressed 5 secs !        //此代码表示黄灯已经开始闪烁可以松开reset键
 confirm to launch xq_upgrade !
 cmd=dhcp

Net:   MAC0 addr:…………
PHY ID1: 0x4d
PHY ID2: 0xd0b1
EDMA ver 1 hw init
Num rings - TxDesc:1 (0-0) TxCmpl:1 (0-0)
RxDesc:1 (15-15) RxFill:1 (7-7)
ipq6018_edma_alloc_rings: successfull
…………
ipq6018_edma_hw_init: successfull
eth0
Warning: eth0 MAC addresses don't match:
Address in SROM is         …………
Address in environment is  …………

Trying to ping server.....
ipq6018_eth_halt: done
eth0 PHY0 Down Speed :10 Half duplex
…………
eth0 PHY4 Down Speed :10 Half duplex
ipq6018_eth_halt: done
ping failed; host 192.168.31.100 is not alive          //路由器会尝试ping很多次host,然后就会重启
Ping test fail
ipq6018_eth_halt: done
eth0 PHY0 Down Speed :10 Half duplex
eth0 PHY1 Down Speed :10 Half duplex
eth0 PHY2 Down Speed :10 Half duplex
eth0 PHY3 Down Speed :10 Half duplex
eth0 PHY4 Down Speed :10 Half duplex
ipq6018_eth_halt: don
======== dhcp failed, retry !========
boot from rootfs 1                //路由器开始重启,准备跑时间进程代码
  miwifi: check crash in rmem !
ubi0: attaching mtd1
qpic_nand_read_oob: ecc failure while reading from 3580800
…………
qpic_nand_read_oob: ecc failure while reading from 5820800
ubi0: scanning is finished
…………
ui0: available PEBs: 0, total reserved PEBs: 288, PEBs reserved for bad PEB handling: 20
qpic_nand_read_oob: ecc failure while reading from 3580800
…………
qpic_nand_read_oob: ecc failure while reading from 5821000
Read 0 bytes from volume kernel to 44000000
No size specified -> Using max size (3809280)
Erasing NAND...
Erasing at 0x7e0000 -- 100% complete.
Writing to NAND... OK
## Loading kernel from FIT Image at 44000000 ...
   Using 'config@cp03-c1' configuration
   Trying 'kernel@1' kernel subimage
     …………
   Verifying Hash Integrity ... crc32+ sha1+ OK
   Booting using the fdt blob at 0x44376e58
   Uncompressing Kernel Image ... OK
   Loading Device Tree to 484ec000, end 484ff27a ... OK
Could not find PCI in device tree
Using machid 0x8030200 from environment

Starting kernel ...

[    0.000000] Booting Linux on physical CPU 0x0
…………
[    0.317106] msm_rpm_log_probe: OK
…………
[    1.067462] 0x000000980000-0x000000a00000 : "0:ART"
…………
[    5.337009] init: - preinit -
Press the [f] key and hit [enter] to enter failsafe mode
Press the [1], [2], [3] or [4] key and hit [enter] to select the debug level
…………
[    9.904080] [<812de8ac>] (mount_fs) from [<812f45e8>] (vfs_kern_mount+0x4c/0xf4)
[    9.911372] [<812f45e8>] (vfs_kern_mount) from [<812f7688>] (do_mount+0x95c/0xae8)
[    9.918837]

Format: Log Type - Time(microsec) - Message - Optional Info       //如果跑时间代码,没有这一步则断电重启
Log Type: B - Since Boot(Power On Reset),  D - Delta,  S - Statistic
S - QC_IMAGE_VERSION_STRING=BOOT.XF.0.3-00077-IPQ60xxLZB-2
S - IMAGE_VARIANT_STRING=IPQ6018LA
…………
D -    814137 - SBL1, Delta
S - Flash Throughput, 4000 KB/s  (2155057 Bytes,  431900 us)
S - Core 0 Frequency, 800 MHz
S - DDR Frequency, 466 MHz

U-Boot 2016.01 (Jul 13 2020 - 12:00:51 +0000), Build: jenkins-common_router_openwrt_ota_publish-75

…………

PCI0 is not defined in the device tree
In:    serial@78B1000
Out:   serial@78B1000
Err:   serial@78B1000
machid: 8030200
eth0 MAC Address from ART is not valid,use random ethaddr
bootwait is on, bootdelay=5    //此时中断进程已打开,只要按键盘任意键即可中断AutoBoot
### main_loop: bootcmd="bootmiwifi"
Hit any key to stop autoboot:  0

Net:   MAC0 addr:…………
PHY ID1: 0x4d
PHY ID2: 0xd0b1
EDMA ver 1 hw init
Num rings - TxDesc:1 (0-0) TxCmpl:1 (0-0)
RxDesc:1 (15-15) RxFill:1 (7-7)
ipq6018_edma_alloc_rings: successfull
…………


IPQ6018#                           //成功进入U-Boot
五、 准备刷入备份的固件包
1. 输入:printenv,查看以下内容是否和设置的一致
ipaddr=192.168.31.1                 //表示路由器IP,要和电脑的网关及DNS一致
serverip=192.168.31.100 //服务IP也就是电脑网卡IPv4地址若不一致则返回“准备救砖程序”这一步将电脑的IP地址、网关和DNS设置成以上内容。
2. 输入:smeminfo查看路由器分区数据,代码如下:
IPQ6018# smeminfo
ubi0: attaching mtd1
ubi0: scanning is finished
ubi0: attached mtd1 (name "mtd=0", size 36 MiB)
ubi0: PEB size: 131072 bytes (128 KiB), LEB size: 126976 bytes
ubi0: min./max. I/O unit sizes: 2048/2048, sub-page size 2048
ubi0: VID header offset: 2048 (aligned 2048), data offset: 4096
ubi0: good PEBs: 288, bad PEBs: 0, corrupted PEBs: 0
ubi0: user volume: 3, internal volumes: 1, max. volumes count: 128
ubi0: max/mean erase counter: 22/8, WL threshold: 4096, image sequence number: 38617650
ubi0: available PEBs: 0, total reserved PEBs: 288, PEBs reserved for bad PEB handling: 20
flash_type:             0x2
flash_index:            0x0
flash_chip_select:      0x0
flash_block_size:       0x20000
flash_density:          0x100000
partition table offset  0x0
No.: Name             Attributes            Start             Size
  0: 0:SBL1           0x0000ffff              0x0         0x180000
  1: 0:MIBIB          0x0000ffff         0x180000         0x100000
  2: 0:QSEE           0x0000ffff         0x280000         0x380000
  3: 0:DEVCFG         0x0000ffff         0x600000          0x80000
  4: 0:RPM            0x0000ffff         0x680000          0x80000
  5: 0:CDT            0x0000ffff         0x700000          0x80000
  6: 0:APPSBLENV      0x0000ffff         0x780000          0x80000
  7: 0:APPSBL         0x0000ffff         0x800000         0x180000
  8: 0:ART            0x0000ffff         0x980000          0x80000
  9: bdata            0x0000ffff         0xa00000          0x80000
 10: crash            0x0000ffff         0xa80000          0x80000
 11: crash_syslog     0x0000ffff         0xb00000          0x80000
 12: 0:BOOTCONFIG     0x0000ffff         0xb80000          0x80000
 13: 0:BOOTCONFIG1    0x0000ffff         0xc00000          0x80000
 14: 0:QSEE_1         0x0000ffff         0xc80000         0x380000
 15: 0:DEVCFG_1       0x0000ffff        0x1000000          0x80000
 16: 0:RPM_1          0x0000ffff        0x1080000          0x80000
 17: 0:CDT_1          0x0000ffff        0x1100000          0x80000
 18: rootfs           0x0000ffff        0x1180000        0x2400000
        ubi vol 0 kernel
        ubi vol 1 ubi_rootfs               //注意18-19这5行红色的分区表信息
        ubi vol 2 rootfs_data
 19: rootfs_1         0x0000ffff        0x3580000        0x2400000
 20: overlay          0x0000ffff        0x5980000        0x24a0000
21: cfg_bak 0x0000ffff 0x7e20000 0x80000大部分变砖的原因都是第18-20,这3个分区的信息被破坏了,故只要恢复这三个分区的格式和内容即可成功救砖。运行代码前务必核对以上分区表的信息以及输入命令窗口内的代码是否和我的一致,不一致请自行修改。
3. 因前面打开了Tftp64,并且已经将需要用到的固件(rootfs、rootfs_1、overlay和更名后的1.0.16版官方固件)放入了对应目录,故现在只需要依次将变砖前备份的mtd18(rootfs)和mtd19(rootfs_1)刷入Redmi AX5路由器:

刷入备份的固件
依次复制并执行以下3条命令:
①	tftpboot mtd18.bin&&nand erase 0x1180000 0x2400000&&nand write 0x44000000 0x1180000 0x2400000               //写入rootfs的分区数据

②	tftpboot mtd19.bin&&nand erase 0x3580000 0x2400000&&nand write 0x44000000 0x3580000 0x2400000               //写入rootfs_1的分区数据

③ reset //重启路由器!!!注意:下面这一行代码是在执行了前面三步还不能进入路由器控制界面或者灯依旧是黄色的情况下再执行,否则路由器可能报错。
④ tftpboot miwifi.bin&&nand erase 0x5980000 0x24a0000&&nand write 0x44000000 0x5980000 0x24a0000如果有Redmi AX5的ubi底包,更名为miwifi.ubi放到Tftp64的Current Directory目录下,直接用以下代码一次性刷入,否则使用该代码会导致U-Boot无限重启:
tftpboot miwifi.ubi&&nand erase 0x1180000 0x2400000&&nand erase 0x3580000 0x2400000&&nand write 0x44000000 0x3580000 0x2400000
以下是①②③条命令的跑代码过程,省略了大部分井号
IPQ6018# tftpboot mtd18.bin&&nand erase 0x1180000 0x2400000&&nand write 0x44000000 0x1180000 0x2400000
ipq6018_eth_halt: done
eth0 PHY0 Down Speed :10 Half duplexnd erase 0x1180000 0x2400000&&nand write 0x44000000 0x1180000 0x2400000
eth0 PHY1 Down Speed :10 Half duplex
eth0 PHY2 Down Speed :10 Half duplex
eth0 PHY3 up Speed :100 Full duplex
eth0 PHY4 Down Speed :10 Half duplex
ipq6018_eth_init: done
Using eth0 device
TFTP from server 192.168.31.100; our IP address is 192.168.31.1
Filename 'mtd18.bin'.
Load address: 0x44000000
Loading: *
Got TFTP_OACK: TFTP remote port: changes from 69 to 59030
#################################################################
         #################################################################
         ………………………………
         #################################################################
         #####################################
         2.6 MiB/s
done
Bytes transferred = 37748736 (2400000 hex)
ipq6018_eth_halt: done

NAND erase: device 0 offset 0x1180000, size 0x2400000
Erasing at 0x3560000 -- 100% complete.
OK

NAND write: device 0 offset 0x1180000, size 0x2400000
 37748736 bytes written: OK
IPQ6018# tftpboot mtd19.bin&&nand erase 0x3580000 0x2400000&&nand write 0x44000000 0x3580000 0x2400000
ipq6018_eth_halt: done
eth0 PHY0 Down Speed :10 Half duplex
eth0 PHY1 Down Speed :10 Half duplex
eth0 PHY2 Down Speed :10 Half duplex
eth0 PHY3 up Speed :100 Full duplex
eth0 PHY4 Down Speed :10 Half duplex
ipq6018_eth_init: done
Using eth0 device
TFTP from server 192.168.31.100; our IP address is 192.168.31.1
Filename 'mtd19.bin'.
Load address: 0x44000000
Loading: *
Got TFTP_OACK: TFTP remote port: changes from 69 to 53380
#################################################################
         #################################################################
         …………………………
         #####################################
         2.6 MiB/s
done
Bytes transferred = 37748736 (2400000 hex)
ipq6018_eth_halt: done

NAND erase: device 0 offset 0x3580000, size 0x2400000
Erasing at 0x5960000 -- 100% complete.
OK

NAND write: device 0 offset 0x3580000, size 0x2400000
 37748736 bytes written: OK
IPQ6018# reset等待几分钟路由器的灯变蓝……
六、 至此,路由器就又满血啦!
