
一. Selenium
from selenium import webdriver

driver=webdriver.Chrome()

driver.implicitly_wait(30)
driver.maximize_window()

driver.get('https://www.douban.com')

search_field=driver.find_element_by_name("q")

search_field.clear()

search_field.send_keys("Phones")
search_field.submit()

products=driver.find_element_by_xpath('//*[@id="content"]/div/div[1]/div[3]')

print("Found"+str(products)+"products:")

driver.quit()
注意事项:需要先下载 ChromeDriver.exe 放在项目主路径下。
解析:
1. 首先,从Selenium包中导入WebDriver才能使用Selenium WebDriver方法。
from selenium import webdriver
2. 创建一个Chrome浏览器驱动实例。
driver=webdriver.Chrome()
3. 对浏览器窗口进行控制。 driver.implicitly_wait(30) driver.maximize_window() //30秒隐式等待时间。//最大化浏览器窗口。
4. 调用driver.get()访问网站。
driver.get('https://www.douban.com')
//在get( )方法被调用后,WebDriver会等待,一直到页面加载完成才继续控制脚本。
5. 在加载页面后,Selenium会像真实用户那样,和页面上各种各样的元素交互。
//模拟:在输入框中输入一个搜索内容,然后点击Search按钮。
search_field=driver.find_element_by_name("q") //首先,定位搜索框。(搜索输入框中有一个值为”q“的name属性,使用这个属性来定位。) search_field.clear()
//一旦找到这个搜索输入框,就可以使用clear()方法来清理之前的值。 search_field.send_keys("Phones") search_field.submit()
//通过send_keys() 方法输入新的特定的值。接着调用submit()方法提交搜索申请。
6. 在提交搜索请求后,Firefox浏览器会加载结果页面。结果页面中有一系列与搜索项(phones)匹配的产品。我们可以读取结果列表,并且可以使用find_elements_by_xpath方法获取路径是以<a>标签结尾的所有产品名称。它将会返回多于1个的元素列表。
products =driver.find_elements_by_xpath("//h2[@class='product-name']/a")
print("Found"+str(products)+"products:")
// products=driver.find_element_by_xpath('//*[@id="content"]/div/div[1]/div[3]')
6. 在脚本的最后,使用driver.quit() 方法来关闭Chrome浏览器。 driver.quit()

二. UnitTest
(一)unittest单元测试框架
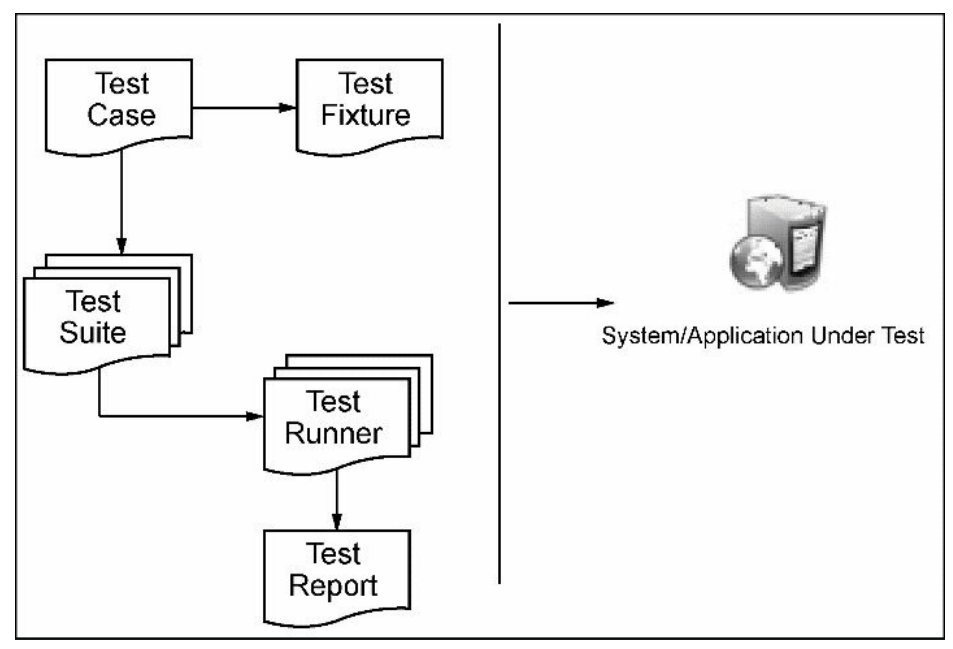
1. Test Fixture(测试夹具):通过使用测试夹具,可以定义在单个或多个测试执行之前的准备工作和测试执行之后的清理工作。
2. Test Case(测试用例):一个测试用例是在unittest中执行测试的最小单元。它通过unittest提供的 assert 方法 来验证一组特定的操作和输入以后得到的具体响应。unittest提供了一个名称为TestCase的基础类,可以用来创建测试用例。
3. Test Suite(测试套件):一个测试套件是多个测试或测试用例的集合,是针对被测程序的对应的功能和模块创建的一组测试,一个测试套件内的测试用例将一起执行。
4. Test Runner(测试执行器):测试执行器负责测试执行调度并且生成测试结果给用户。测试执行器可以使用图形界面、文本界面或者特定的返回值来展示测试执行结果。
5. Test Report(测试报告):测试报告用来展示所有执行用例的成功或者失败状态的汇总,执行失败的测试步骤的预期结果与实际结果,还有整体运行状况和运行时间的汇总。
1. 测试用例和测试夹具的概念通过 TestCase 和 FunctionTestCase 类 来支持;
前者应在创建新测试时使用,
后者可在将现有测试代码与驱动框架集成时使用。
2. 当使用测试夹具时,
可以重写 setUp()和 tearDown()方法来为夹具提供初始化和清理。
3. 有了这些,现有的函数可以传递给构造函数用于这些目的。
4. 当测试运行时,夹具初始化首先运行;
如果成功,则在执行测试后运行清理方法,而不管测试结果如何。
每个实例仅用于运行单个测试方法,因此每个测试都会创建一个新的固件。
5. 测试套件由TestSuite 实施。这个类允许 汇总单独的测试和测试套件;
当套件执行时,所有直接添加到套件和“child”测试套件的测试都会运行。
6. 测试运行器是提供单个方法的对象run(),它接受一个TestCase或一个TestSuite对象作为参数,并返回一个结果对象。该类被提供用作结果对象。
提供了默认情况下在标准错误流上报告测试结果的测试运行器的示例。
执行器可以被移植到其他环境(如图形环境),而不需要从特定的类派生。
(二)测试框架创建的测试分为3个部分:
1. Arrange:是用来初始化测试的前置条件,包含初始化被测试的对象、相关配置和依赖。
2. Act:用来执行功能操作。
3. Assert:用来校验实际结果与预期结果是否一致。
我们可以通过继承 TestCase 类 并且在测试类中为每一个测试添加测试方法来创建单个测试或者一组测试。
1. 为了创建测试,我们需要使用TestCase类中的 assert 或者使用其中的一种 assert 方法。
每个测试最重要的任务是:
调用 assertEqual() 来校验预期结果,
调用 assertTrue() 来验证条件,
或者调用 assertRaises() 来验证预期的异常。
2. 除了添加测试,我们可以添加测试夹具——setUp()方法和tearDown()方法,创建或处置测试用例所需要的任何对象和条件。
import unittest
from selenium import webdriver
class SearchTest(unittest.TestCase):
def setUp(self):
self.driver=webdriver.Chrome()
self.driver.implicitly_wait(30)
self.driver.maximize_window()
self.driver.get(&quot;https://www.douban.com&quot;)
def test_search_by_category(self):
self.search_field=self.driver.find_element_by_name(&quot;q&quot;)
self.search_field.clear()
self.search_field.send_keys(&quot;phones&quot;)
self.search_field.submit()
products=self.driver.find_element_by_xpath(&#39;//*[@id=&quot;content&quot;]/div/div[1]/div[3]/div[2]/div[1]/div[2]/div/h3/a&#39;)
print(products)
if __name__==&#39;__main__&#39;:
unittest.main(verbosity=2)在每次执行测试方法之前,先自动执行setup()方法。测试完成后,会自动执行tearDown()方法。
setup() -----> test_method() ------> tearDown()
解析:
1. 先引入unittest模块,然后定义一个继承于TestCase 类的子类,
import unittest
from selenium import webdriver

class SearchTest (unittest.TestCase)://这里定义了子类:SearchTest。
2. setUp()方法
一个测试用例是从setUp()方法开始执行的,我们可以用这个方法在每个测试开始前去执行一些初始化的任务。可以是这样的初始化准备:比如创建浏览器实例,访问URL,加载测试数据和打开日志文件等。
此方法没有参数,而且不返回任何值。当定义了一个setUp()方法,测试执行器在每次执行测试方法之前优先执行该方法。
def setUp(self):
# create a new Firefox session
self.driver = webdriver.Firefox()
self.driver.implicitly_wait(30)
self.driver.maximize_window()
# navigate to the application home page
self.driver.get(&quot;http://demo.magentocommerce.com/&quot;)// 这里, 用setUp()方法来创建Firefox的实例,设置properties,而且在测试开始执行之前访问到被测程序的主页。
3. 测试方法: test
(1) test方法也是在TestCase类中实现。
(2) 测试方法命名以:test开头。 ( 比如:test_search_by_category() )
这种命名约定通知 test runner 哪个方法代表测试方法。
(3) 对于 test runner 能找到的每个测试方法,都会在执行测试方法之前先执行 setUp() 方法。
(这样做有助于确保每个测试方法都能够依赖相同的环境,无论类中有多少测试方法。)
def test_search_by_category(self):
# get the search textbox
self.search_field = self.driver.find_element_by_name(&quot;q&quot;)
self.search_field.clear()
# enter search keyword and submit
self.search_field.send_keys(&quot;phones&quot;)
self.search_field.submit()
# get all the anchor elements which have product names
# displayed currently on result page using
# find_elements_by_xpath method
products = self.driver.find_elements_by_xpath(&quot;//h2[@class=&#39;product-name&#39;]/a&quot;)
self.assertEqual(2, len(products))// 这里, 通过分类来搜索产品,然后校验返回的产品的数量是否正确。
4. 代码清理
TestCase类会在测试执行完成之后调用tearDown()方法来清理所有的初始化值。
一旦测试被执行,在setUp()方法中定义的值将不再需要,所以最好的做法是在测试执行完成的时候清理掉由setUp()方法初始化的数值。
def tearDown(self):
	# close the browser window
self.driver.quit()//这里,在测试执行完成后,就不再需要Firefox的实例。我们将在tearDown()方法中关闭Firefox实例。
5. 运行测试
为了通过命令行运行测试,我们可以在测试用例中添加对main方法的调用。我们将传递verbosity参数以便使详细的测试总量展示在控制台。
if __name__ == &#39;__main__&#39;:
unittest.main(verbosity=2)
6. 添加多个测试
import unittest
from selenium import webdriver
class SearchTest(unittest.TestCase):
def setUp(self):
self.driver=webdriver.Chrome()
self.driver.implicitly_wait(30)
# self.driver.maximize_window()
self.driver.get(&quot;https://www.douban.com&quot;)
def test_search_by_category(self):
self.search_field=self.driver.find_element_by_name(&quot;q&quot;)
self.search_field.clear()
self.search_field.send_keys(&quot;phones&quot;)
self.search_field.submit()
products=self.driver.find_element_by_xpath(&#39;//*[@id=&quot;content&quot;]/div/div[1]/div[3]/div[2]/div[1]/div[2]/div/h3/a&#39;)
print(products)
def test_search_by_name(self):
self.search_field=self.driver.find_element_by_name(&quot;q&quot;)
self.search_field.clear()
self.search_field.send_keys(&quot;地球&quot;)
self.search_field.submit()
products2=self.driver.find_element_by_xpath(&#39;//*[@id=&quot;content&quot;]/div/div[1]/div[3]/div[2]/div[1]/div[2]/div/h3/a&#39;)
if __name__==&#39;__main__&#39;:
unittest.main(verbosity=2)这段代码里,包含两个测试方法:
test_search_by_category
test_search_by_name
// 运行这个测试类将能看到两个Firefox的实例打开和关闭,这正是setUp()方法和tearDown()方法针对每个测试方法都要执行产生的结果。
(三)让各个测试方法共用一个Chrome 实例
让各个测试方法共用一个Chrome实例,而不是每执行一个测试方法就 启动一个浏览器实例。
解决方法:
使用:setUpClass()方法和tearDownClass()方法及@classmethod标识来实现。
(1) setUpClass()方法
(2) tearDownClass()方法
(3) @ classmethod
作用:这两个方法使我们可以在 类级别 来初始化数据,替代了 方法级别 的初始化,这样各个测试方法就可以共享这些初始化数据。
# searchtest.py
import unittest
from selenium import webdriver
class SearchTest(unittest.TestCase):
@classmethod
def setUpClass(cls):
cls.driver=webdriver.Chrome()
cls.driver.implicitly_wait(30)
# cls.driver.maximize_window()
cls.driver.get(&quot;https://www.douban.com&quot;)
def test_search_by_category(self):
self.search_field=self.driver.find_element_by_name(&quot;q&quot;)
self.search_field.clear()
self.search_field.send_keys(&quot;phones&quot;)
self.search_field.submit()
products=self.driver.find_element_by_xpath(&#39;//*[@id=&quot;content&quot;]/div/div[1]/div[3]/div[2]/div[1]/div[2]/div/h3/a&#39;)
print(products)
def test_search_by_name(self):
self.search_field=self.driver.find_element_by_name(&quot;q&quot;)
self.search_field.clear()
self.search_field.send_keys(&quot;地球&quot;)
self.search_field.submit()
products2=self.driver.find_element_by_xpath(&#39;//*[@id=&quot;content&quot;]/div/div[1]/div[3]/div[2]/div[1]/div[2]/div/h3/a&#39;)
@classmethod
def tearDownClass(cls):
cls.driver.quit()
if __name__==&#39;__main__&#39;:
unittest.main(verbosity=2)
(四)断言
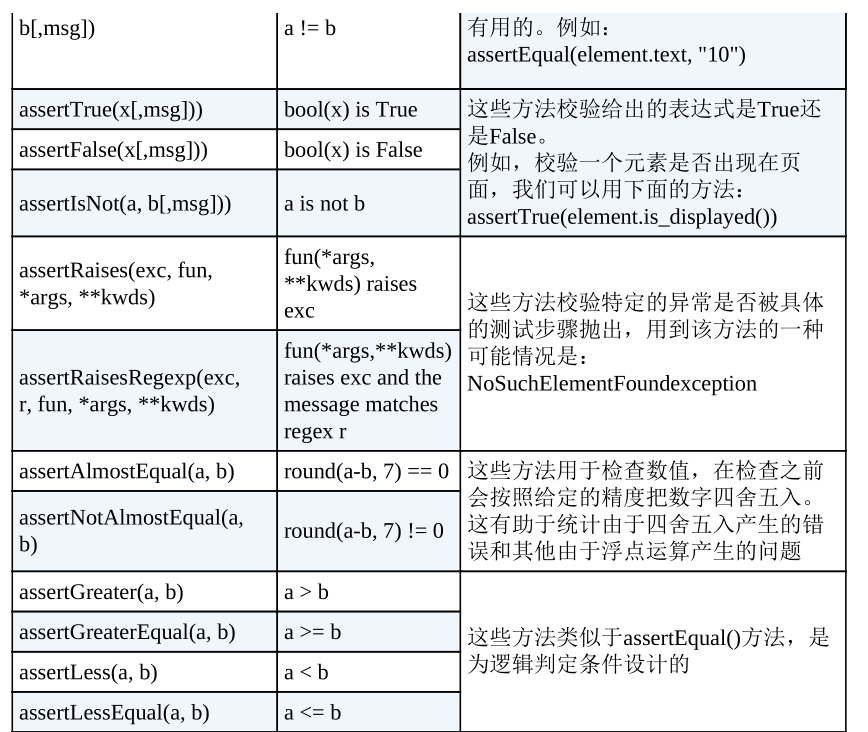
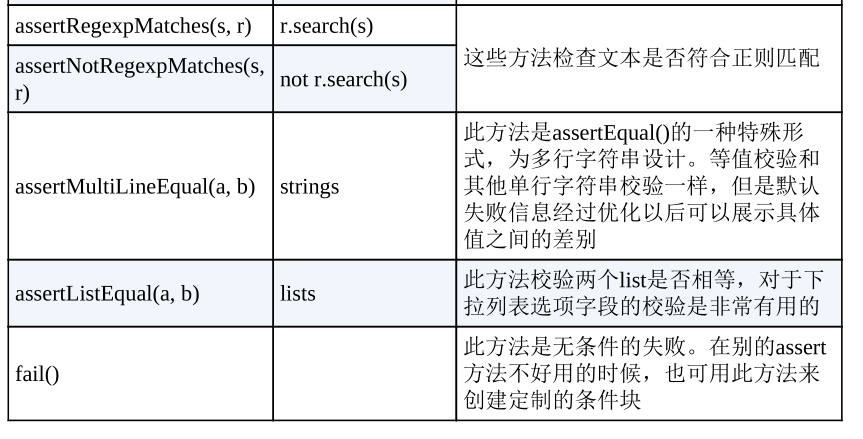
unittest的TestCase类提供了很多实用的方法来校验预期结果和程序返回的实际结果是否一致。
这些方法要求必须满足某些条件才能继续执行接下来的测试。
大致有3种这样的方法,各覆盖一个特定类型的条件,如
等价校验、
逻辑校验
异常校验。
(1) 如果给定的断言通过了,接下来的测试代码将会执行;
(2) 相反,将会导致测试立即停止并且给出异常信息。

(五) 测试套件
应用unittest的TestSuites特性,可以将不同的测试组成一个逻辑组,然后设置统一的测试套件,并通过一个命令来执行测试。
这都是通过TestSuites、TestLoader和TestRunner类来实现的。
# homepagetests.py
import unittest
from selenium import webdriver
from selenium.common.exceptions import NoSuchFrameException
from selenium.webdriver.common.by import By
from builtins import classmethod
class HomePageTest(unittest.TestCase):
@classmethod
def setUp(cls):
cls.driver=webdriver.Chrome()
cls.driver.implicitly_wait(30)
cls.driver.get(&quot;http://demo.magentocommerce.com/&quot;)
def test_search_field(self):
self.assertTrue(self.is_element_present(By.NAME,&#39;q&#39;))
def test_language_option(self):
self.assertTrue(self.is_element_present(By.ID,&quot;select-language&quot;))
def test_shopping_cart_empty_message(self):
shopping_cart_icon=self.driver.find_element_by_css_selector(&quot;div.header-minicart span.icon&quot;)
shopping_cart_icon.click()
shopping_cart_status=self.driver.find_element_by_css_selector(&quot;p.empty&quot;).text
self.assertEqual(&quot;You have no items in your shopping cart.&quot;,shopping_cart_status)
close_button=self.driver.find_element_by_css_selector(&quot;div.minicart-wrapper a.close&quot;)
close_button.click()
@classmethod
def tearDown(cls):
cls.driver.quit()
# def is_element_present(self,how,what):
# &quot;&quot;&quot;
# Utility method to check presence of an element on page
#
# :param how: By locator type
# :param what: locator value
# &quot;&quot;&quot;
# try:self.driver.find_element(by=how,value=what)
#
# except NoSuchFrameException,e:return False
# return True
if __name__==&#39;__main__&#39;:
unittest.main(verbosity=2)
import unittest

# 从自己写的python程序searchtest.py 导入类SearchTest,
# 从 homepagetests.py 导入 类 HomePageTest
from searchtest import SearchTest
from homepagetests import HomePageTest

# 首先获取所有的测试test,使用TestLoader()方法
search_tests=unittest.TestLoader().loadTestsFromTestCase(SearchTest)
home_page_tests=unittest.TestLoader().loadTestsFromTestCase(HomePageTest)

# 然后生成一个test suite,通过将测试方法:home_page_tests 和 SearchTest 结合。
smoke_tests=unittest.TestSuite([home_page_tests,search_tests])

# 最后,运行suite
unittest.TextTestRunner(verbosity=2).run(smoke_tests)
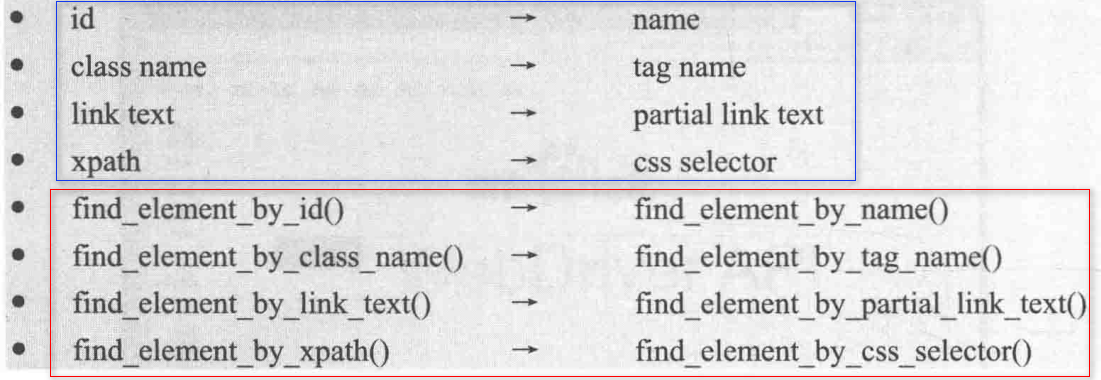
三. 元素定位
id定位 find_element_by_id()
name定位 find_element_by_name()
class定位 find_element_by_class_name()
tag定位 find_element_by_tag_name()
link定位 find_element_by_link_text()
partial link定位 find_element_by_partial_link_text()
XPath定位 find_element_by_xpath()
CSS定位 find_element_by_css_selector()
用By定位元素
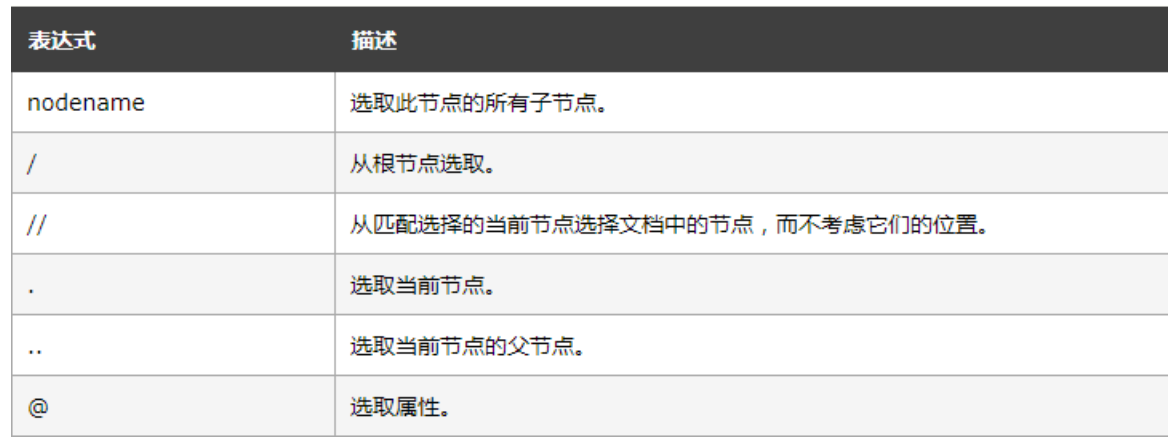
其中, XPath是一种在XML文档中搜索和定位元素的查询语言。
XPath的路径节点表达式:
XPath定位策略:
1. 绝对路径定位:
例: find_element_by_xpath("/html/body/div/div/vid[2]/div/div/div/from/span[2]/input")
2. 利用元素属性定位:
例:find_element_by_xpath("//input[@id='kw']")
find_element_by_xpath("//input[@class='s_ipt']")
find_element_by_xpath("//input[@name='wd']")
3. 层级与属性结合:
例:find_element_by_xpath("//span[@class='bg s_ipt_wr']/input")
4. 使用逻辑运算符:
例:find_element_by_xpath("//span[@class='bg s_ipt_wr']/input")
四. 读取csv文件,读取txt文件
1. 读取txt文件
read() : 读取整个文件
readline() : 读取一行数据。
readlines() : 读取所有行的数据。
# user_info.txt
#
# username,passwrd123
# user2,password
###########################
# user_info.py
user_file=open(&#39;user_info.txt&#39;,&#39;r&#39;)
lines=user_file.readlines()
user_file.close()
for line in lines:
username=line.split(&#39;,&#39;)[0]
password=line.split(&#39;,&#39;)[1]
print(username,password)
2. 读取csv文件
# info.csv
# testing,12345@outlook.com,23,man
#################################
#csv_read.py
import csv
data=csv.reader(open(&#39;info.csv&#39;,&#39;r&#39;))
for user in data:
print(user)3. 读取Excel文件( 模块:xlrd, xlwt, openpyxl )
import xlrd
book=xlrd.open_workbook(&quot;myfile.xlsx&quot;)
sheet=book.sheet_by_index(0)
for rx in range(sheet.nrows):
print(sheet.row(rx))
# 若报错:Excel xlsx file; not supported,表明xlrd不支持xlsx文件格式,
# (1)可以将myfile.xlsx 另存为“myfile.xls”。
# (2)重新安装xlrd,更改为支持xlsx格式的xlrd版本。
# 如:pip install xlrd==1.2.0使用Pandas读取Excel文件
import pandas as pd
pd.read_excel(&#39;myfile.xlsx&#39;)
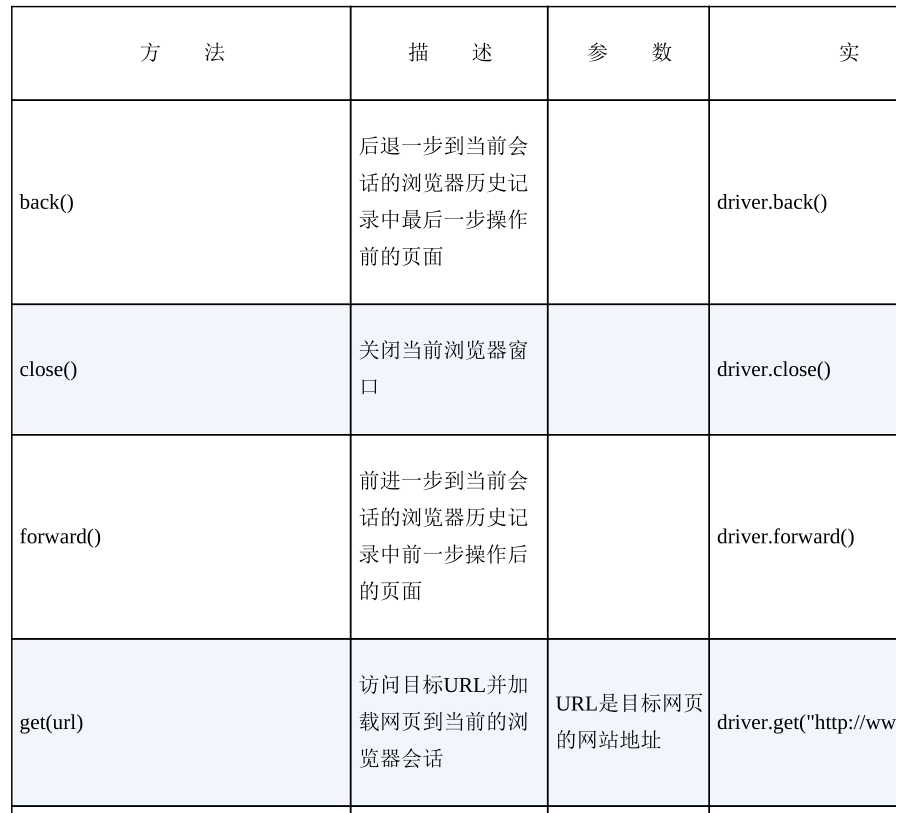
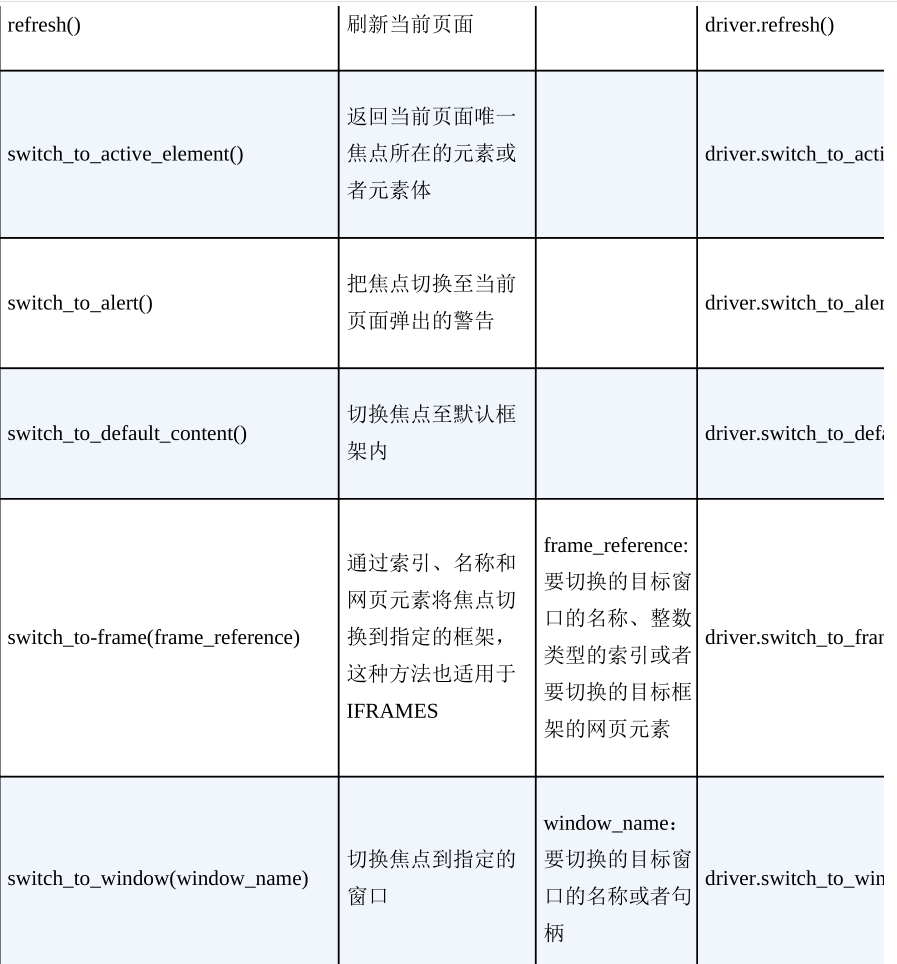
五. 控制浏览器前进、后退,模拟浏览器刷新,鼠标事件,键盘时间,获得验证信息,设置元素等待,多表单切换,多窗口切换,上传文本,下载文件等。
(1)前进: back()方法
(2)后退:forward()方法
self.driver.back()
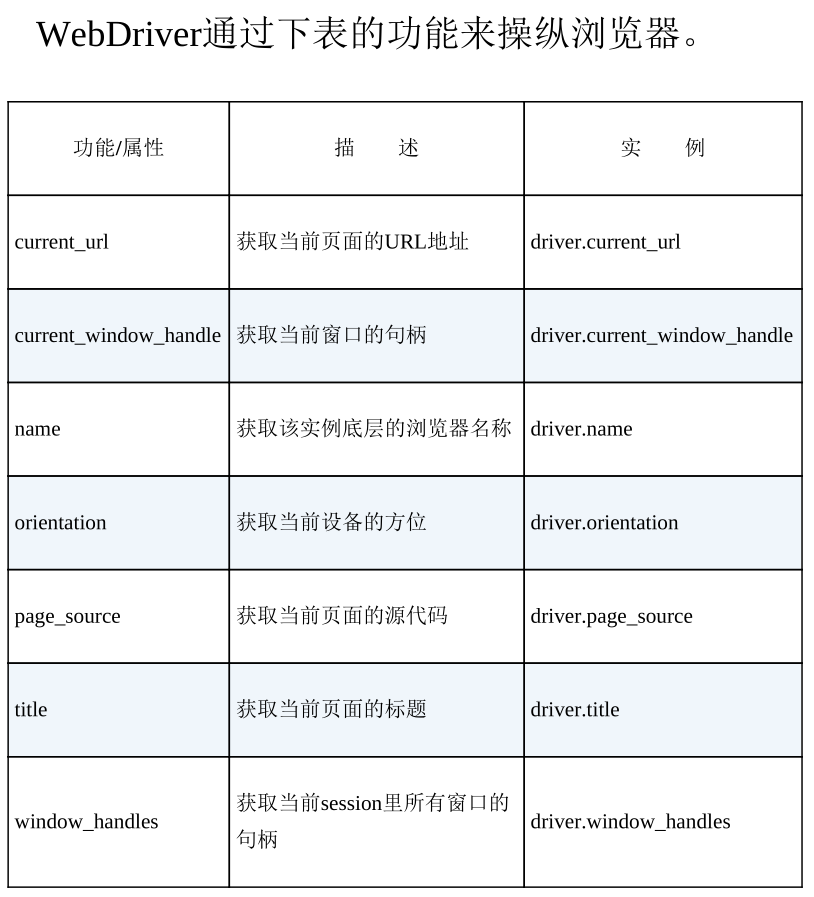
self.driver.forward()WebDriver功能:
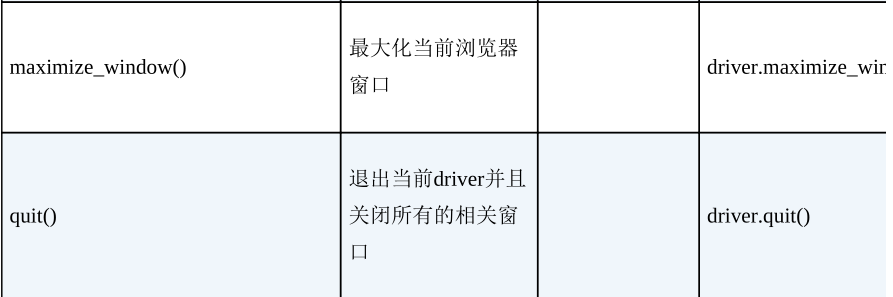
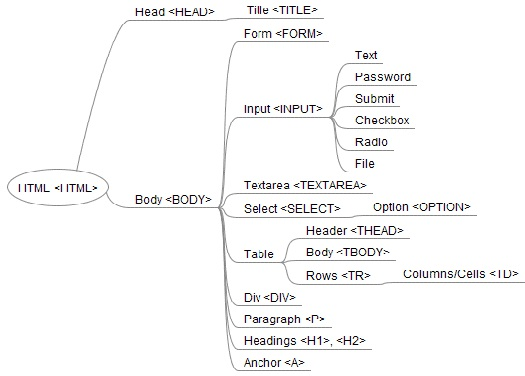
WebDriver方法:
参考:
Selenium自动化测试 ---基于Python语言
Learning Selenium Testing Tools with Python
